Introduction
In the video below I show you the unboxing of 8 games I got made in Cartridge format and explain where I got them, to read about it check my blog post here.
In the video below I show you the unboxing of 8 games I got made in Cartridge format and explain where I got them, to read about it check my blog post here.
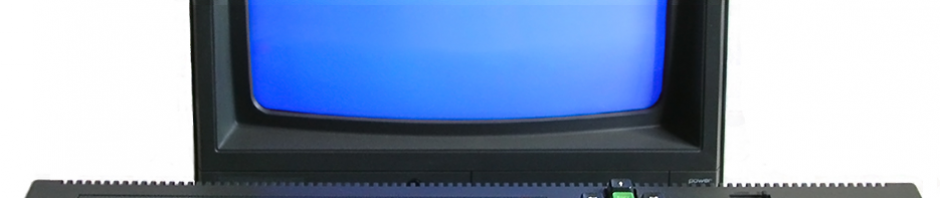
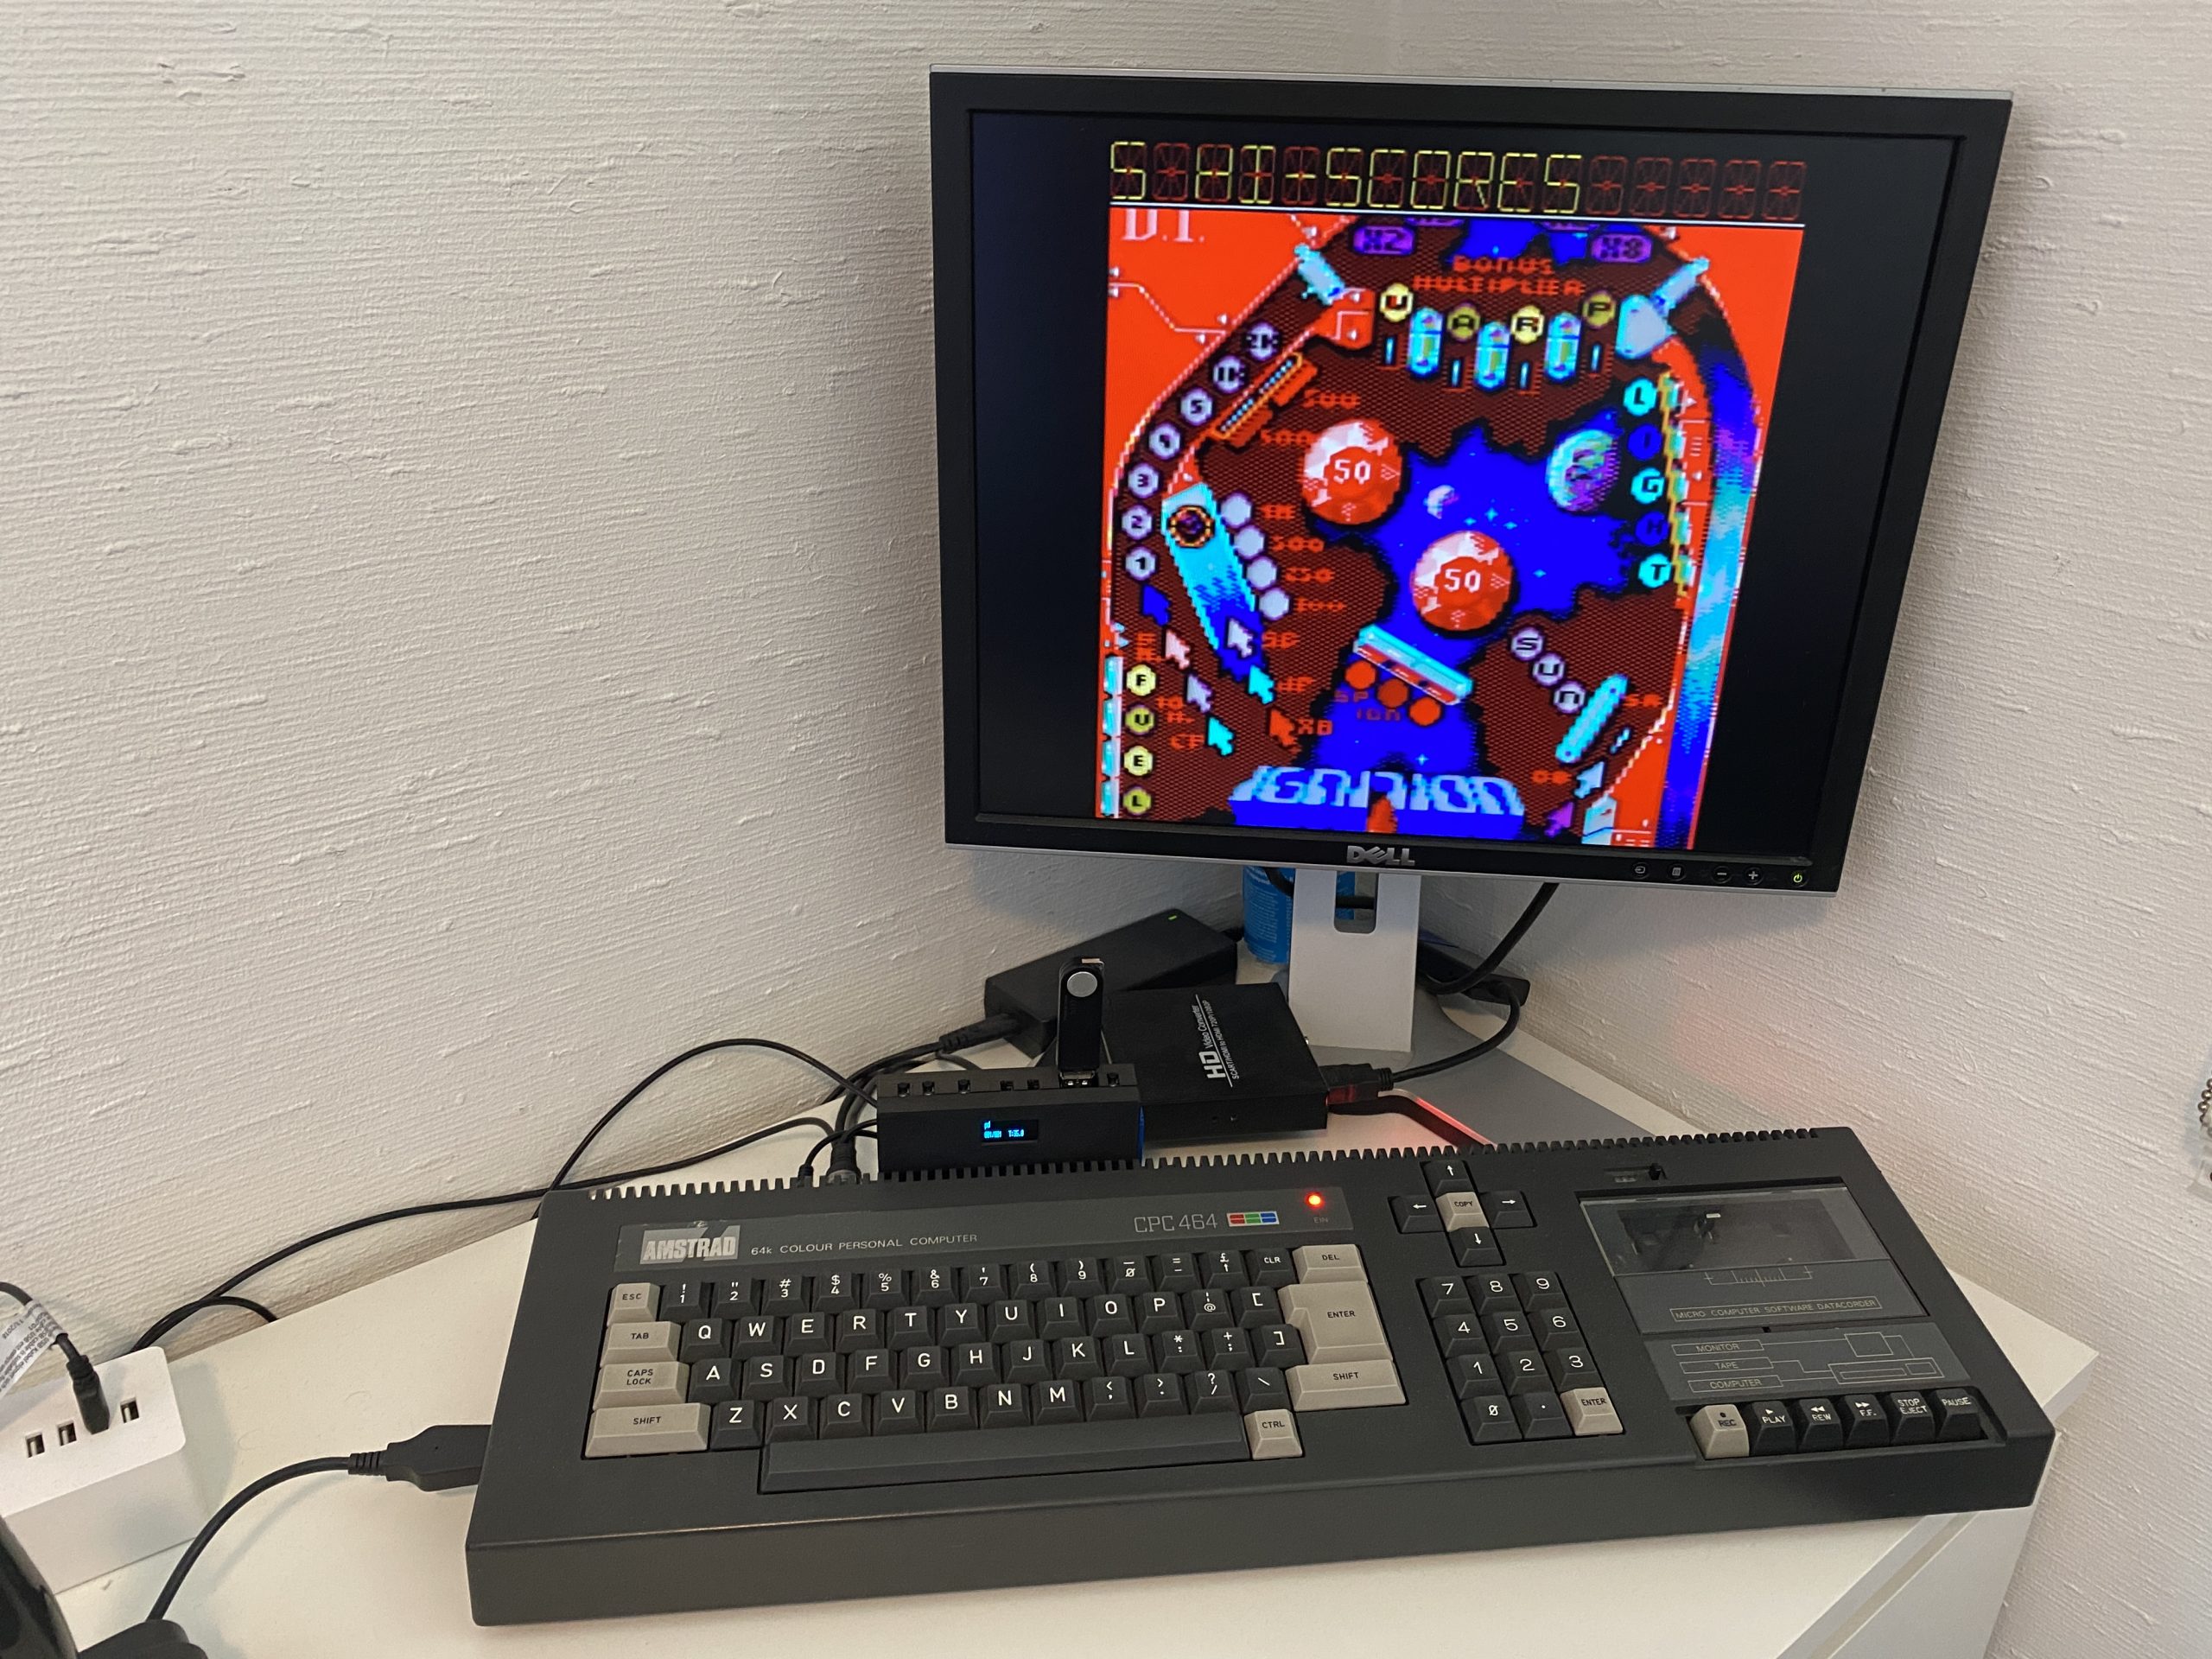
I’ve spent quite a bit of time doing up my Amstrad 464 Plus lately, and I must admit, I am really taking a liking to this hardware. It looks good, feels good and it’s fast to load “Burnin Rubber” using the slide-in cartridge ability.
I have a grand total of 1 cartridge and it is the Burnin’ Rubber that came with my 464 plus. The game announces itself with a great logo and awesome music, but the actual game behind the loading screen is awful.
“Burnin’ Rubber is so dull.
The music however is awesome !”
I mean it, I love the Burnin’ Rubber music, I had my 464 Plus connected to some external speakers and my lcd and I was pumping up the volume, and dare I say it, dancing to it all by myself.
Now I know I can connect my Dandanator Elite + to this and play games but I really wanted to experience some fun using the ‘built in method’ that this computer was sold with, and I don’t mean the tape deck.
I was intrigued when I saw a post on facebook about custom cartridges (shown below) being offered for sale, so I decided to investigate.
 I contacted the poster Anakintf and asked him if these were for sale, he responded that these particular cartridges were out of stock but he would come back to me with prices for my own ones if I was interested.
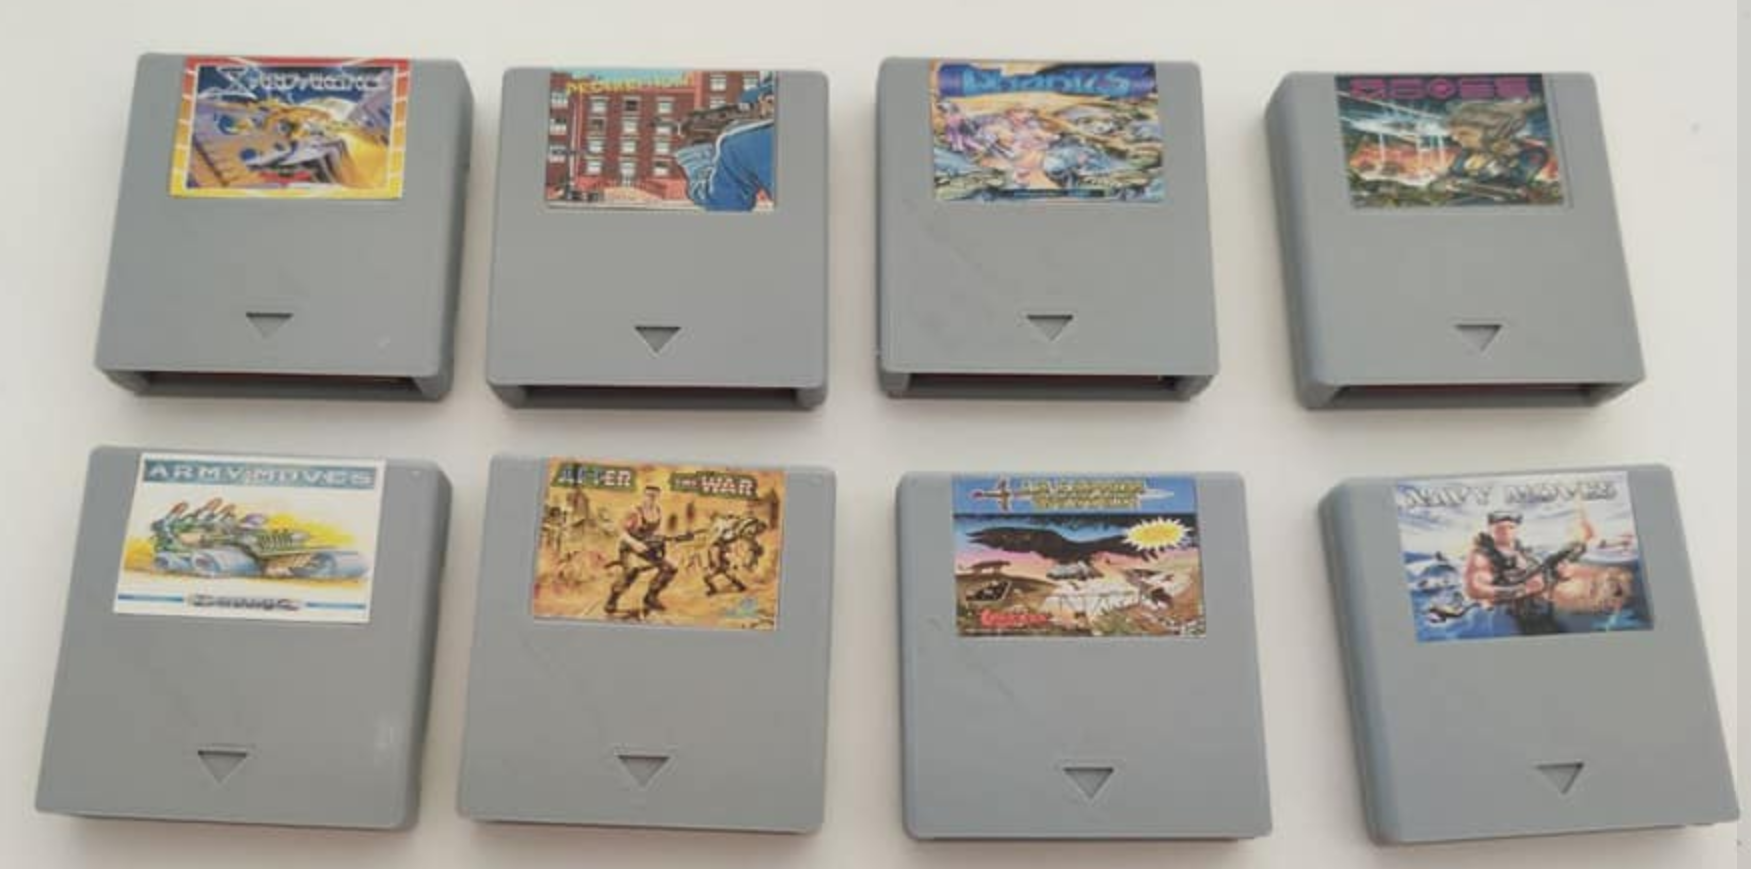
I was interested, so he pointed me to the following Spanish website and asked me to pick some games that were listed as GTX 4000 or Plus compatible. I came up with a list of 8 games that I wanted in cartridge format including a recently released game, 77 attempts.
Here is my list.
1. 77 attempts
2. barbarian II
3. Bomb Jack
4. commando
5. donkey kong
6. ikari warriors
7. operation wolf
8. prince of persia
Anakintf took my list and said he would go ahead and create the cartridges, but also asked me if I wanted custom boxes for them too. Remember, these were the games that I wanted including a community released game. I said sure thing !
Naturally it costs more with the boxes but I wanted the ‘full experience’.
One small thing had to be done first and that was to pay in advance, all the games including boxes, stickers, postage from Spain > Sweden cost 123 Euros, not bad at all if you ask me.
I have to say this seller communicated with me in a very professional way, at all times he kept me informed about the progress, included photos of what they looked like and tested each game and then included a video of that process for me to review, 10/10 for this seller, outstanding communication and interaction. After I paid, he sent me the tracking number of the delivery and thanked me for my trust.
“Outstanding communication and interaction”
The photos below, are all from the seller, that is insane and really shows the ‘love’ he has for what he does.
Please encourage him by buying his stuff.
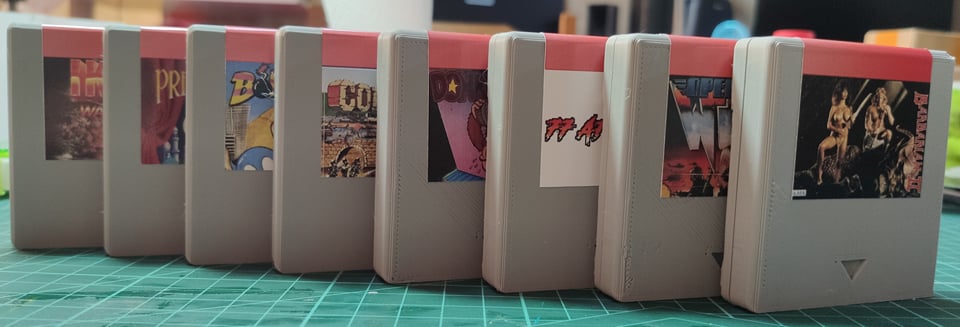
Here are some snapshots of the games sent to me. Look at that quality !


And below are all my 8 games in a row ! how cool is that !!
 Tomorrow, i’ll post a video showing the unboxing experience, stay tuned !
cheers
niall
In this video I show you what cable you need to connect up your 464 Plus (or 6128 Plus) to an external LCD, the advantage of this is to take up much less space on your desk and also to be able to easily flick between different plus models.
I previously bought another Retro shack cable for the CPC 464, 664, 6128 models which I’ve already blogged about it here, however that cable does NOT work with the 464 or 6128 PLUS models.
The cable in this video was specially made for the PLUS models.
Please note that this cable requires a 5v 2.4a 2.5×5.5 mm power supply (DC), which is not included, you have to source that yourself.
Here’s the PLUS cable I ordered from ebay:
https://www.ebay.co.uk/itm/251970455548
and here’s the 600MA DC power supply from Amazon:
https://www.amazon.se/dp/B002E4YQGY?ref_=pe_24982401_513610551_E_301_dt_1
If you’d prefer, you can purchase a similar one with a higher AMPERAGE rating, however in my testing, this one works just fine.
The speakers used in the video are Edifier brand which comes with its own RCA inputs and cables:
https://www.amazon.se/dp/B01NCTGH9M
Here is the video
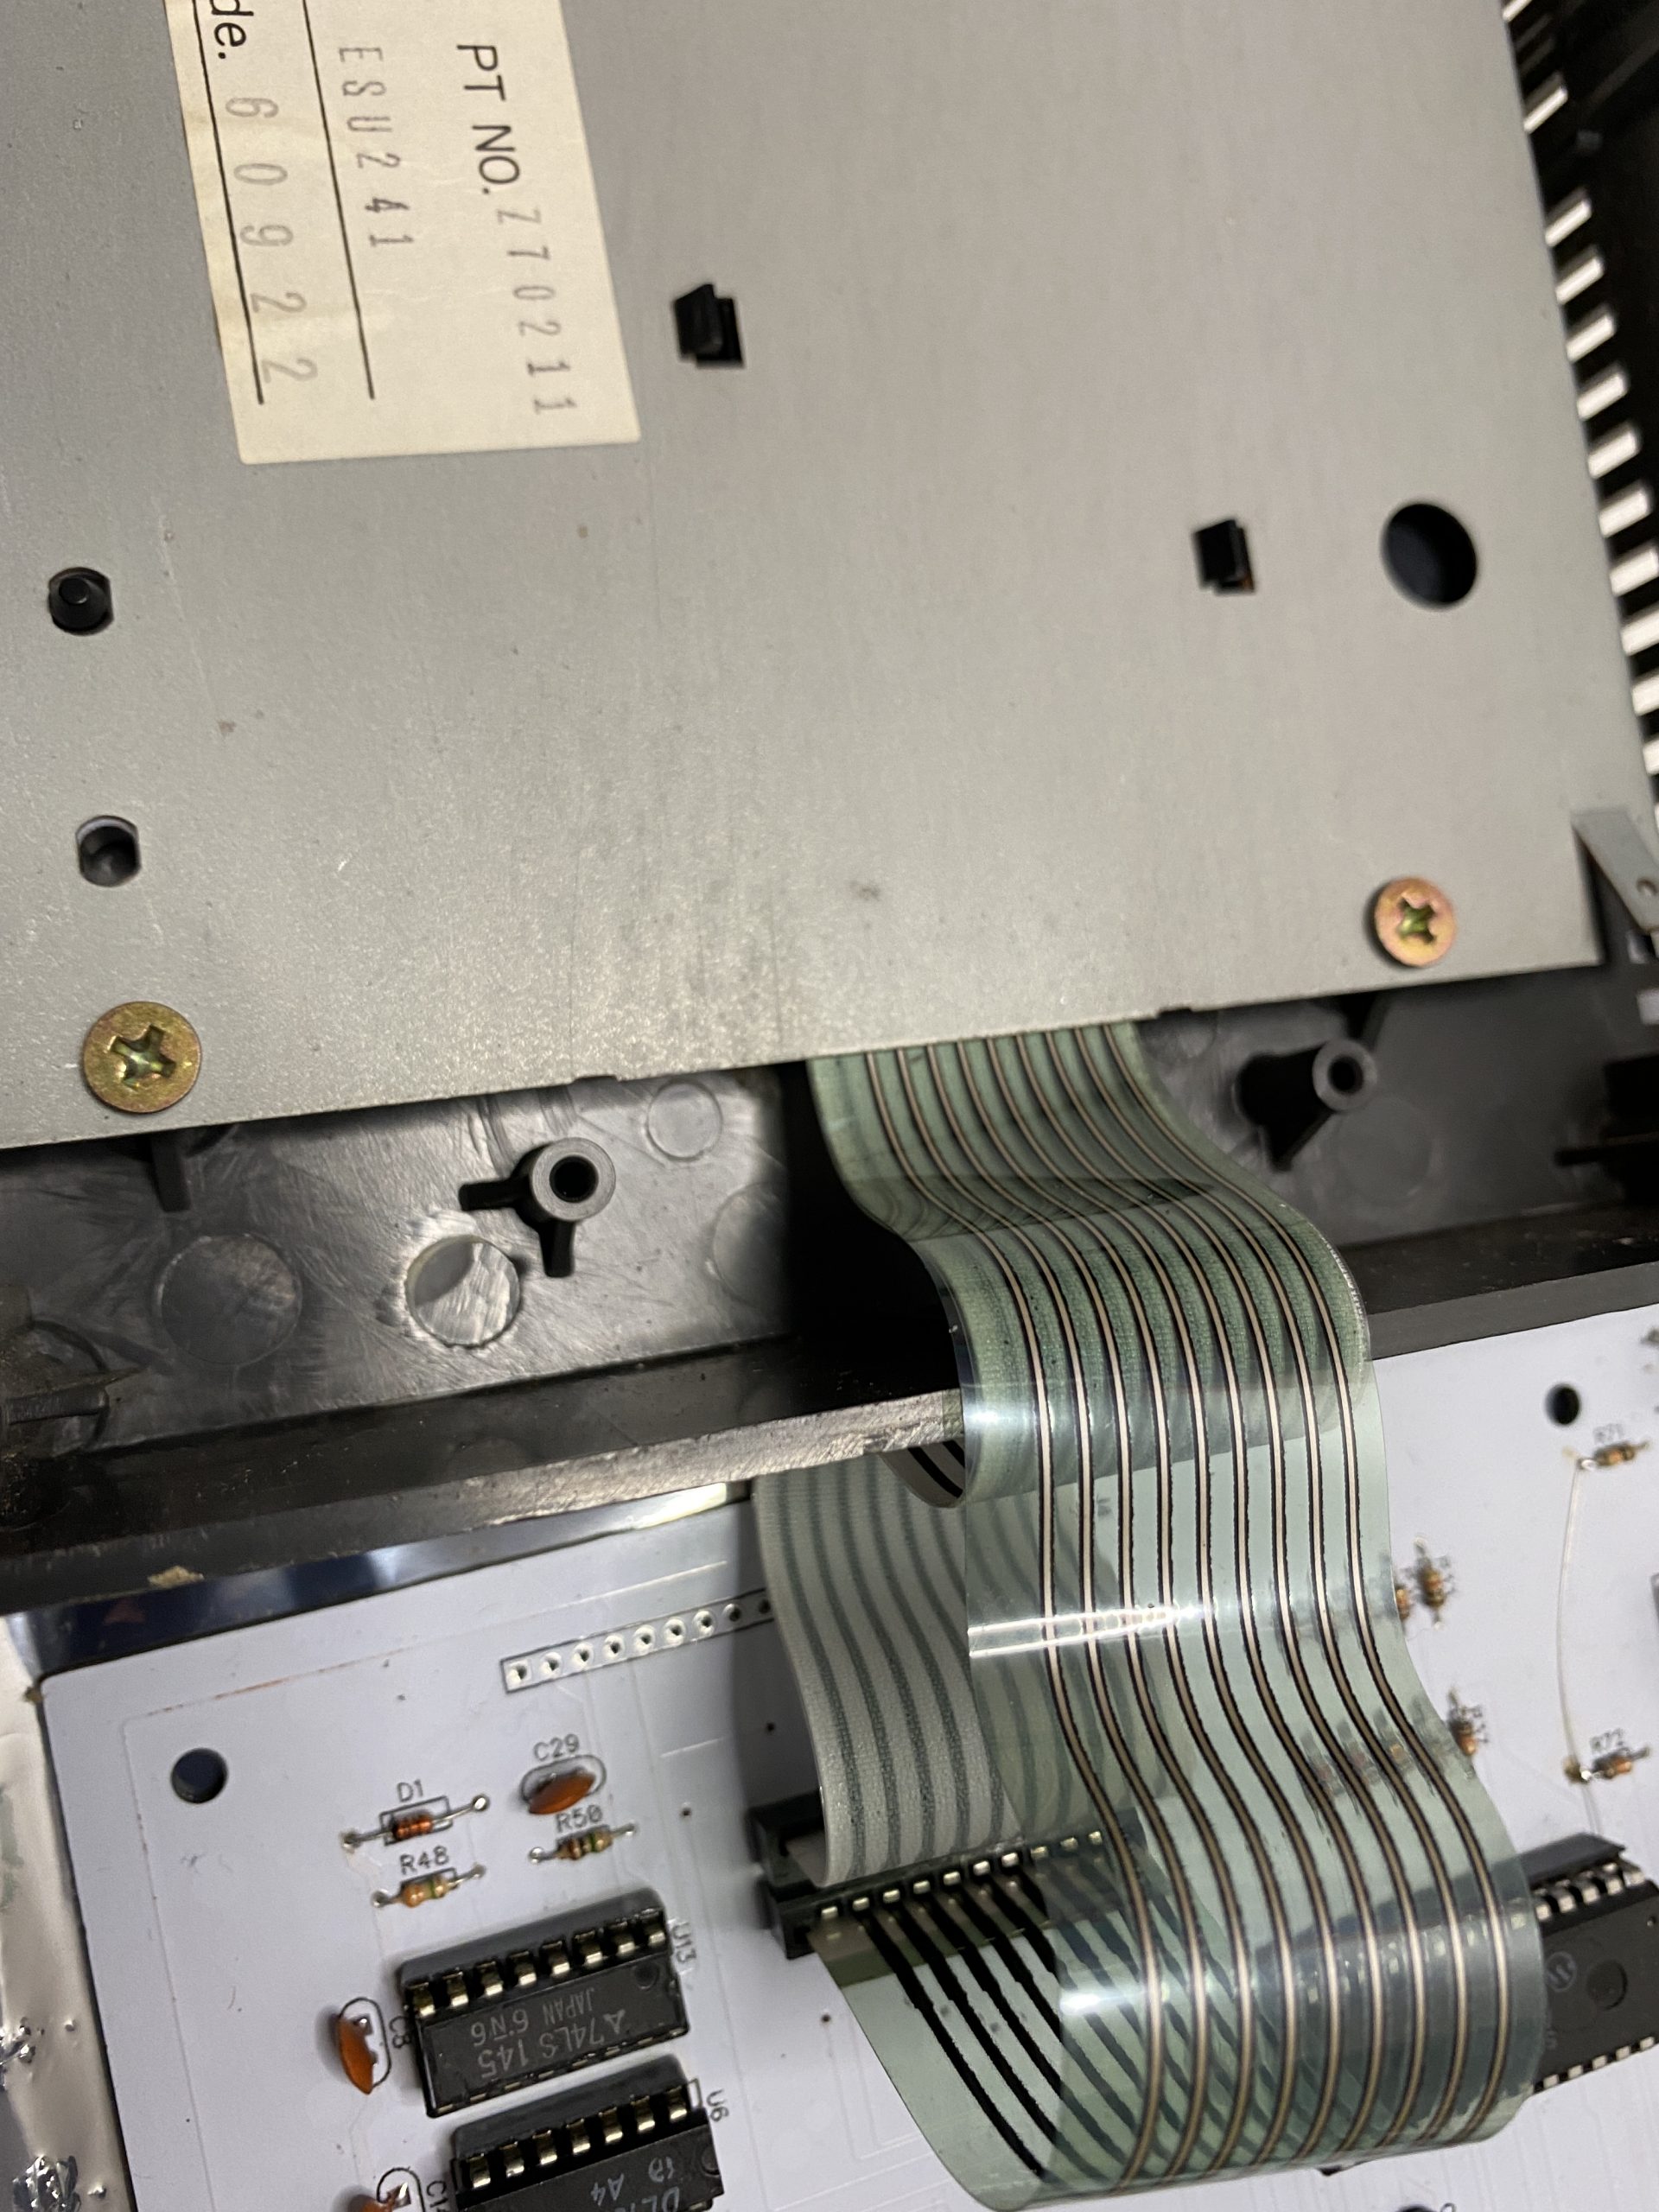
I got this 464 plus (my first ever plus model) back in May 2021 and while it looked OK in reality it needed a good clean, that became very apparent as soon as I took it apart, loads of dirt, hair, spiders and dirt fell out. I spent the better half of a day taking it apart carefully, and of course videoing the entire process so that you could be part of it and learn how to do it yourself. It was definetly worth doing, not 100% perfect but totally better than it was.
Here’s the video !
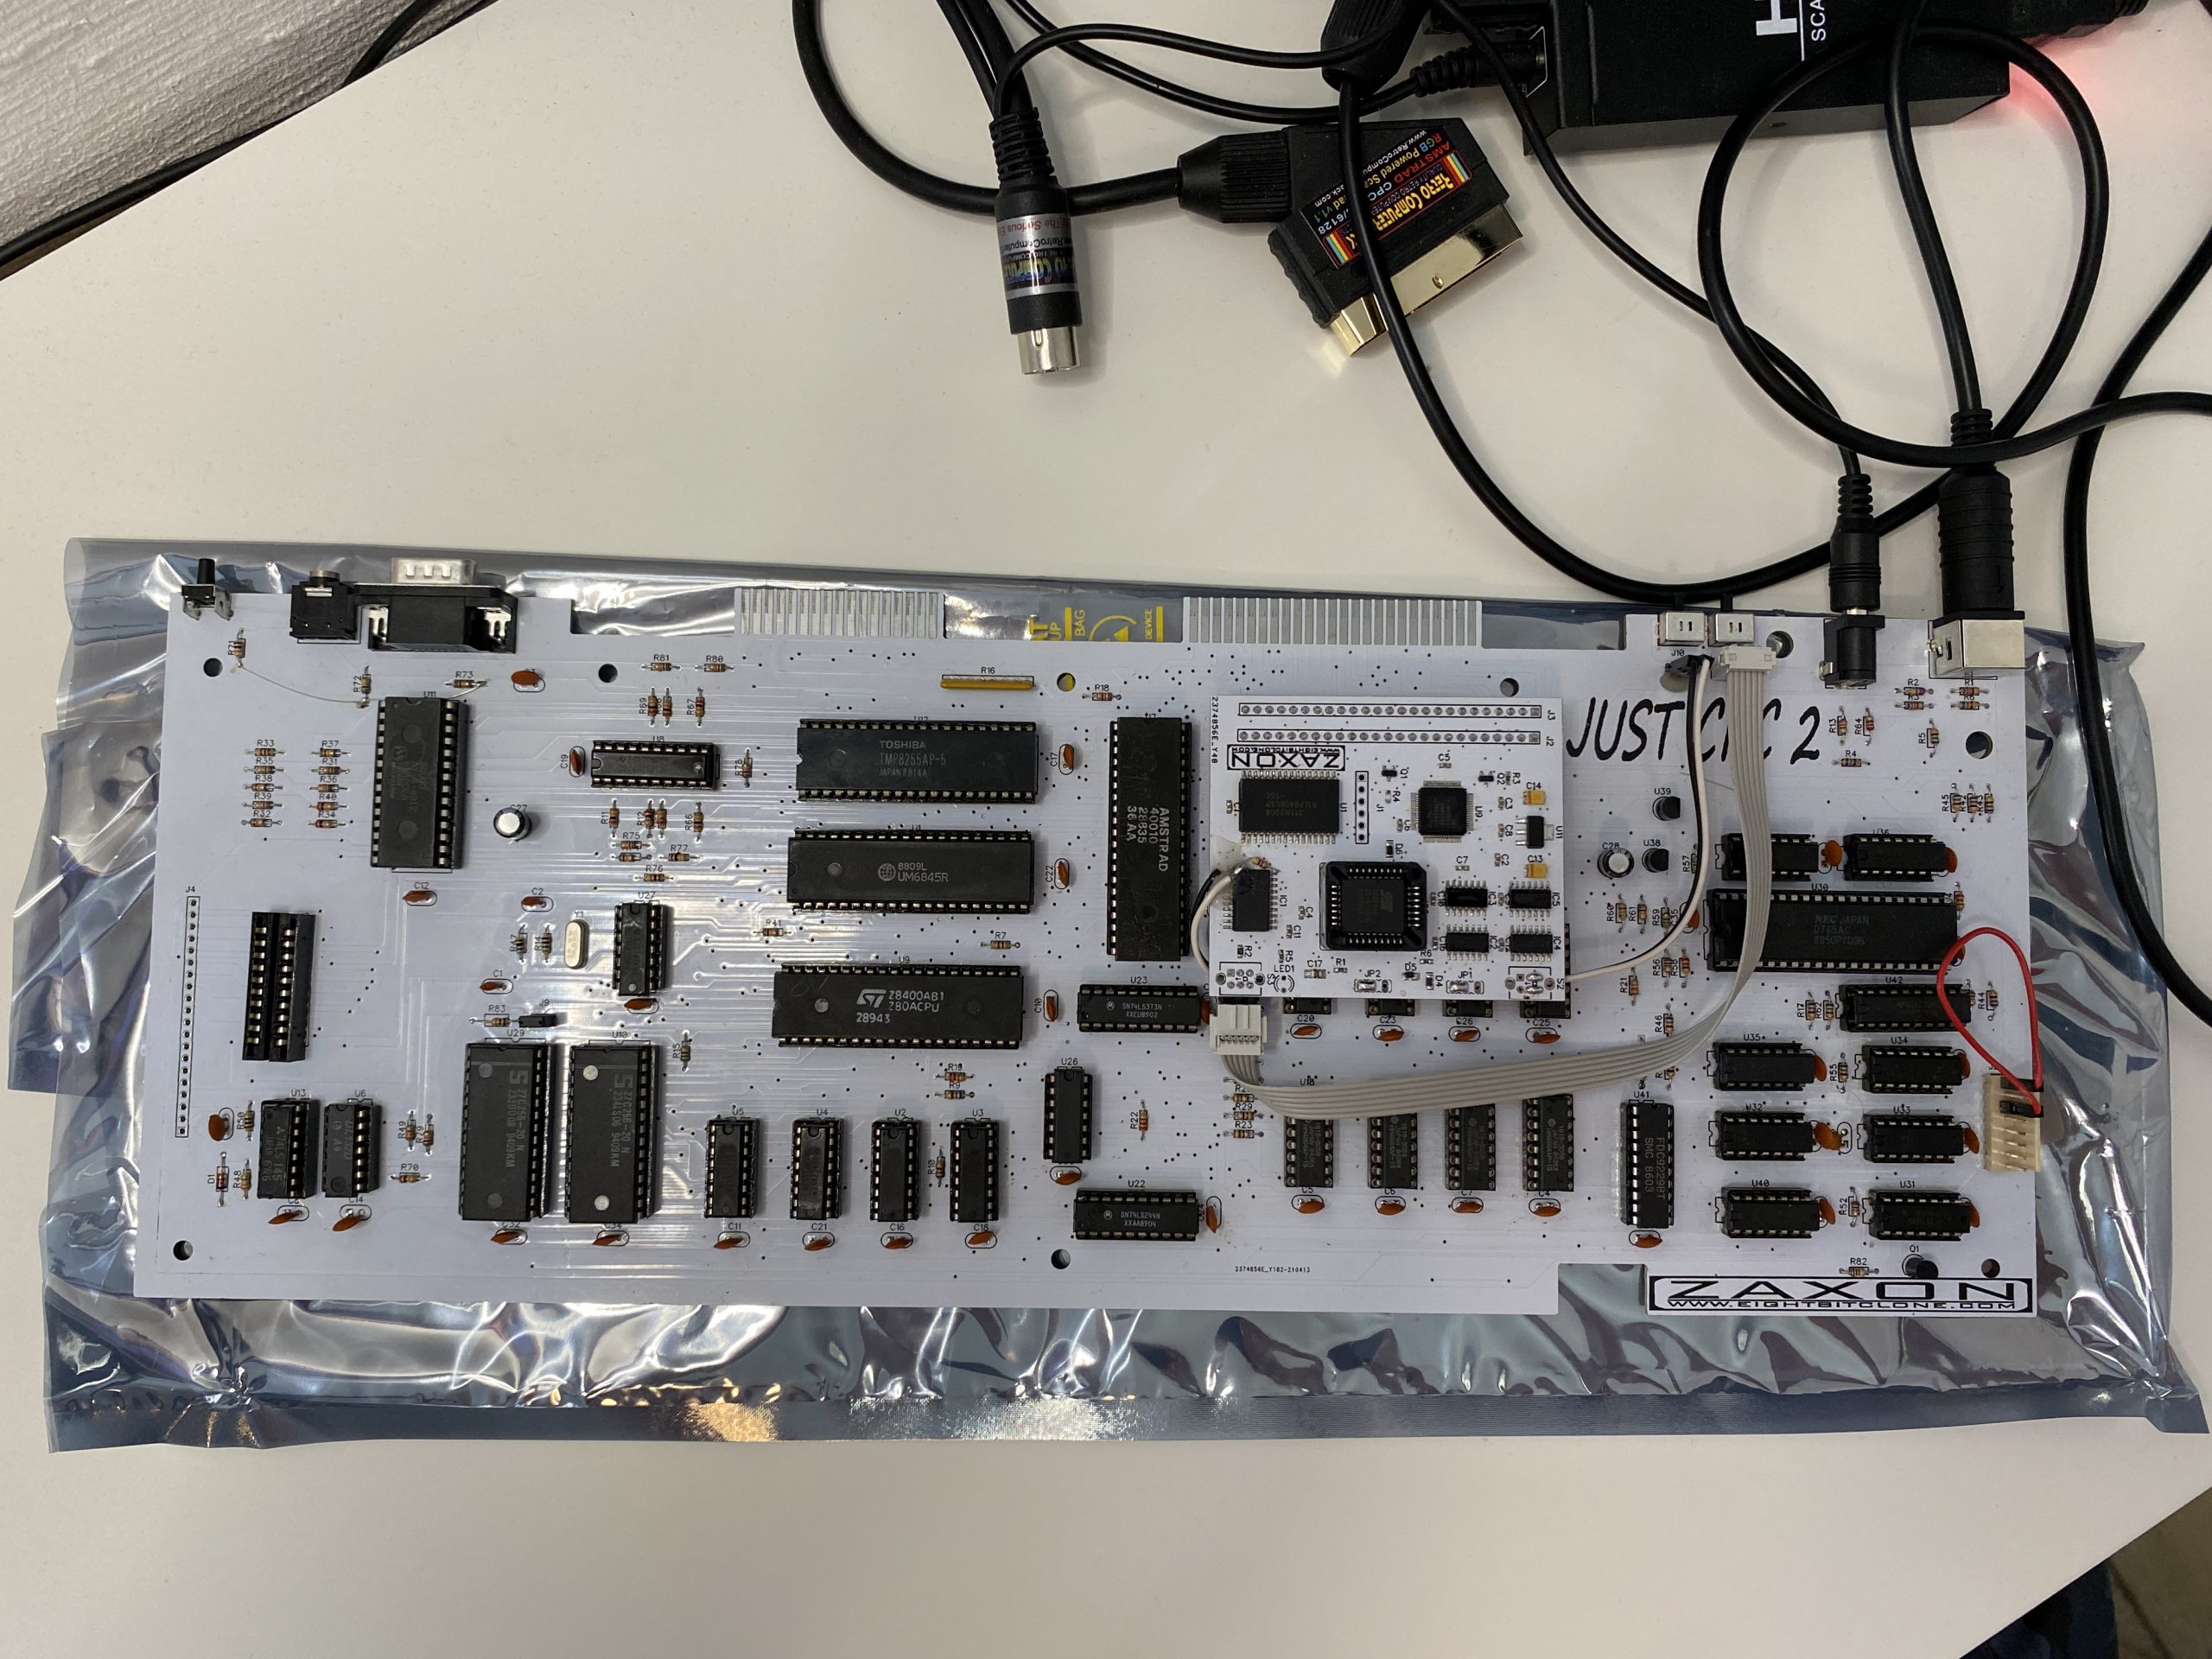
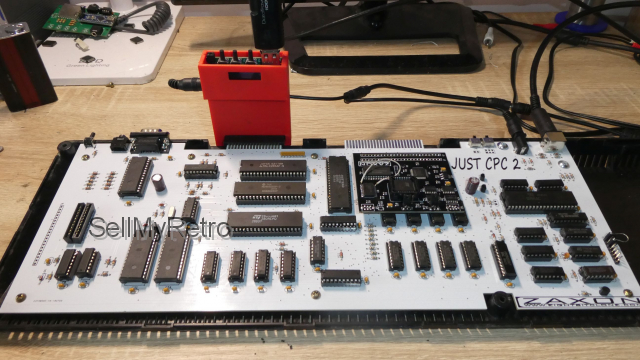
I ordered the Just CPC 2 from SellMyRetro some time ago and it turned up relatively quickly considering it was built by hand. It was nicely packaged, and more importantly it was very nicely wrapped with loads of protective bubble wrap, in addition there was a copy of the invoice in Polish and a scart/svideo cable included, so far so good.
What was not included was any sort of manual or explanation of what the board was or it’s intended use. I had to google and ask Piotr Bugaj, the maker of the hardware to confirm some things. I hope this post covers most points to save you guys the hassle.
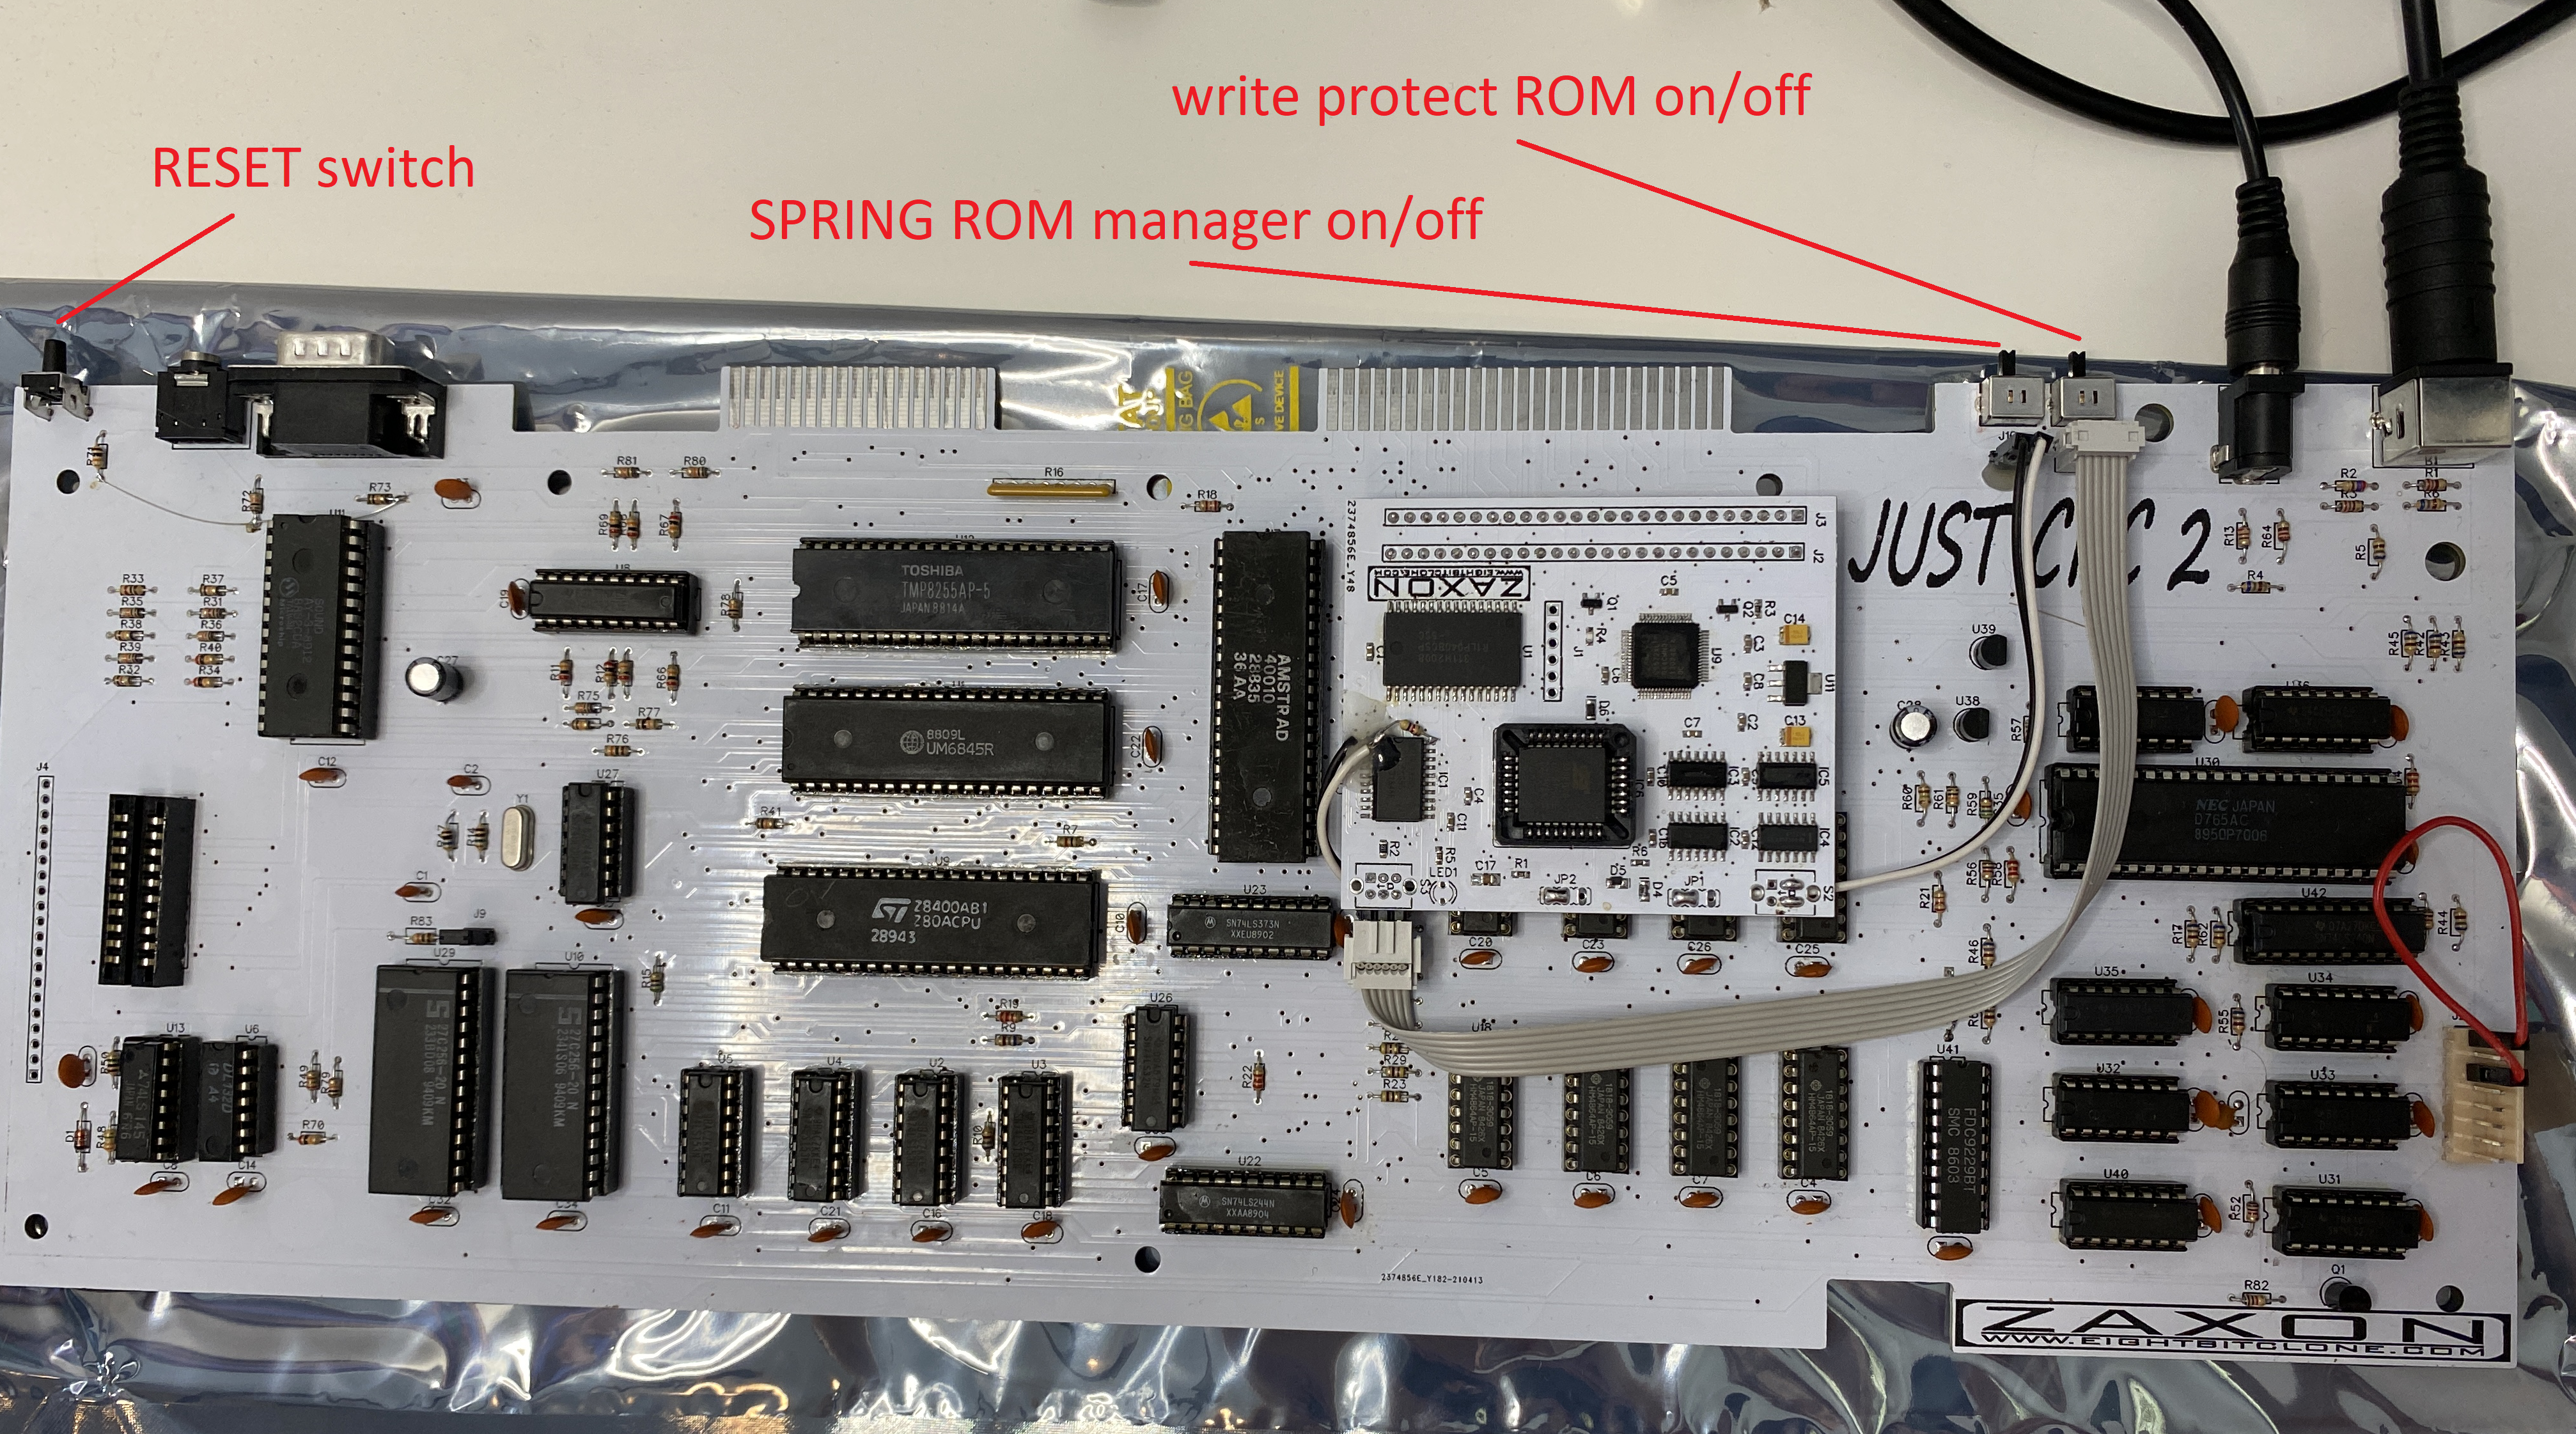 To the right of the photo above you can see pins 1 & 3 are jumpered, this will power on the Just CPC 2 when 5V is connected. You can pull out this cable and connect up your standard cable coming from the CPC donor (to allow the red LED to work and the on/off switch on the side of the CPC).
But what is the Just CPC 2, and what can you do with it ? What I do know is as follows:
It is a clone of the CPC 464 motherboard that fits in a CPC 464 case (long board) and it’s designed and hand built by Piotr Bugaj (otherwise known as Zaxon). Let’s take a quick look at the board.
Below you can see it sitting on top of the anti-static bag that it shipped in. In addition, I’ve connected my 5V power connector and I’ve also plugged in the scart adapter which was supplied with the unit.
Included on the Just CPC 2 motherboard are a few extra features.
The printer port is replaced by a disk drive port to allow you to easily Zaxon’s USB floppy emulator (the red DDI3 in the pic below, at least, I think it’s a DDI3).
You need an original case from an Amstrad CPC 464 (long board version), 5v power and an external monitor (or LCD), you’ll also need a working keyboard with that case otherwise you can’t type anything.
It would be awesome if this version had a USB keyboard option, I know that there is an ATX version which offers PS/2 keyboard support but it would be great to get USB added to a later revision of Just CPC 2 so you could get this working without even having to have a real CPC.
You’ll also need a drill (or something pointy and hot) to poke some holes in your CPC base in order for the reset button and two additional switches to see the light of day.
I’ll be honest, I don’t like modifying original hardware unless it’s really worth it or unless it’s practically invisible, but this was a design choice that Piotr made and we are stuck with it. In addition to the holes, you’ll have to remove one plastic support on the base.
Ok, so now we know a little bit about the board let’s connect it up. I opened up three CPC 464’s and the first keyboard didn’t work, so I tried the next, only some keys worked when plugged into the Just CPC 2.
I located another CPC 464 and this one finally worked, however some keys wouldn’t work at first, for example shift @ to get the | symbol. Maybe I did something wrong, I dunno.
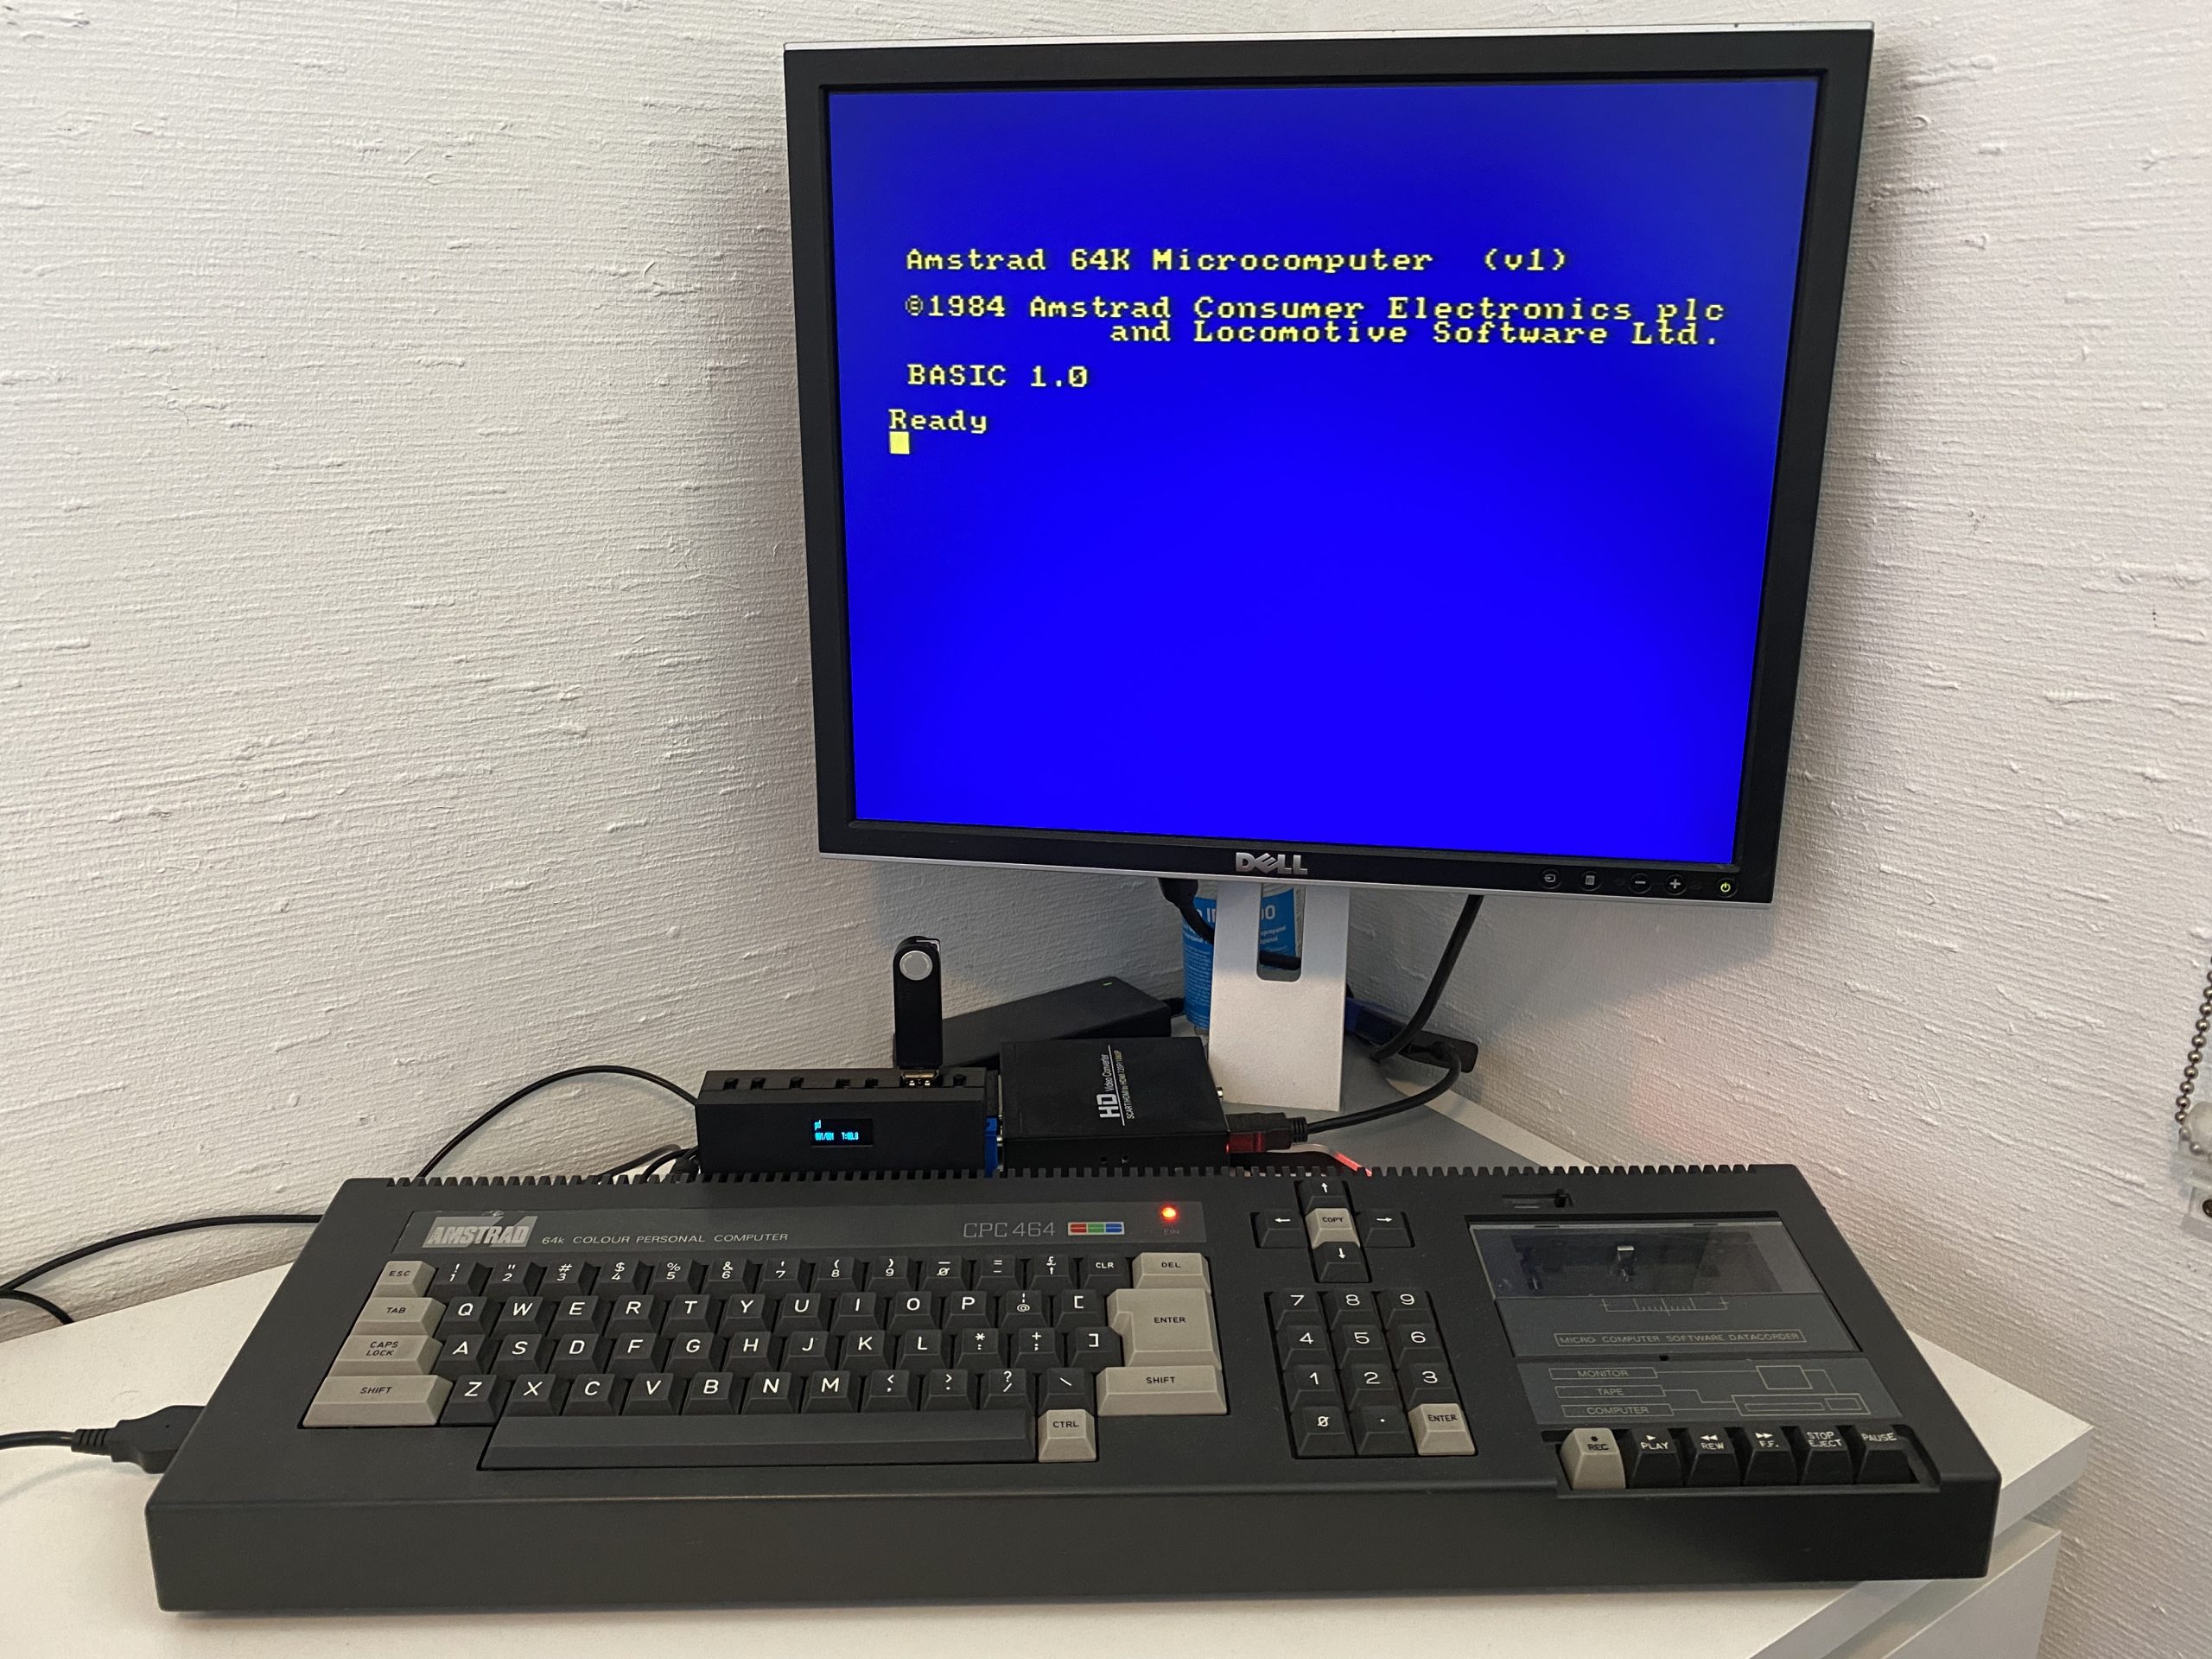
Once powered on you can see that it’s advertising itself as a 6128 basically (Amstrad 128k v.3) and includes BASIC 1.1 and a ROM manager from Spring.
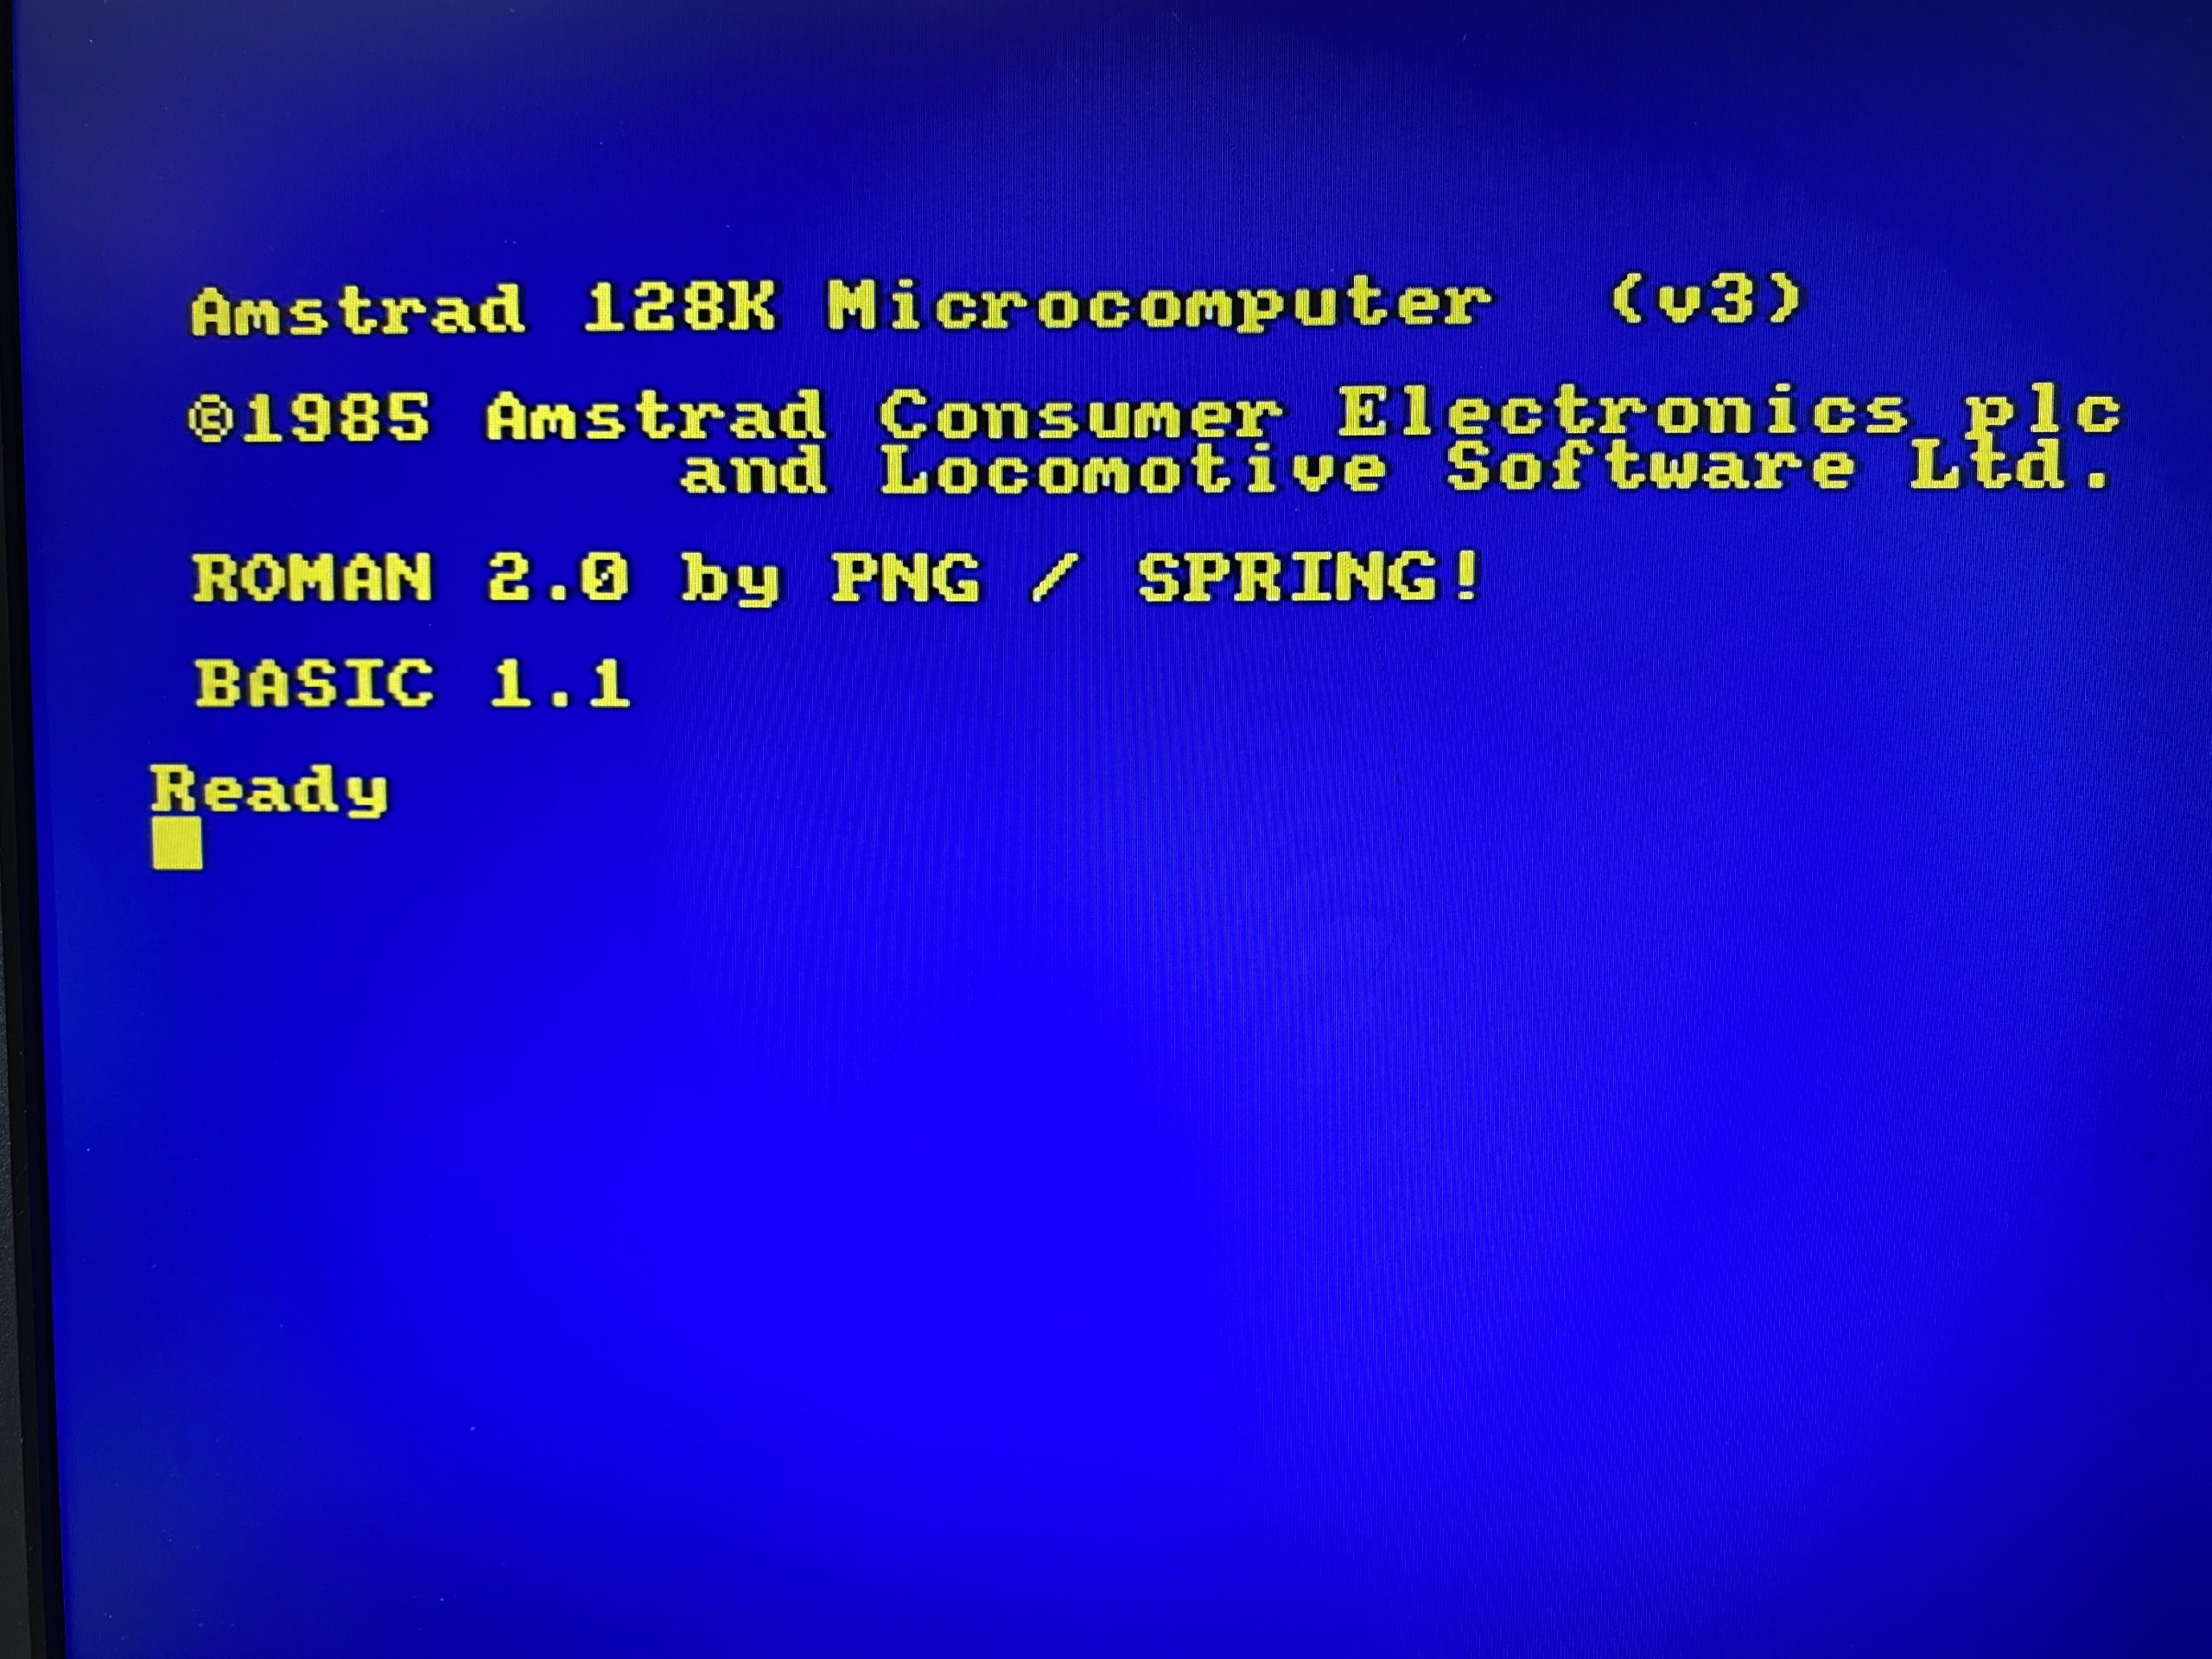
Type |ROMAN to see the ROM manager from Spring.
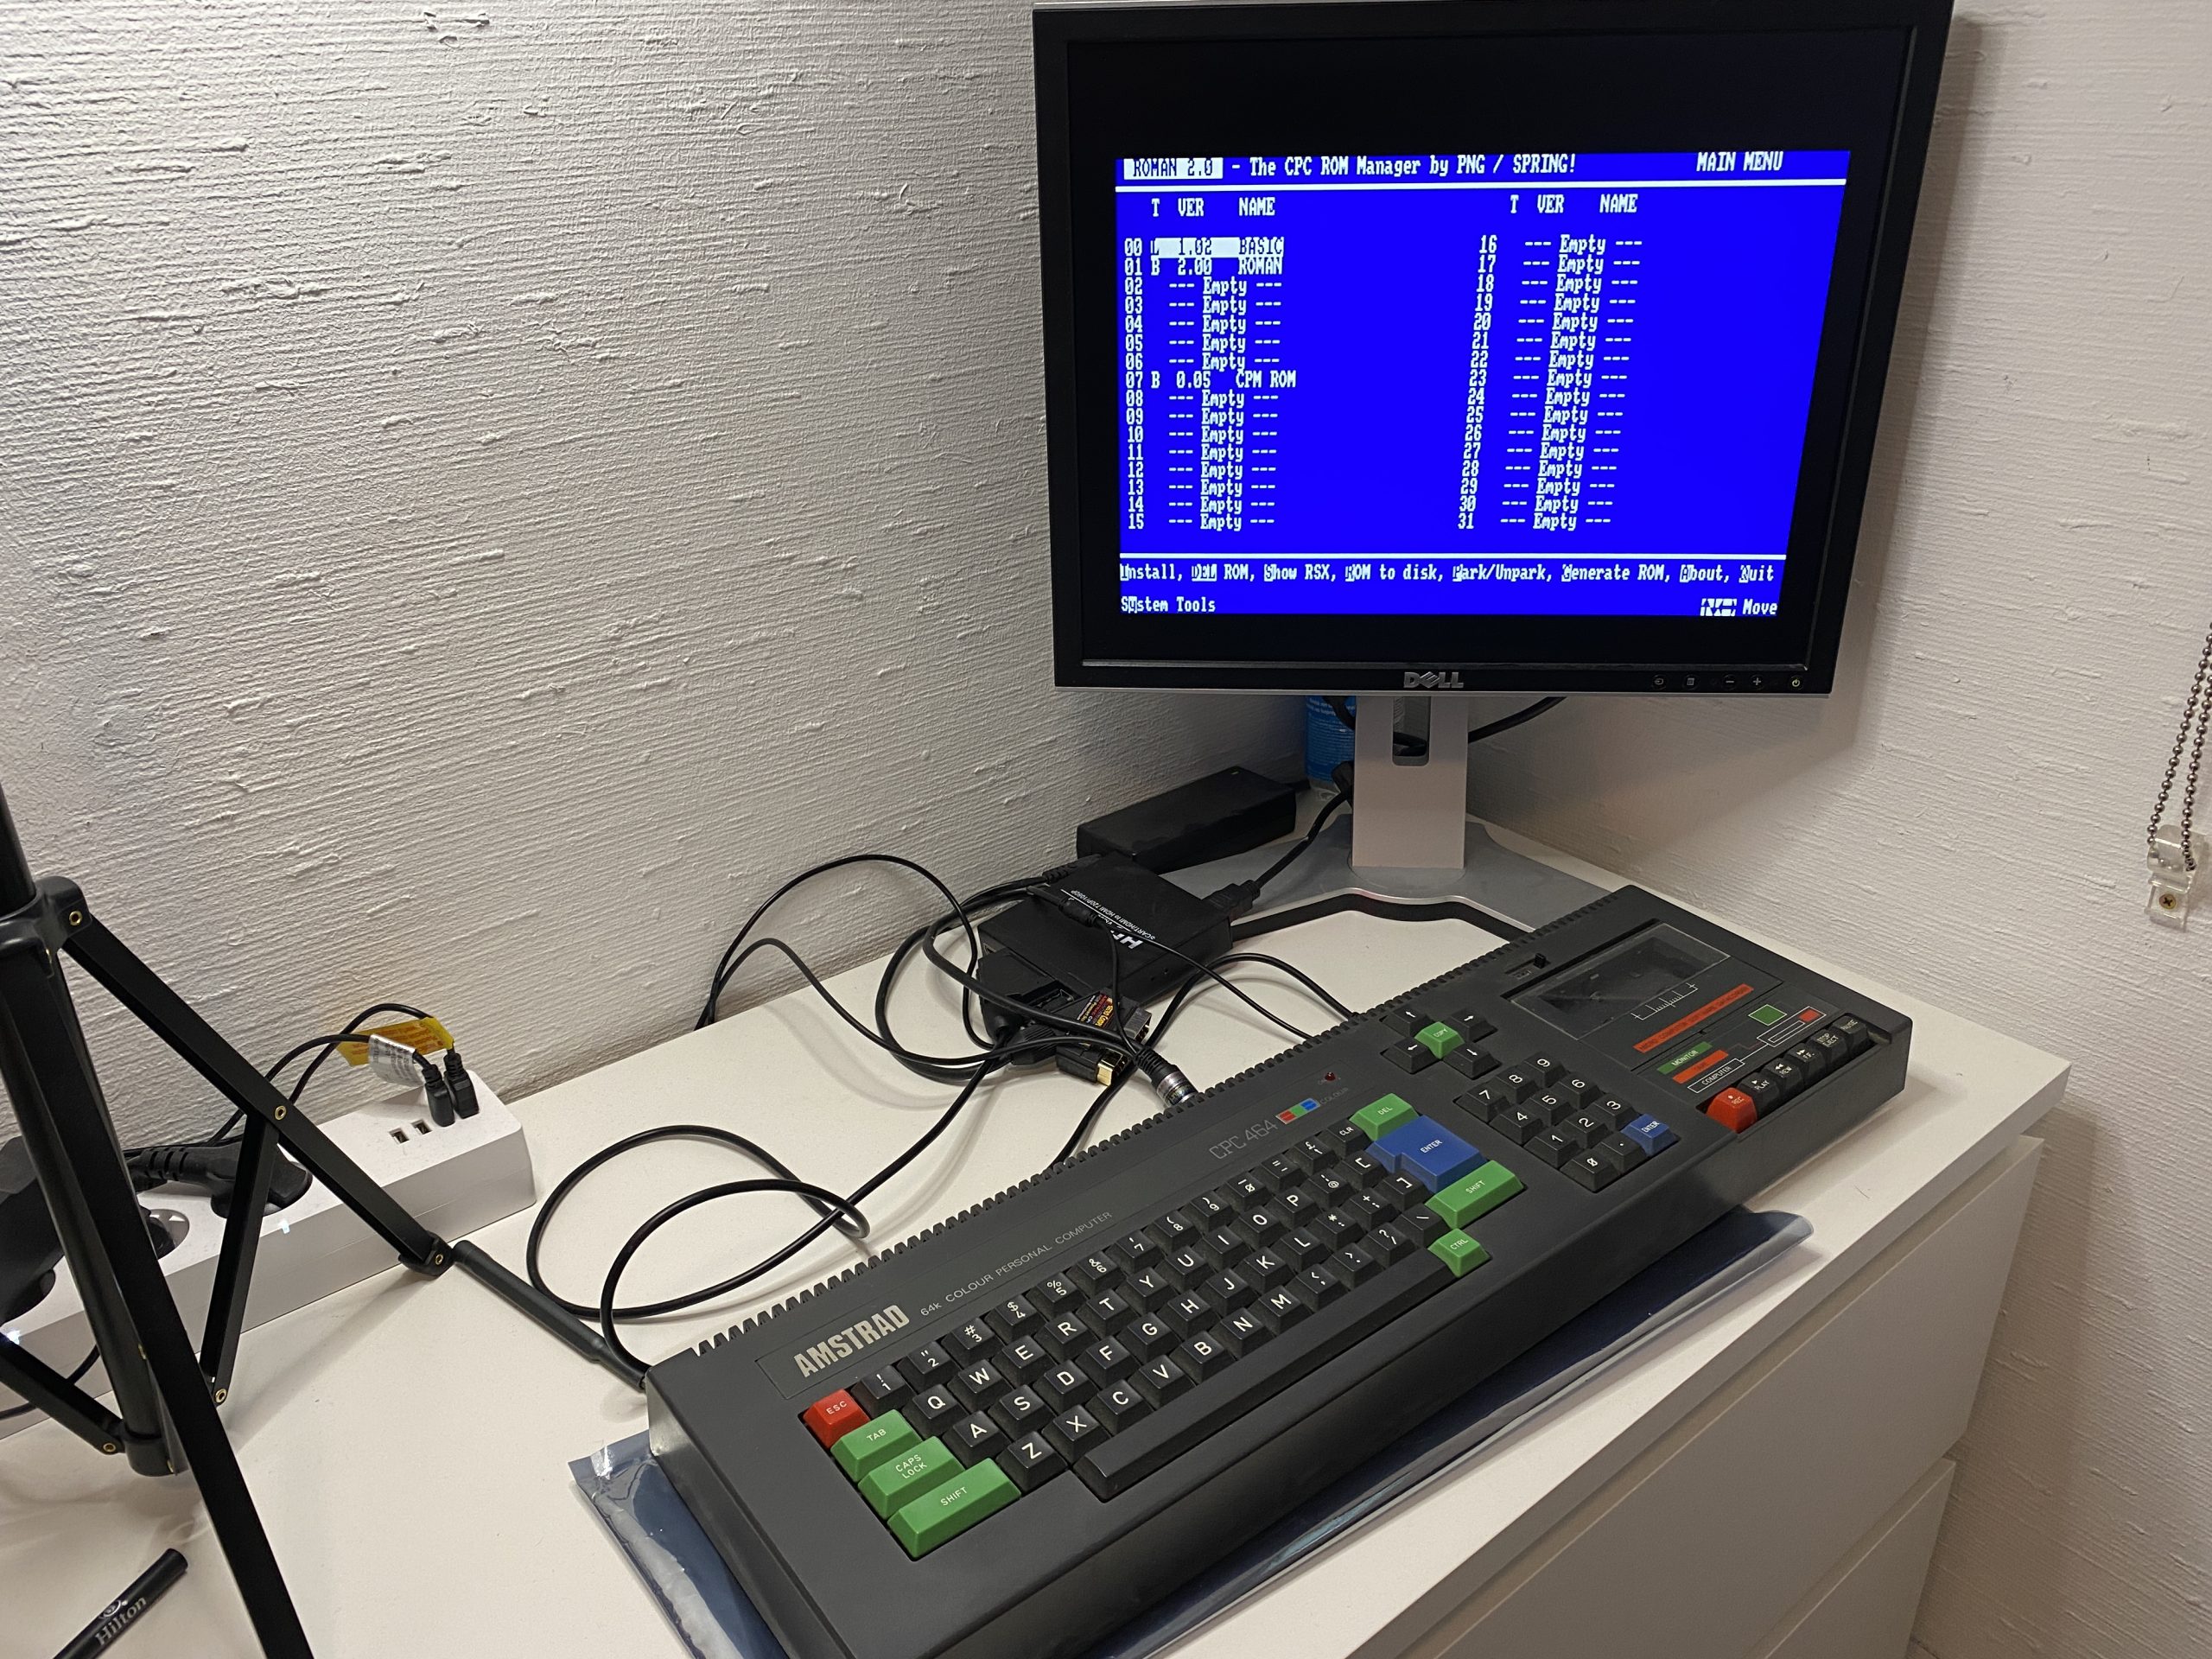
This allows you to add or remove multiple ROMS using the manager. The M4 board from Duke offers something similar.
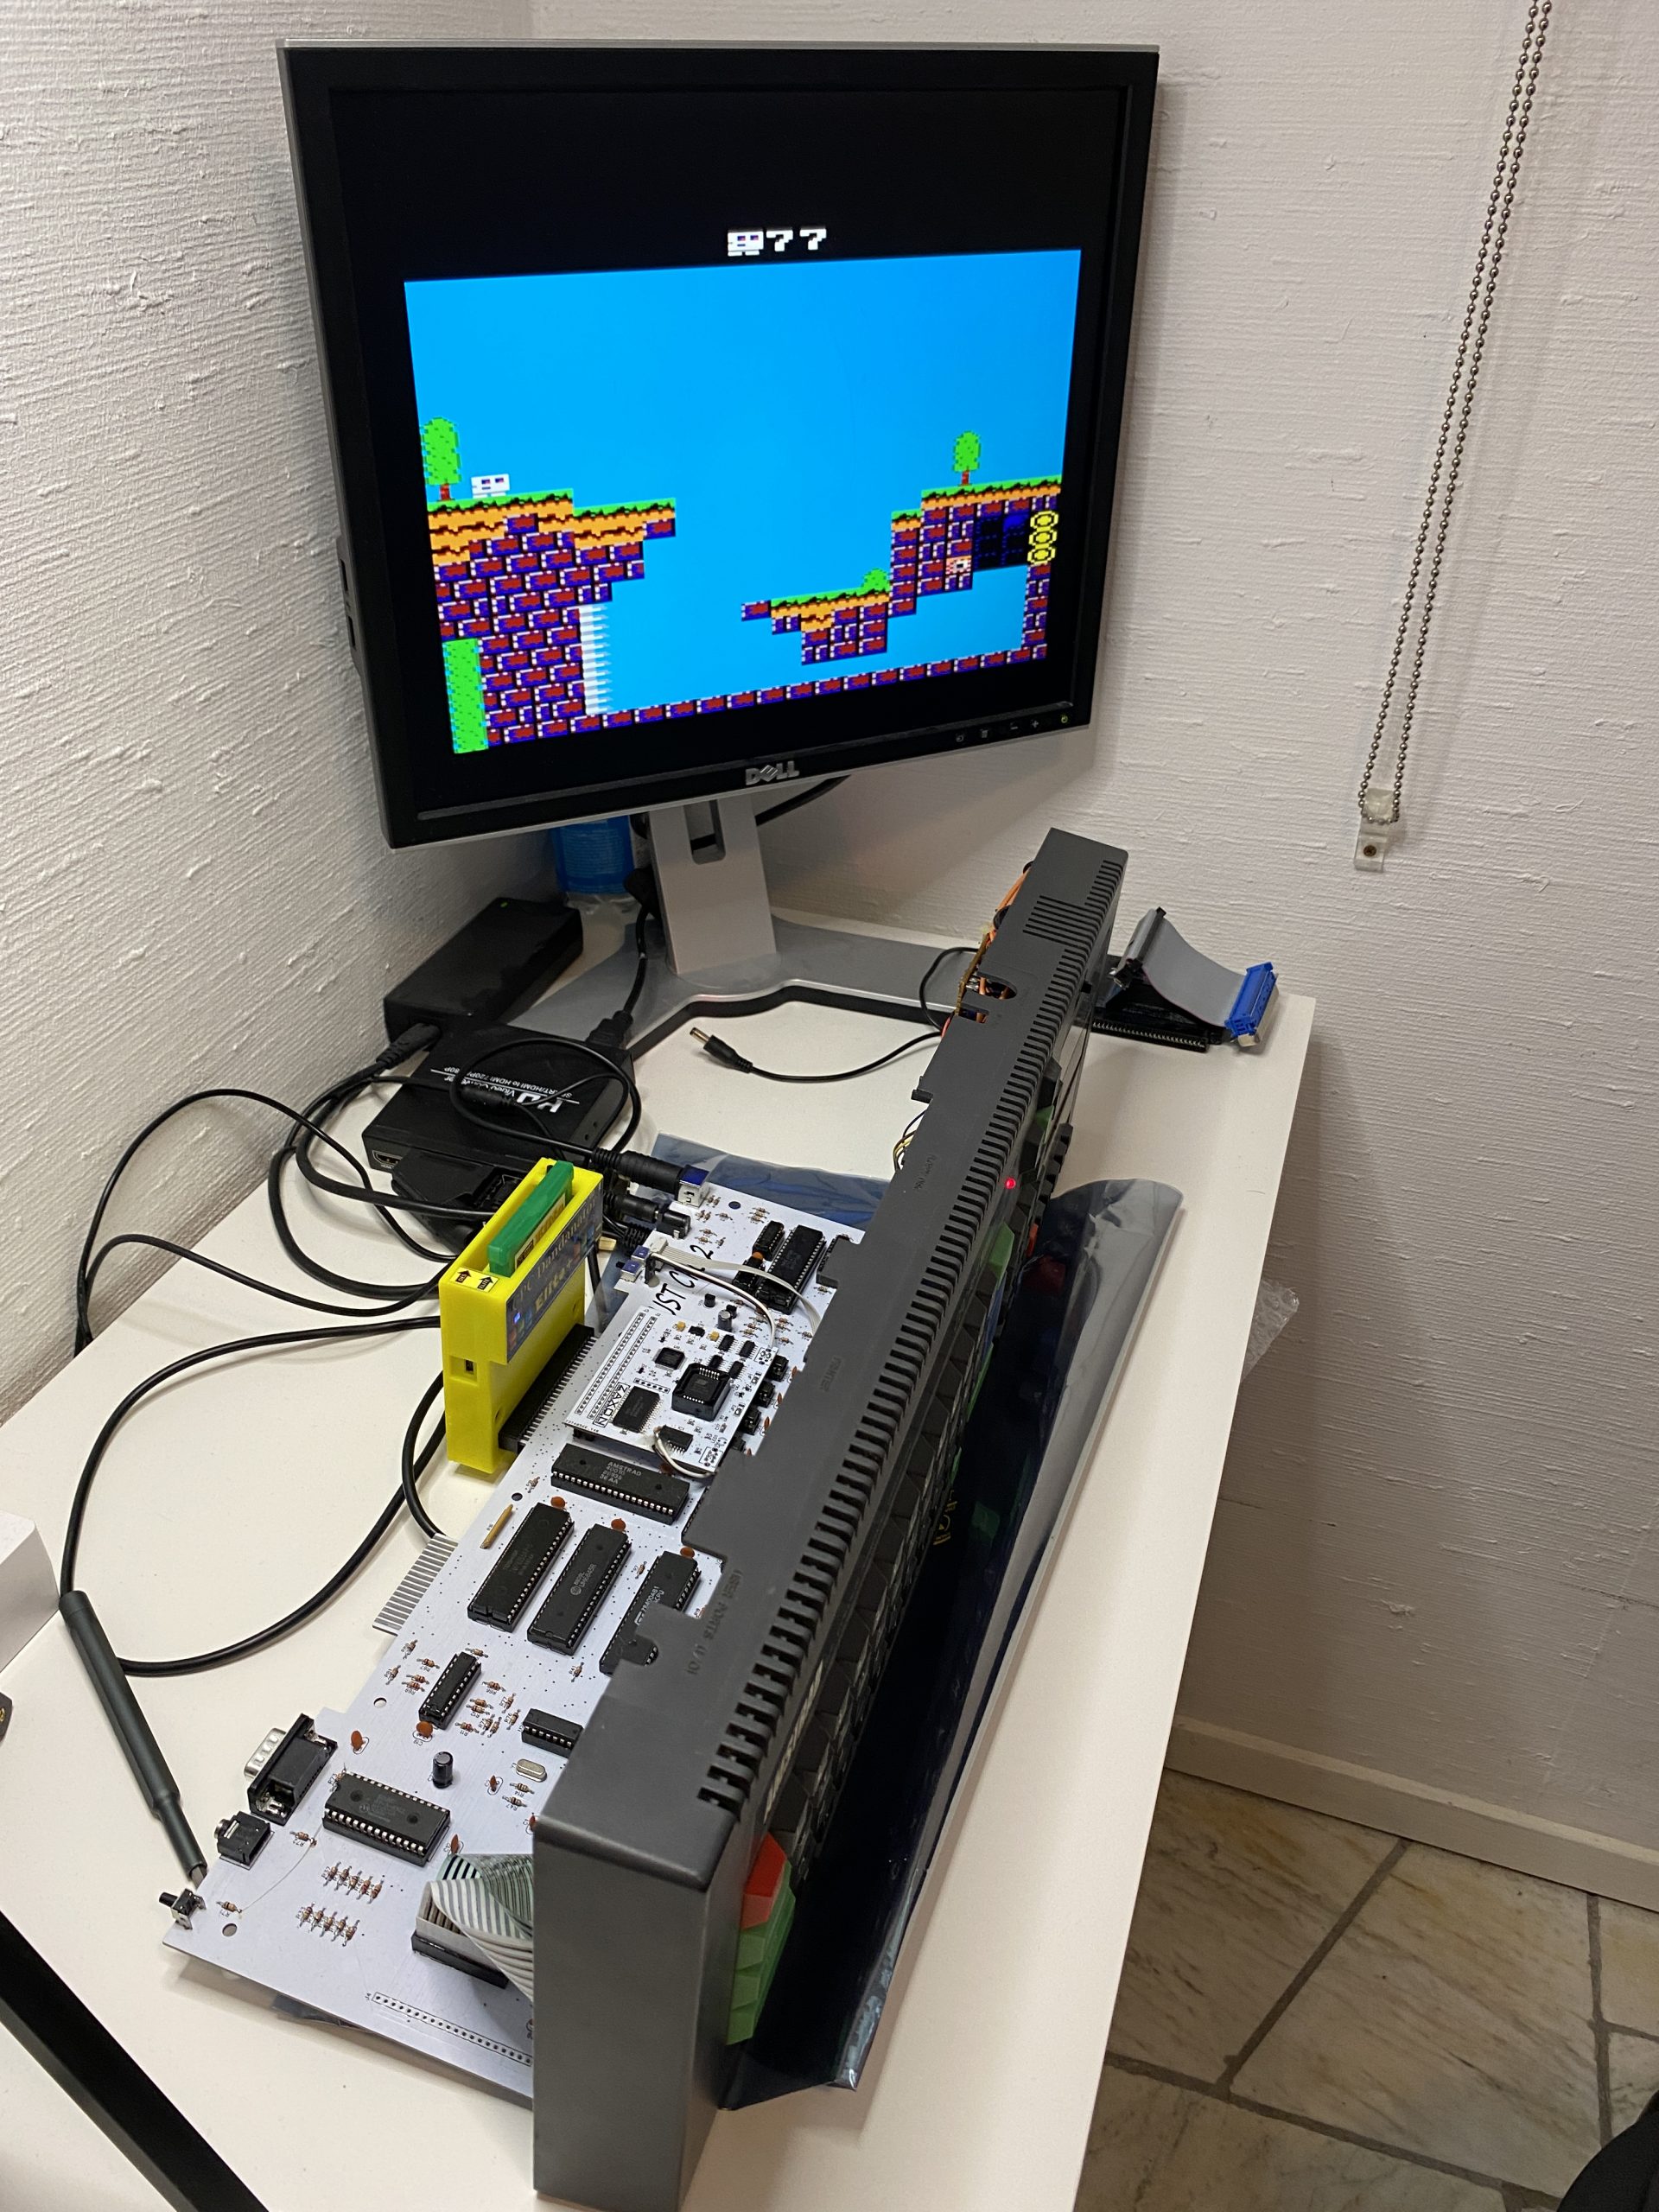
Next I plugged in my Dandanator Elite +
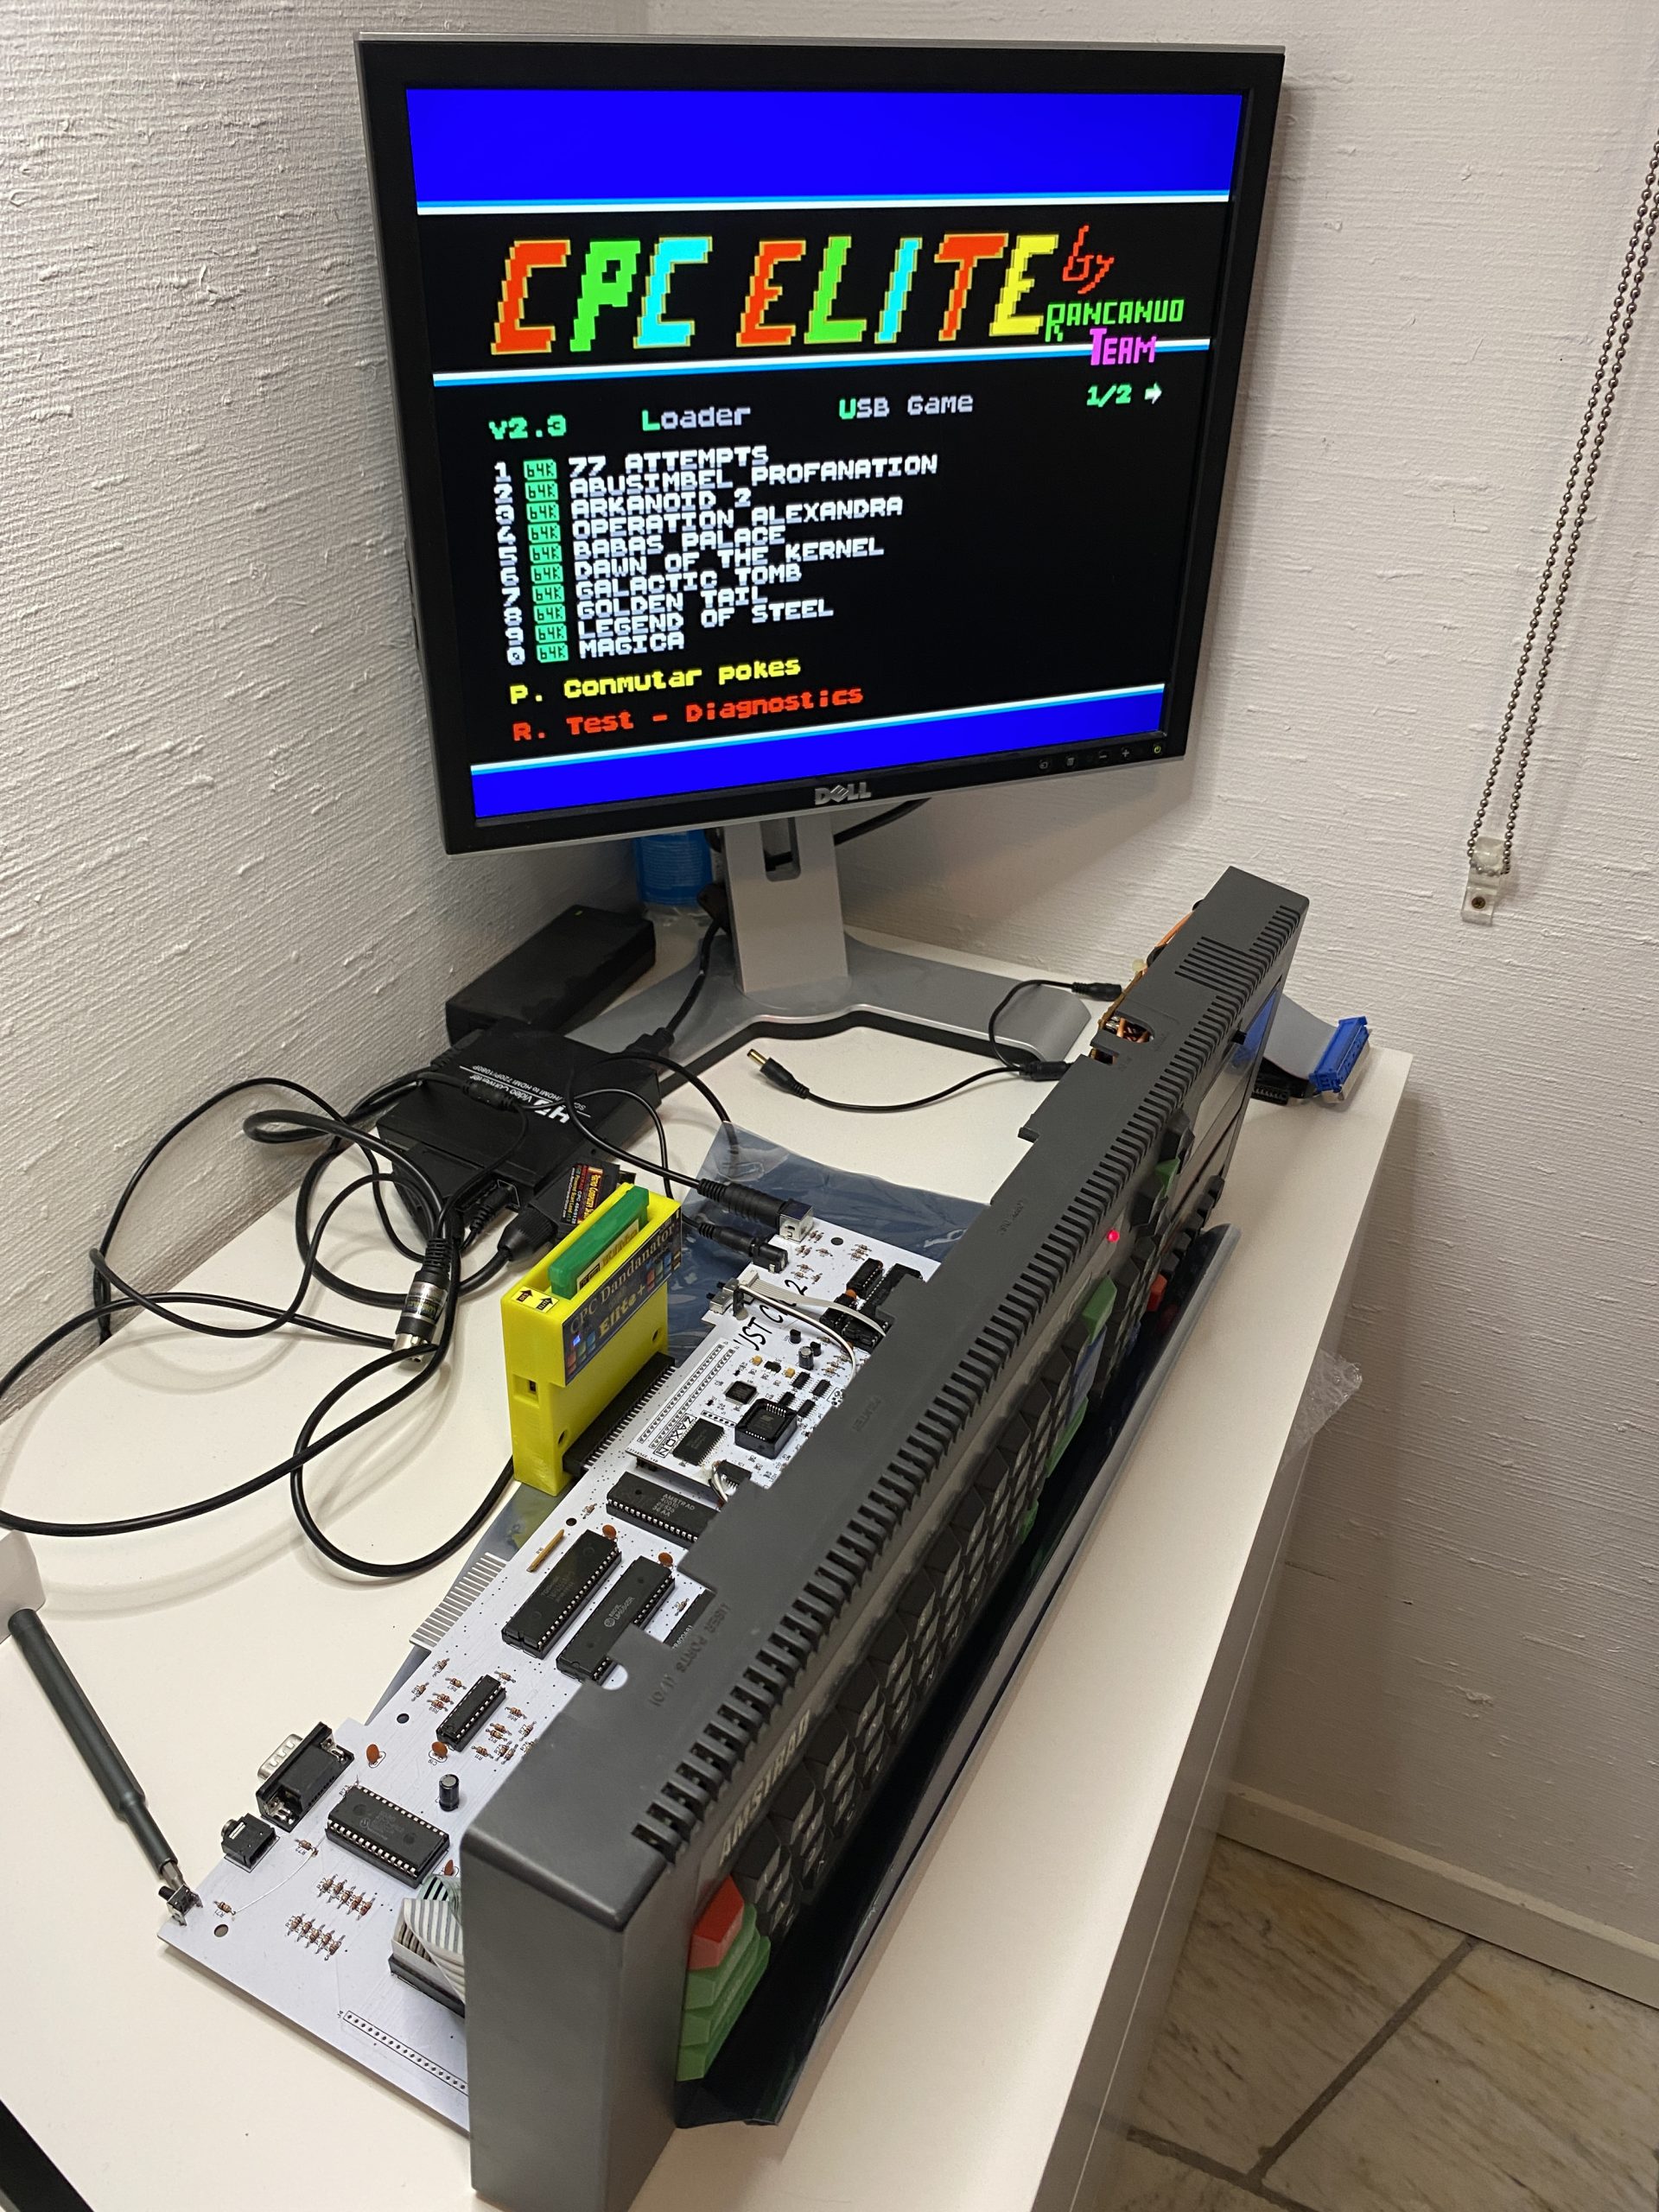 and fired up some games, all looked good to me.
I guess the benefit of this board is that it gives you the ability to give life back to a dead CPC 464 (assuming you have one with a dead motherboard. It also allows you to add 32 ROMS and use 576k of RAM, to run things like SYMBOS on your CPC 464. It also offers a built in Digiblaster and that’s something very cool indeed.
The board cost me 150GBP plus shipping, so it was not cheap, it’s very well built, and I think the white motherboard looks lovely especially when you compare it to the usual green motherboards in CPC computers.
I think the motherboard is so cool looking that I’d love to see a see-through CPC showing off this mobo on the inside, maybe someone who is good with plastics can help me with that ?
While researching this board I came across the following forums post. Long story short, some people accused Zaxon of salvaging old Amstrad CPC 464’s to pull out the custom Gate Array chips made by Amstrad. There are 5 pages of replies from different folks including Piotr so if you want to take a look go ahead.
Great hardware let down by poor documentation, but hey, that gives people like me something to do 🙂
I blogged about the DDI5 here and I wanted to also do a video showing the capabilities and challenges I had with the device, please check it out and subscribe if you haven’t already.
The comments on the video were interesting, some people saying that the folder navigation behaviour can be changed by customizing the firmware, and that’s something I need to test later on.
Update firmware procedure. Copy latest Flash floppy firmware from the Keir webpage, copy the UPD file to your pendrive . Press the hold the right button, power on interface. Release the button, the firmware update will start. After few seconds , it is done. Simple as that https://github.com/keirf/FlashFloppy/wiki/Downloads
Anyone who is active in the Amstrad scene today should be aware of the myriad of 3rd party retro hardware available today for their Amstrad CPC’s, and the DDI interfaces from Piotr Bugaj (Zaxon) are no exception.
He has recently released a new version called the DDI5 for Amstrad CPC 464. DDI stands for Disk Drive Interface and this is the 5th iteration.
So Let’s take a look.
 But first off, what is the DDI5 exactly ? In it’s simplest form it’s basically a floppy disc drive emulator that allows you to connect a USB drive and read DSK files on the USB drive directly as if they were floppy disks. What’s more, there’s an external FDD connector on the side of the DDI5 to allow you to connect up a real Disk Drive or Gotek drive.
What else, it has a 512KB expansion RAM pack built in (cool, check out this list of software that works with > 64k ram on a CPC) and you can flip between the built in AMSDOS rom and PARADOS 1.52. There were earlier versions of the DDI devices from Piotr, and he’s even selling the DDI4 interface currently on sellmyretro. I chatted with him to get an idea of the differences between the earlier devices and the DDI5 and here’s what he said (edited).
The DDI 3 is an earlier version of the DDI5. The difference is : DDI5 has a 3d printed case, it also has a 512 ram expansion and different display. Both the DDI3 and DDI5 have on board USB floppy emulator for loading games from a pen-drive. The DDI 4 doesn’t have a USB floppy emulator on board so you’d need your own Gotek or floppy drive to use with the DDI4.
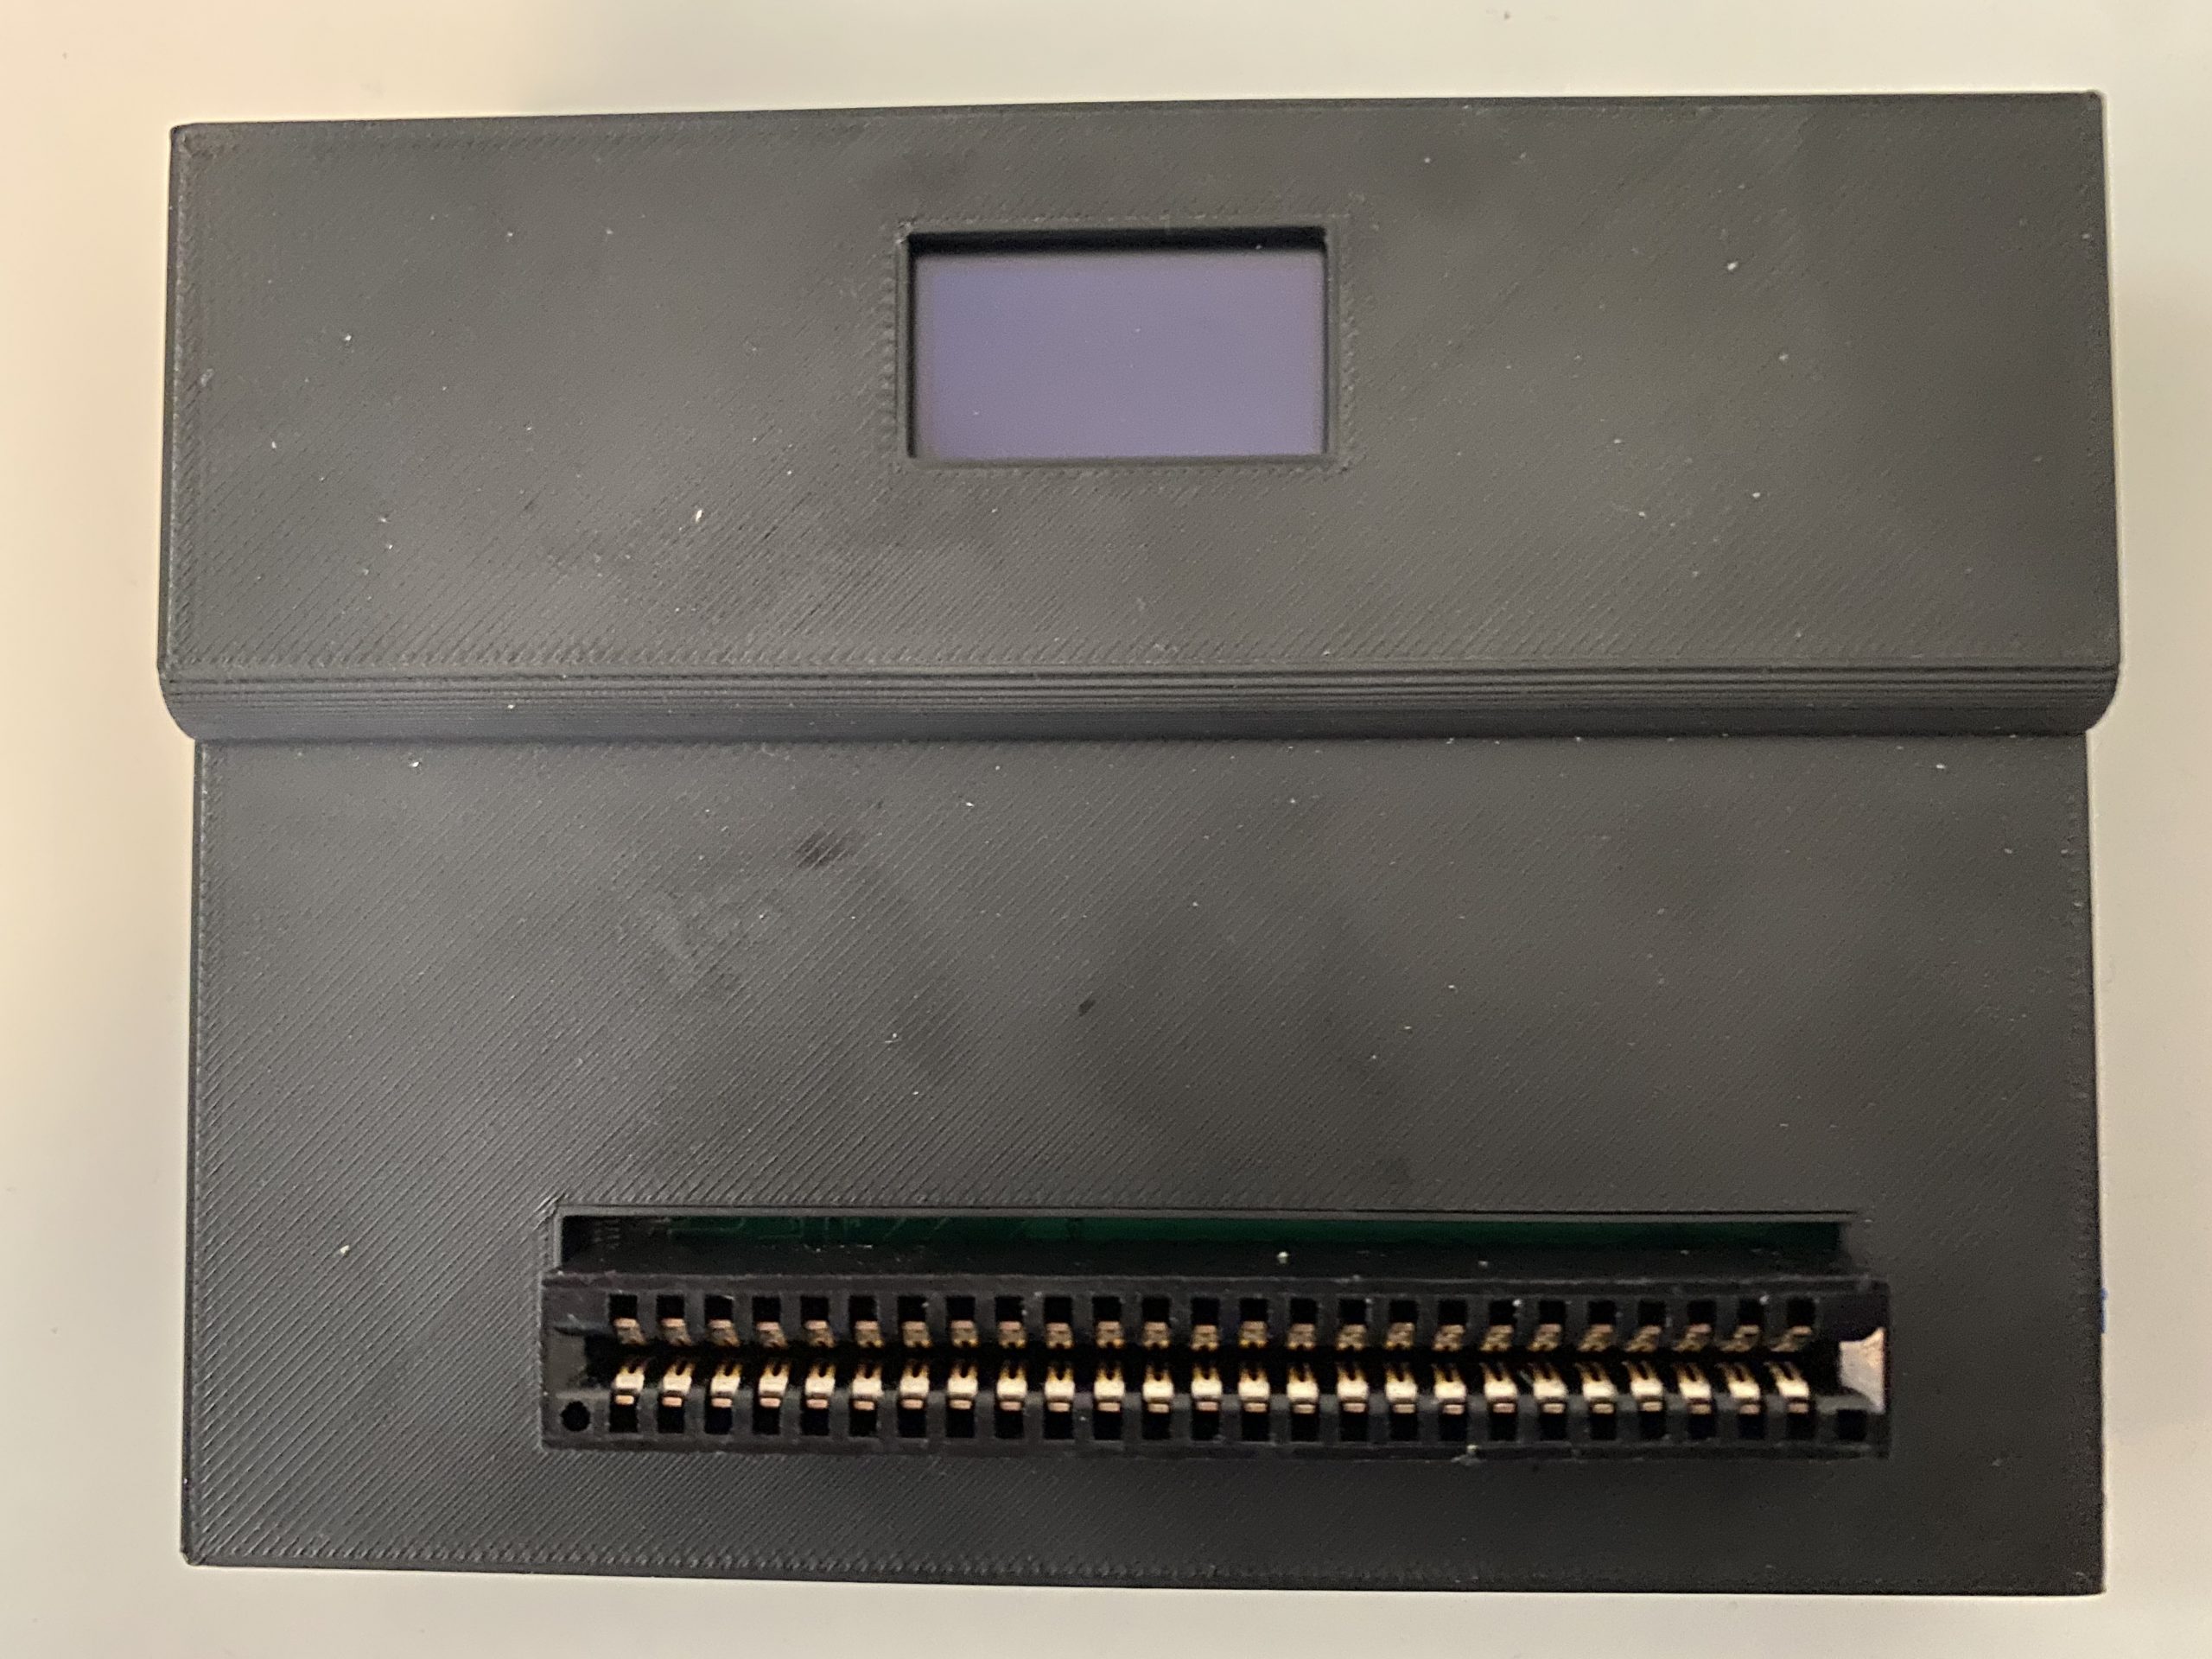
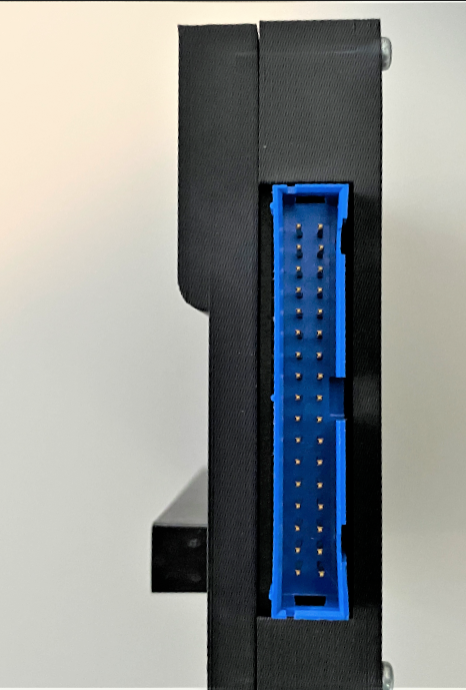
So let’s take a look at the hardware. Below you can see the device in it’s nicely 3D printed case, complete with a small LCD and 50 pin edge connector (Amstrad 464 only).
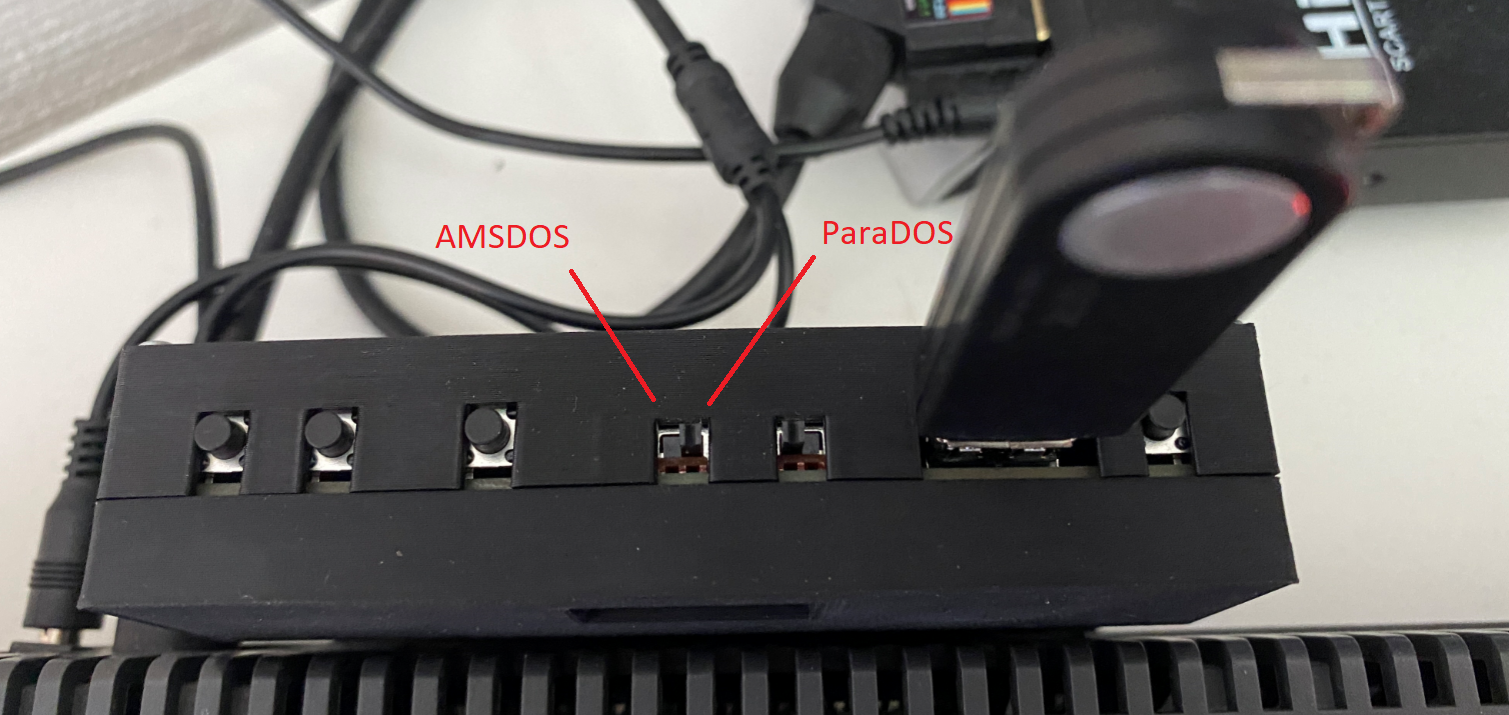
If we look at the top of the device there are a bunch of buttons, switches and a USB port. the first 3 buttons are for navigating your files/folders on the USB key. Then you have 2 switches. The first switch allows you to switch between normal AMSDOS and ParaDOS. The second switch flips the DDI from a default |a drive to |b (otherwise known as an ABBA switch).
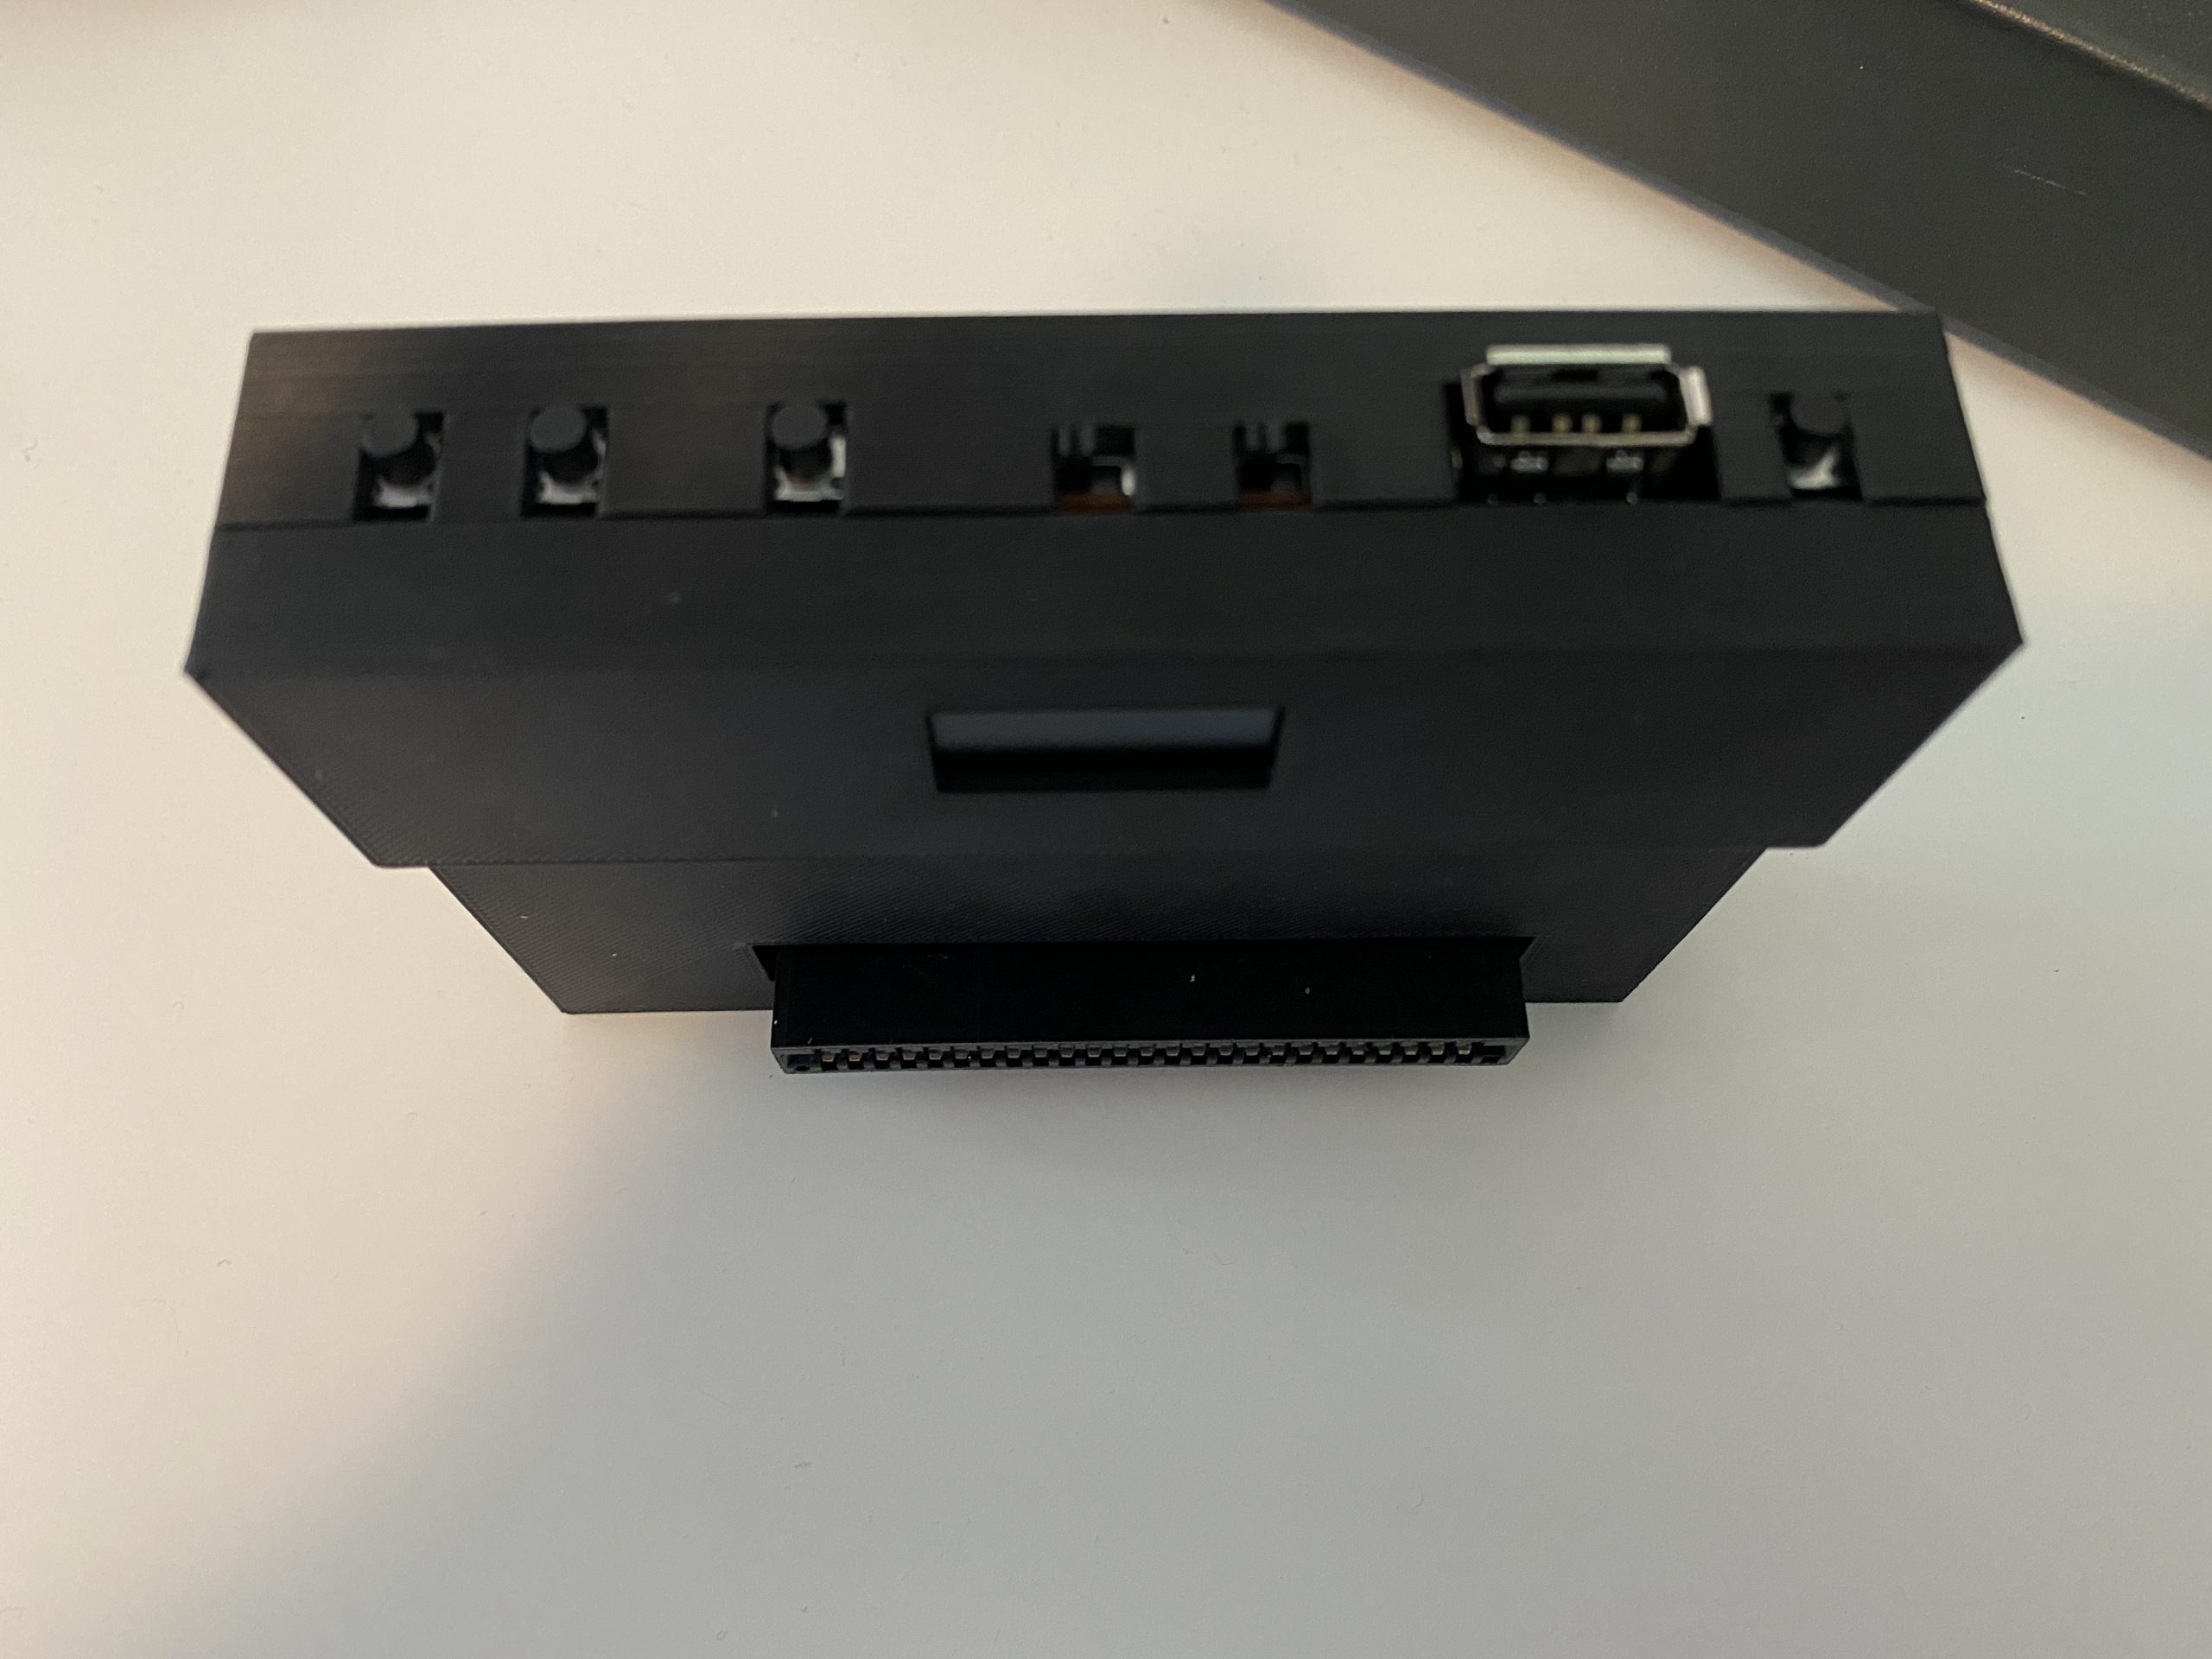 finally, to the right of the USB port is another button and that resets the CPC.
To use the device you’ll need your own USB key (or an external DDI) and copy games to that key. I already owned another Zaxon based hardware called the Amstrad CPC USB floppy emulator , budget version 😉 which uses the same type of methodology as the DDI5 so I had a ready and waiting USB key with Amstrad games in .DSK format on it.
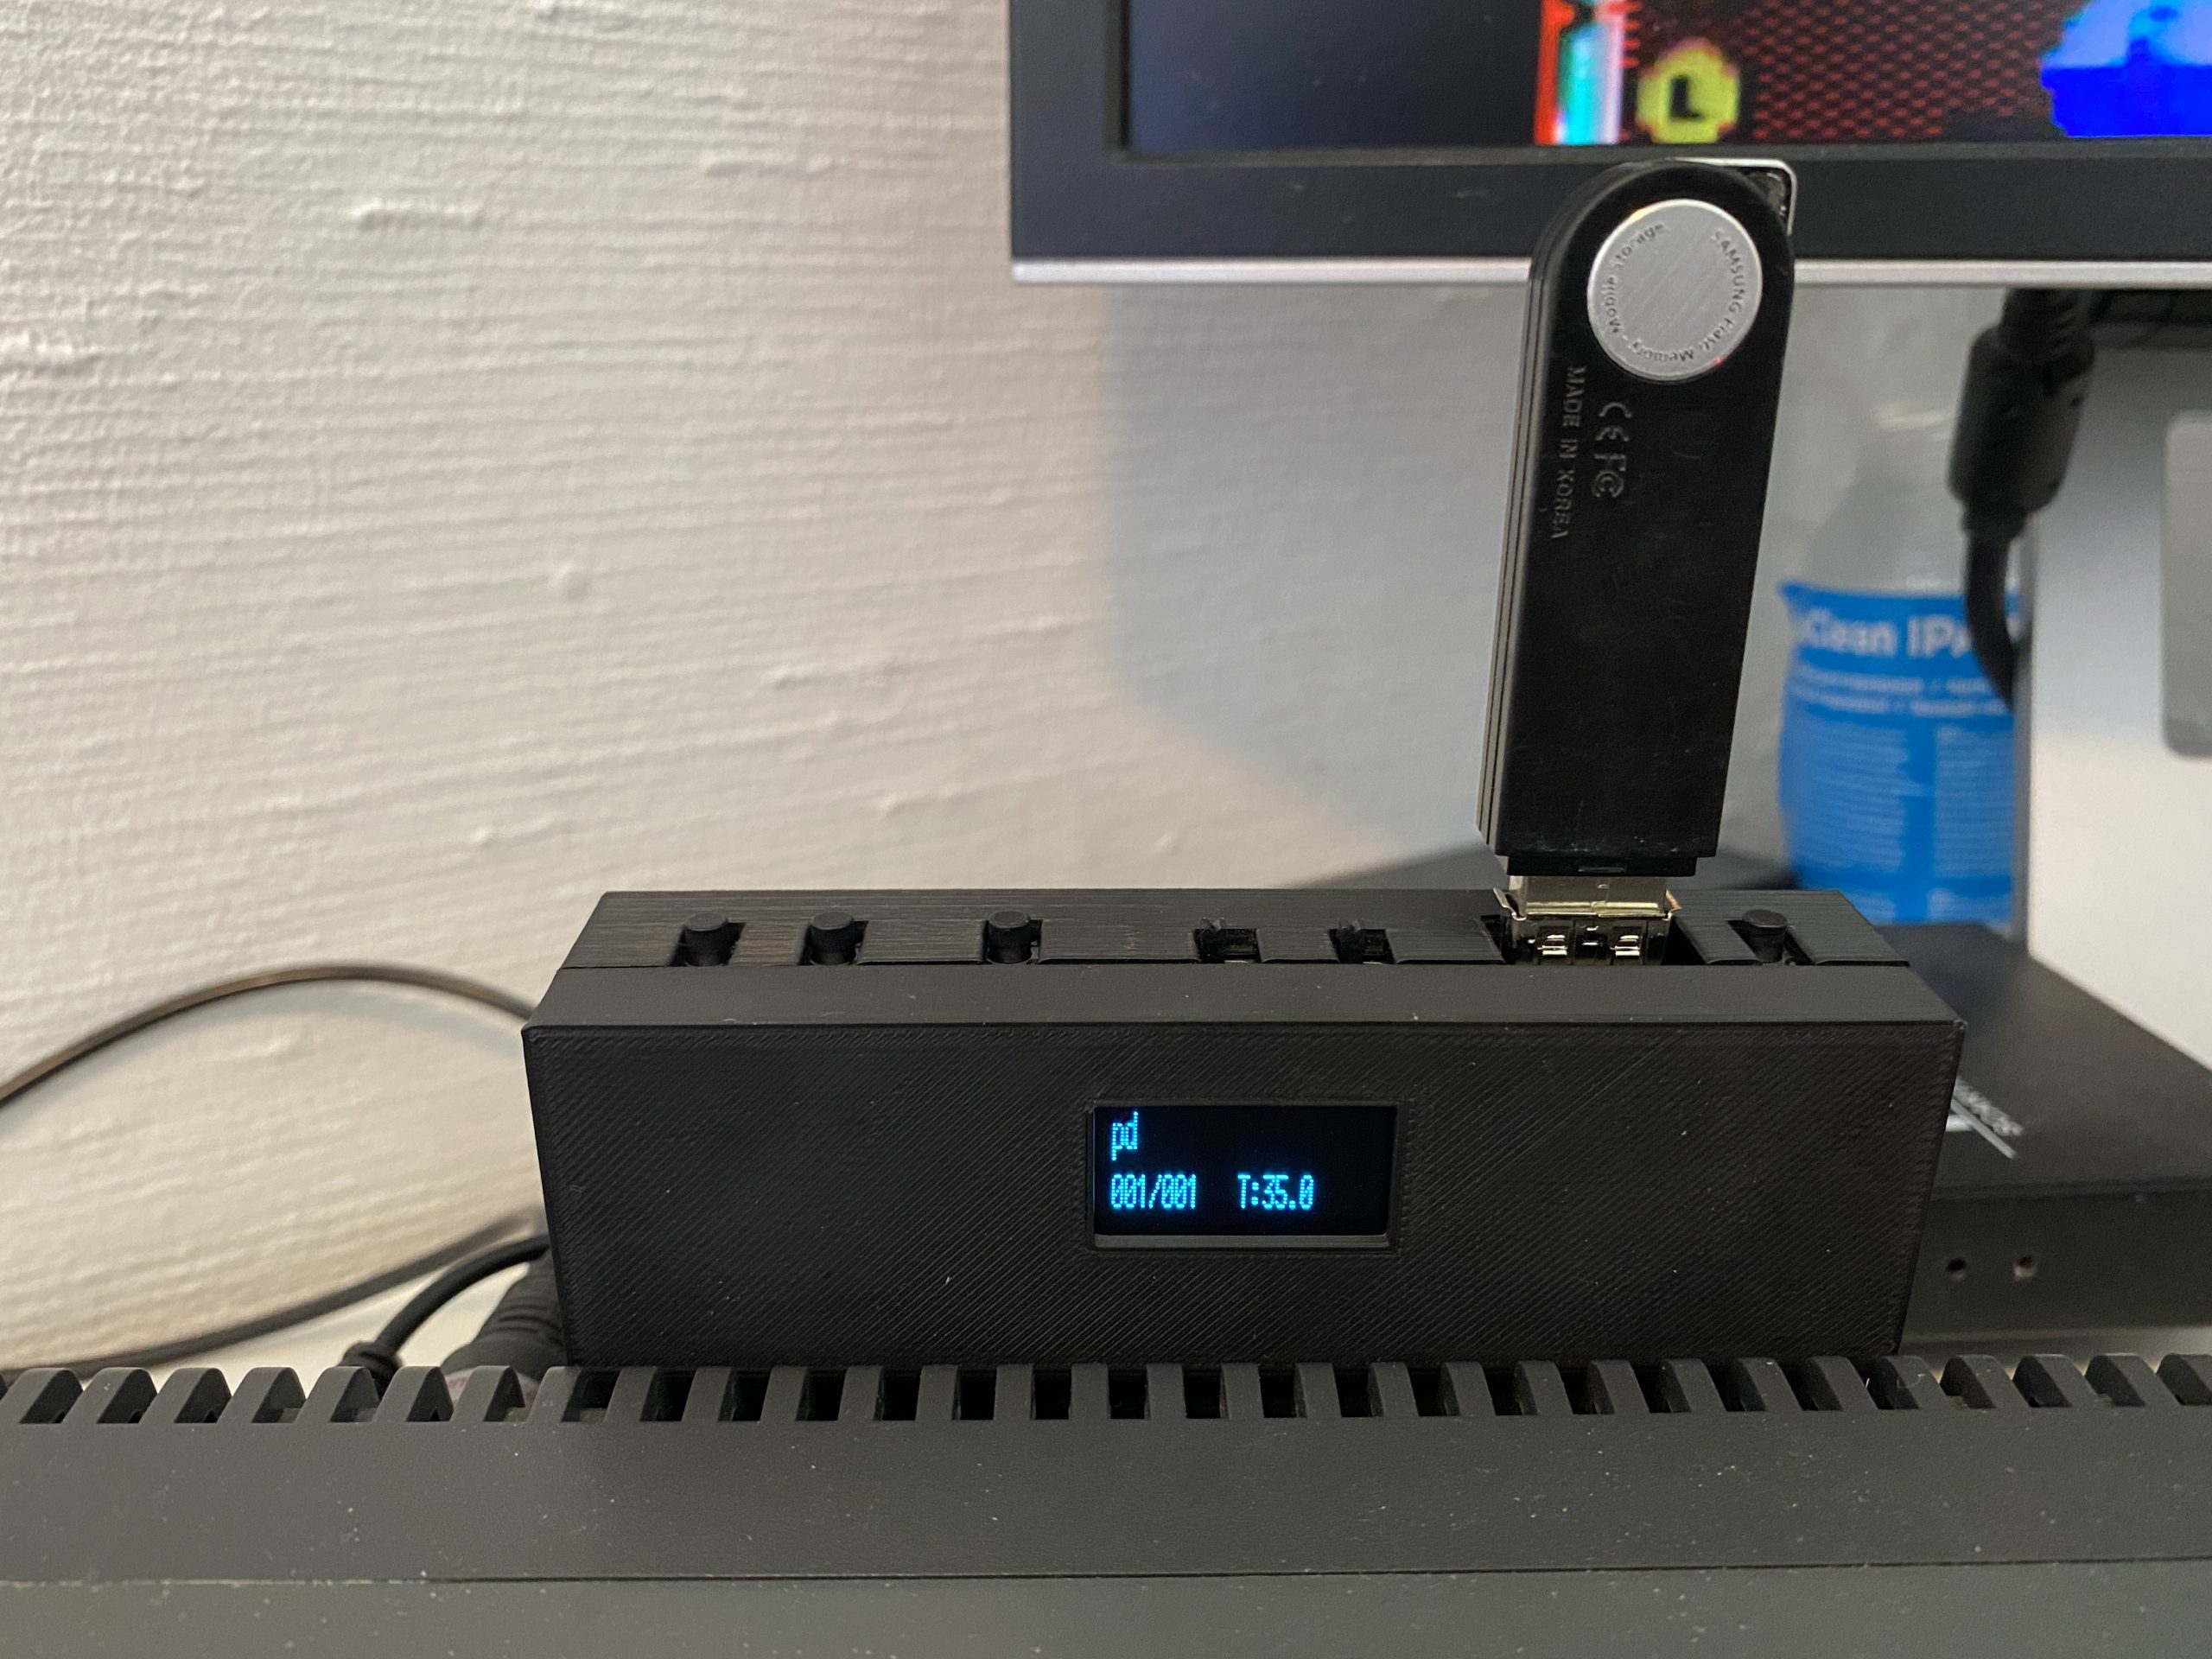
Plug in the USB key and then connect the DDI5 into the expansion port on your CPC 464 and power on the machine. The mini LCD should light up telling you the version of flashfloppy.
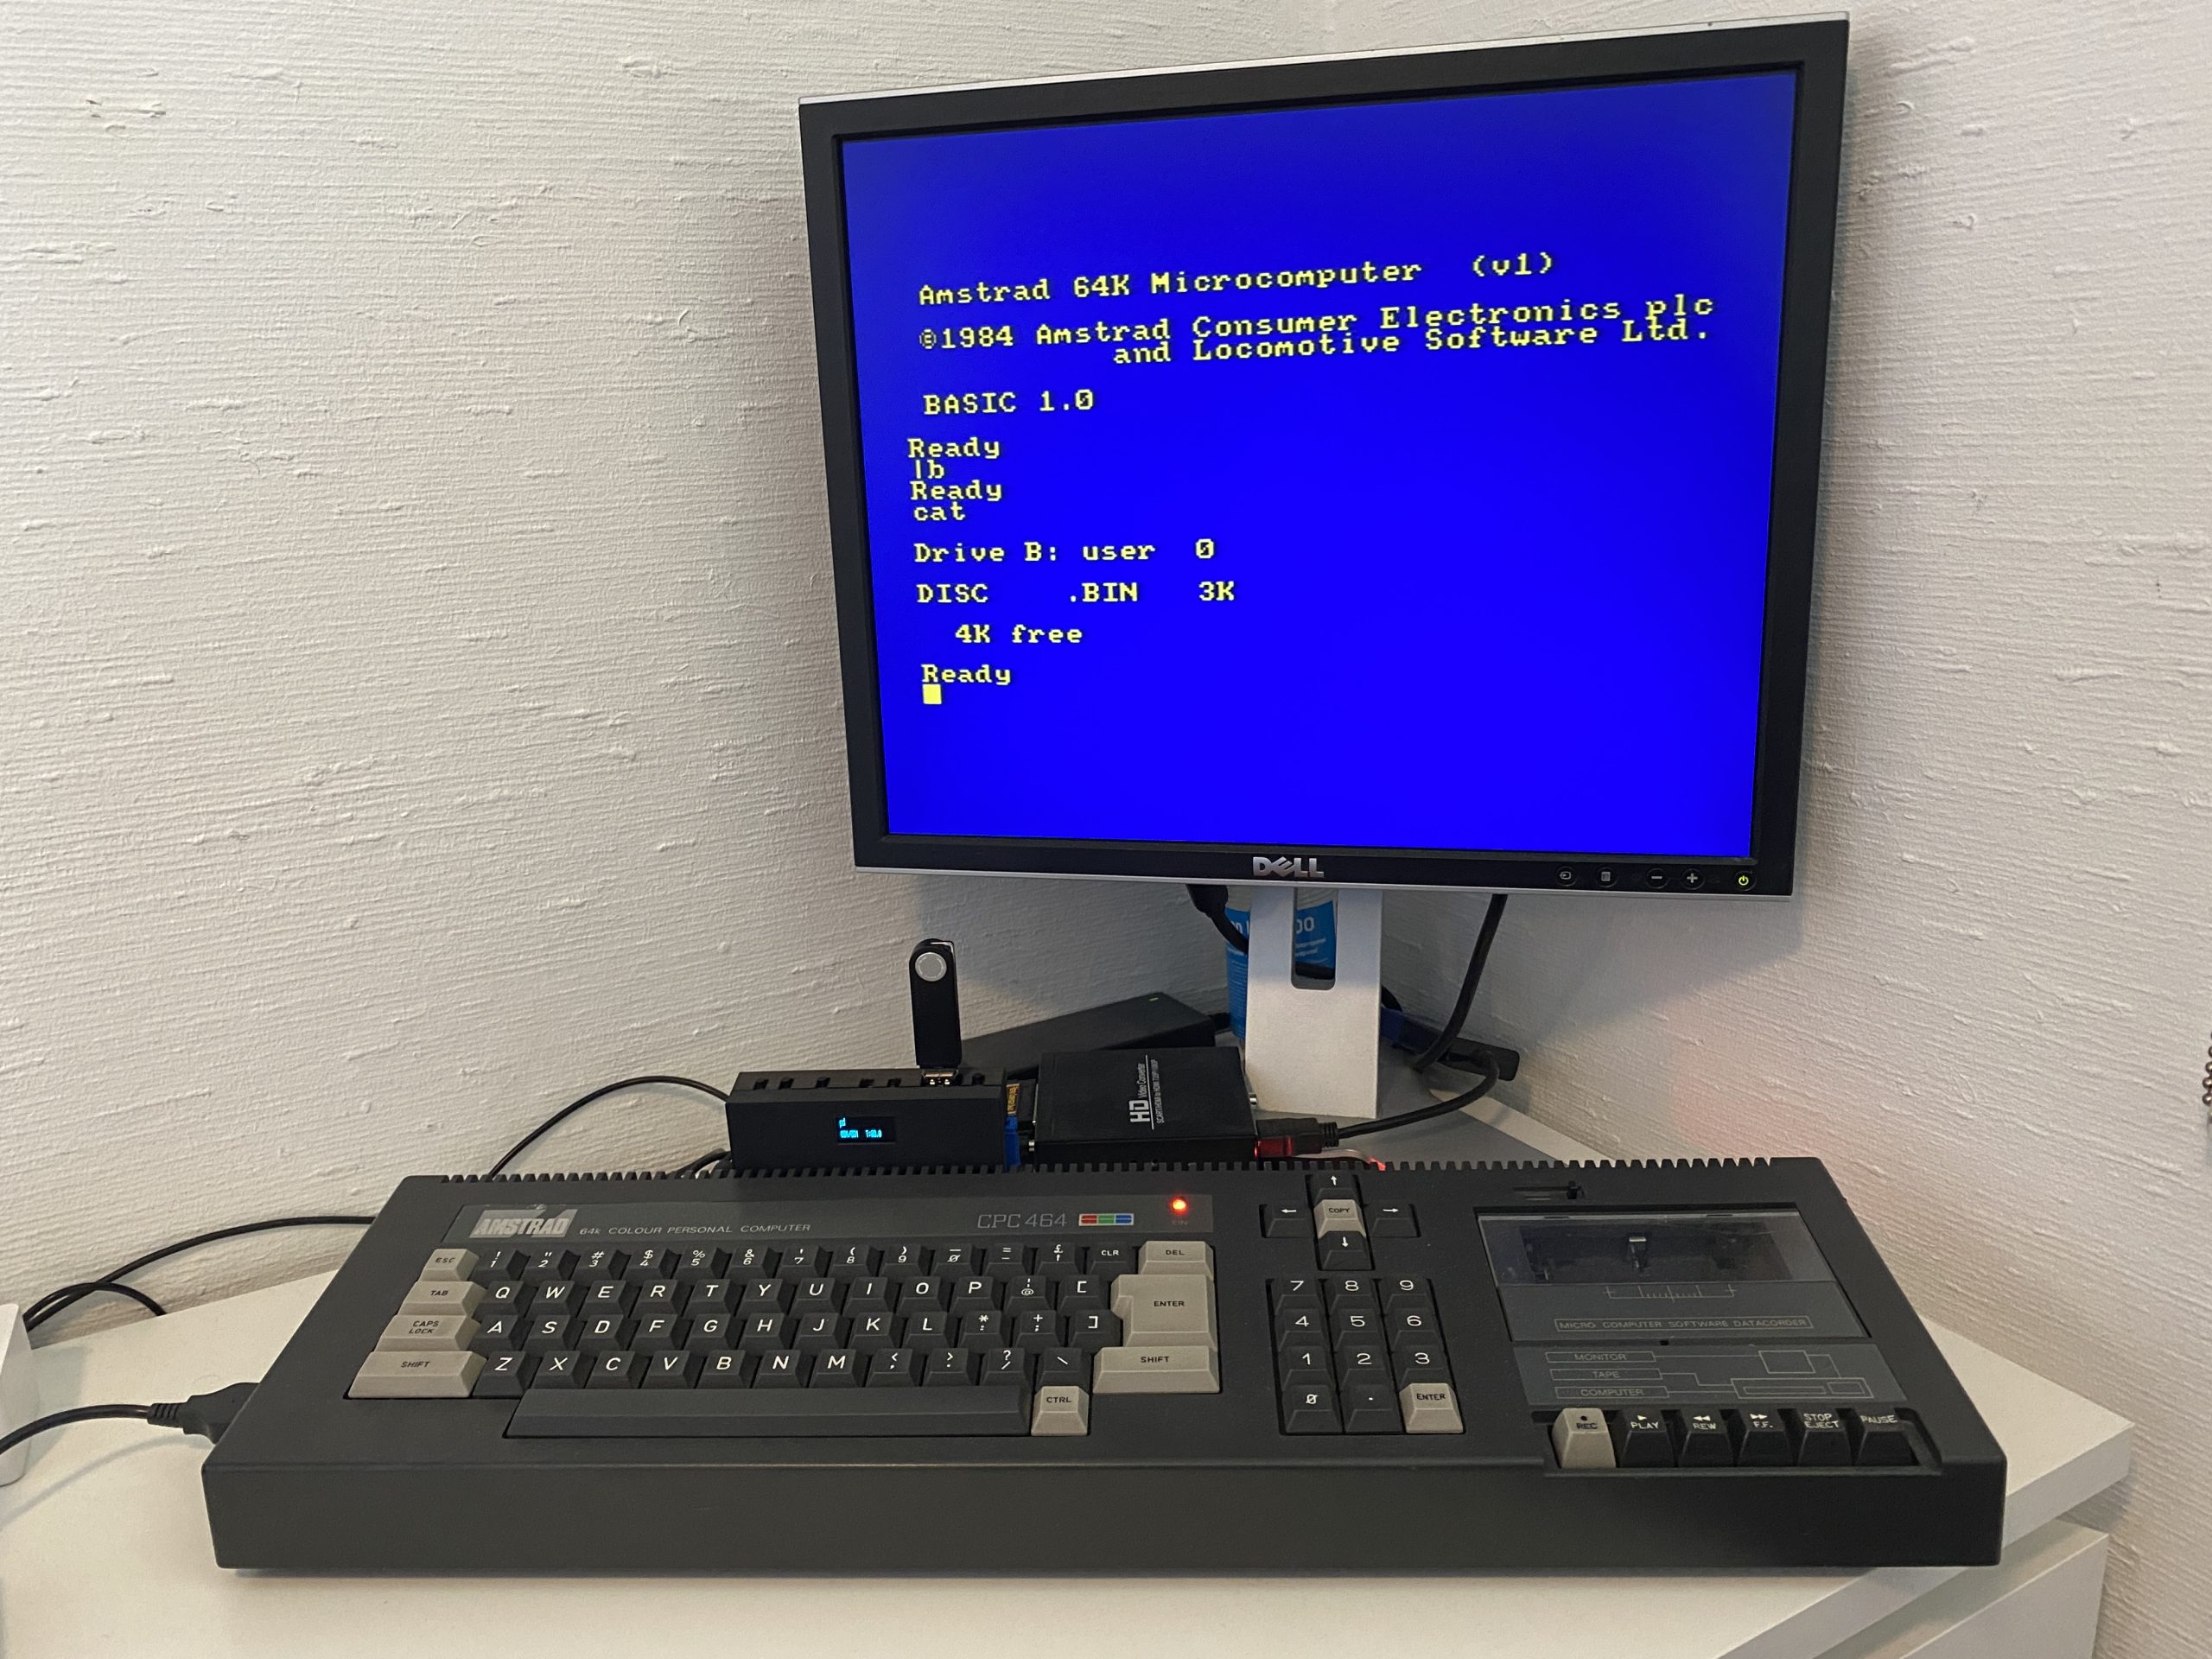
In the screenshot below it’s running AMSDOS (the built in Amstrad Disc Operating System).
 And below it’s running ParaDOS 1.2, this is done by ensuring the CPC is off and then by selecting the first of the two switches and moving it to the RIGHT.
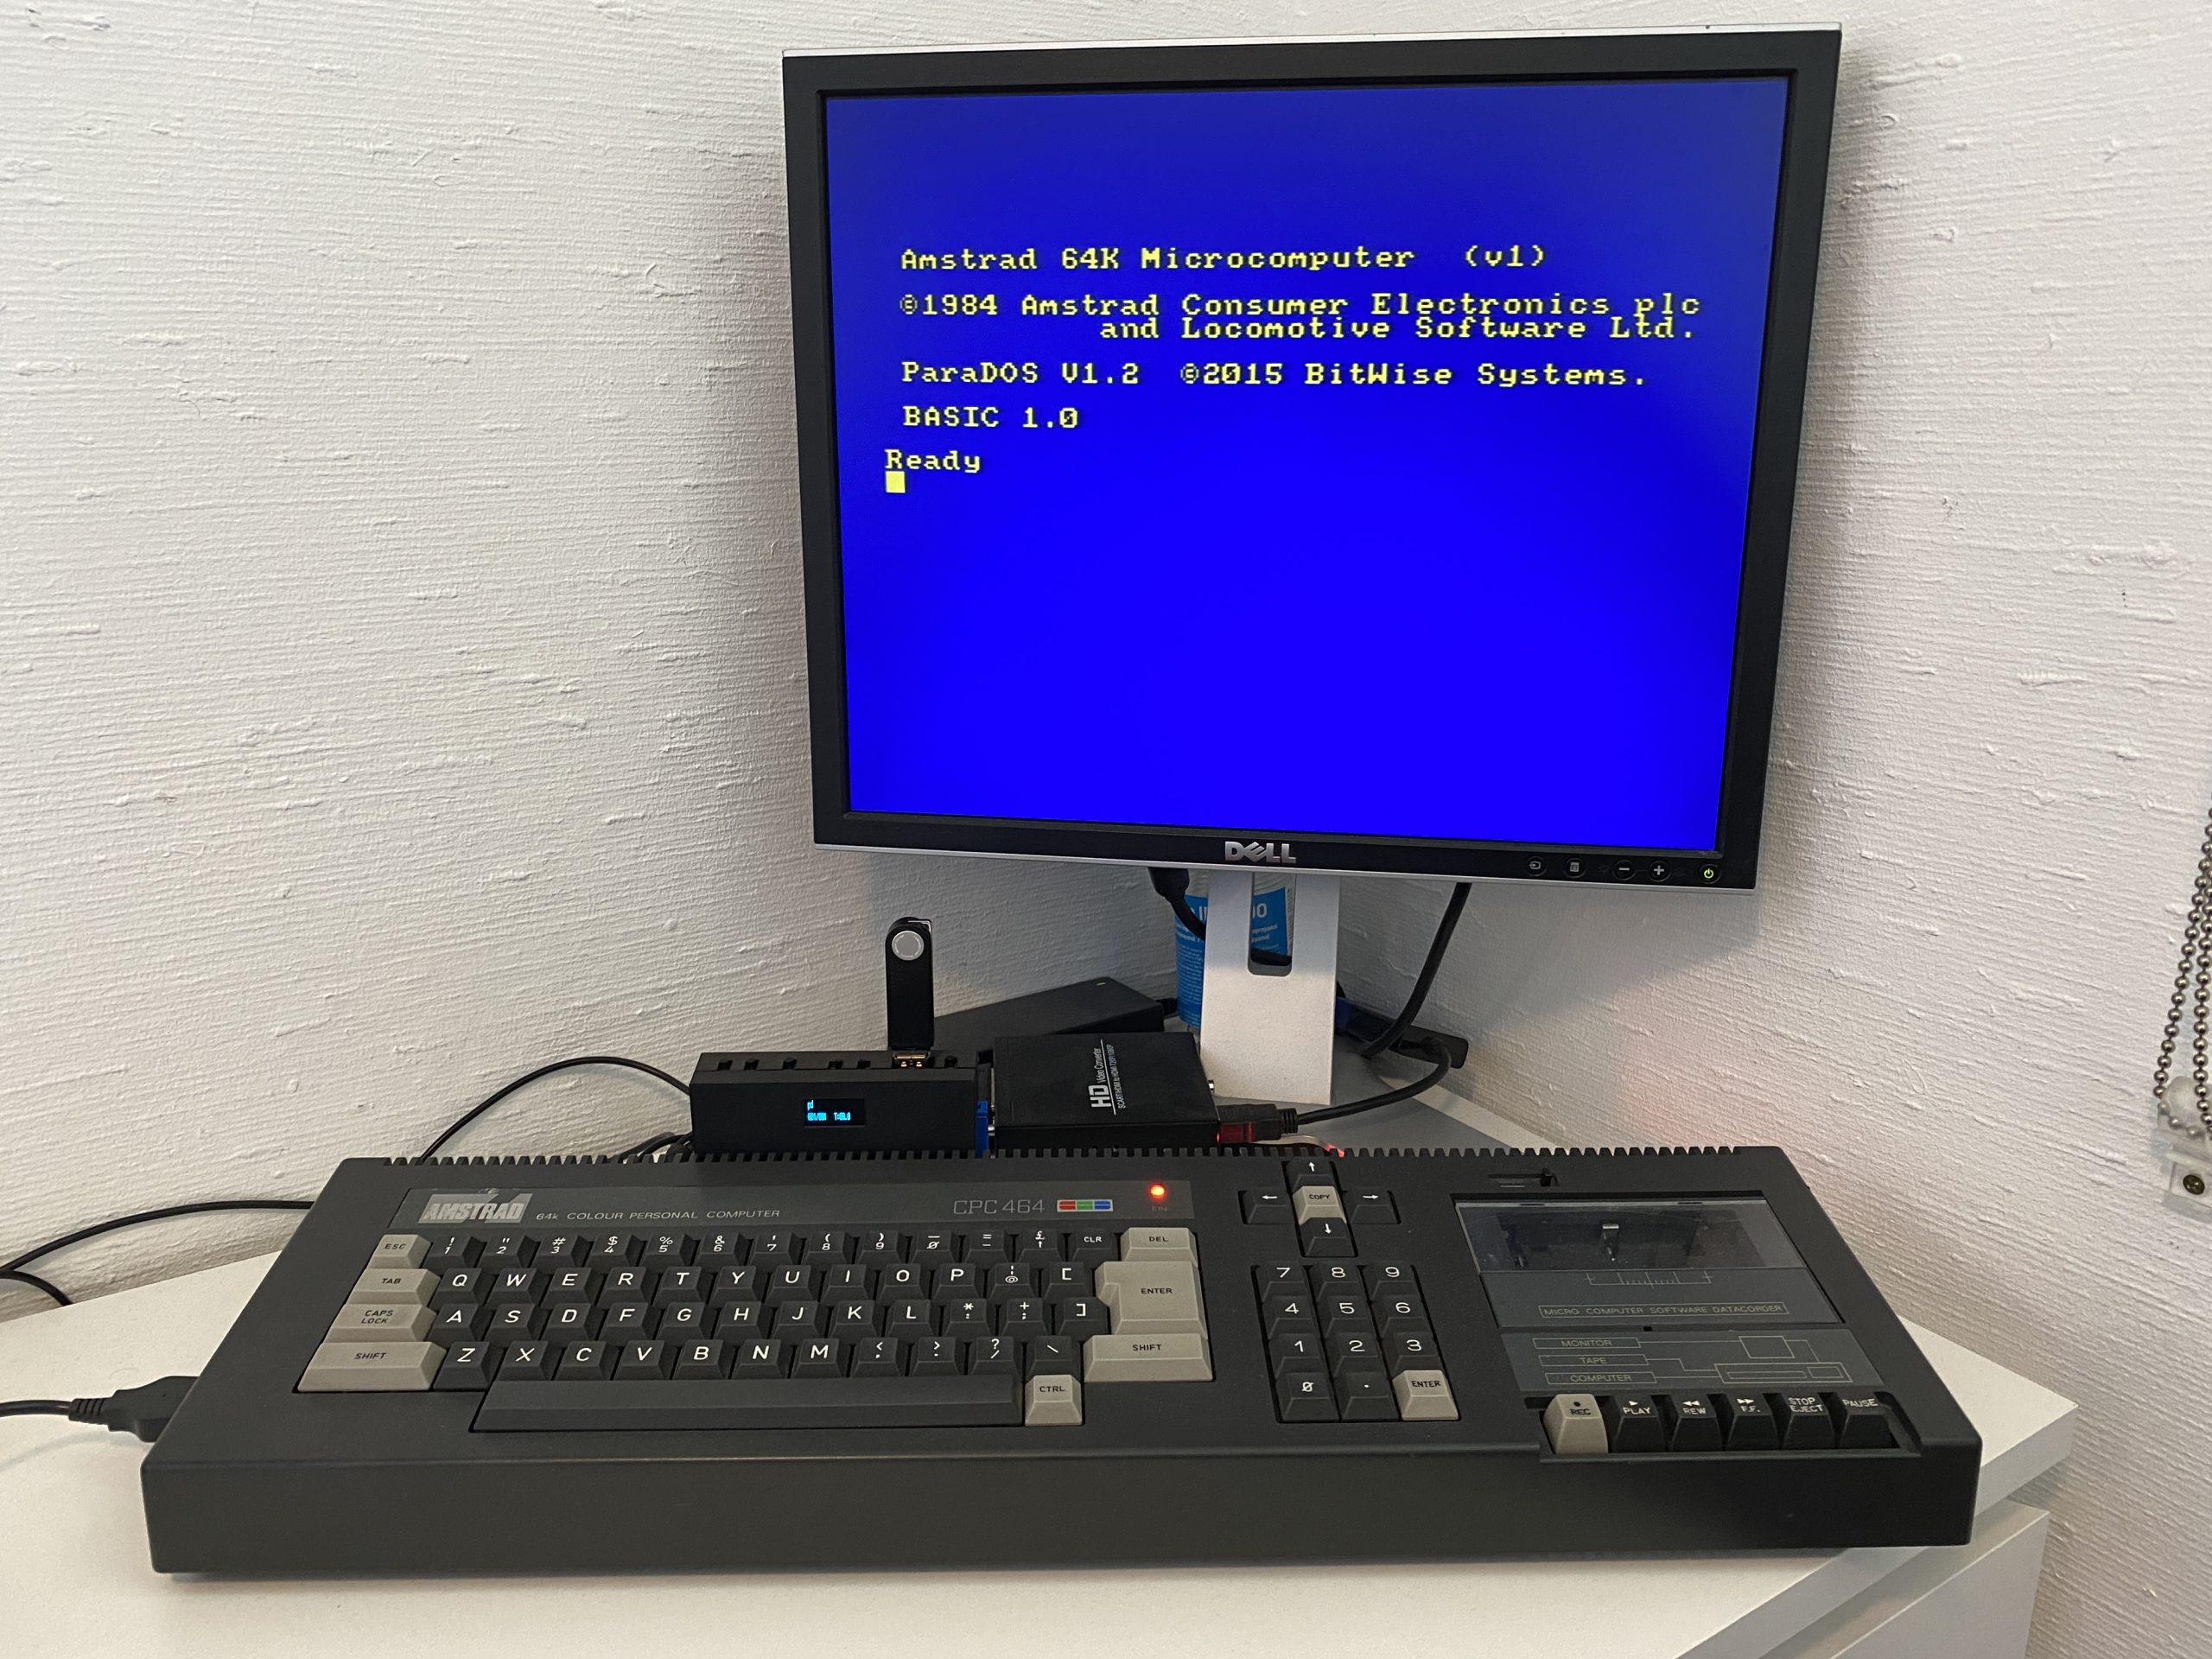 Here you can see the switch is flipped over to ParaDOS.
To switch between the default |a drive to say |b, use the second switch and move it to the right most position. This will mean that the DDI5 will only respond to |b as the drive letter (|a will be reserved for external FDDs).
On the right side of the DDI5 you can see the connector to connect up an external disc drive interface or a gotek.
 And here you can see the ABBA switch moved to the drive b setting
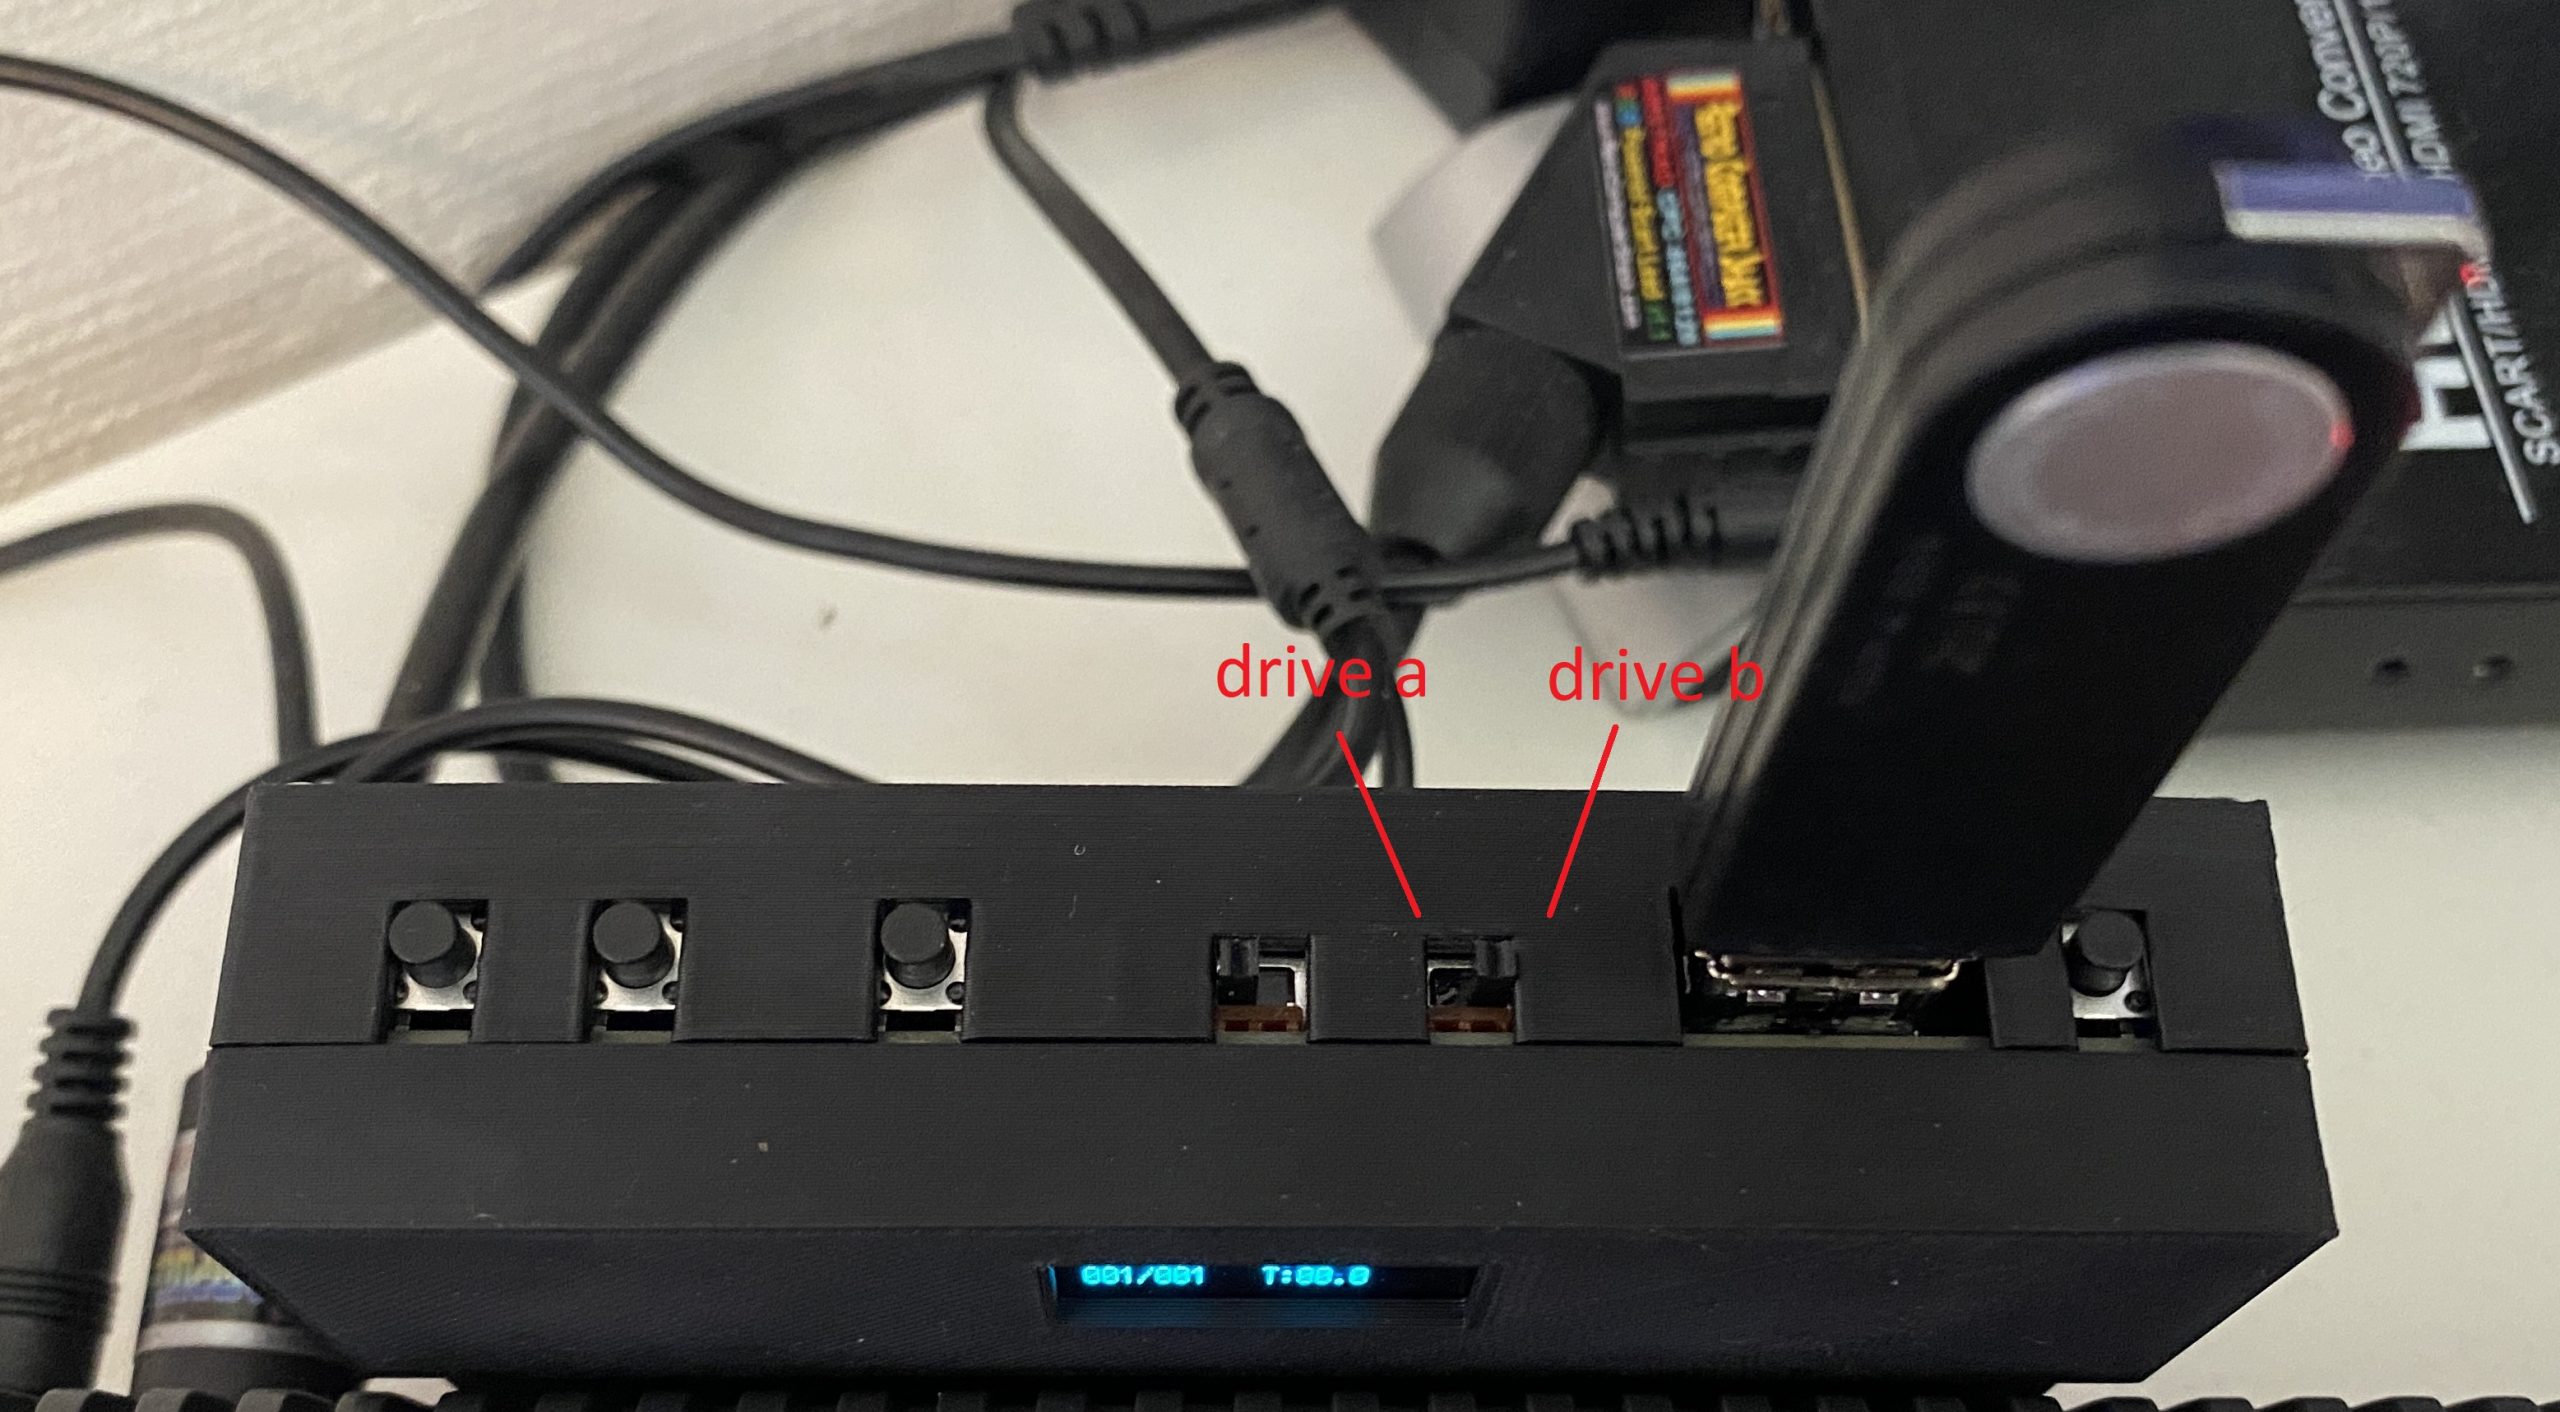 and notice how the CPC use the DDI5 as drive letter B here.
 Navigating files/folders
To navigate files/folders use the first three buttons. These 3 buttons allow you to navigate , mount and un-mount DSK images.
I find navigating hard on this device if you have multiple files/folders such as the below with each of those folders containing a file in .dsk format.
PD
-PD
–3_5_inch
–3_inch
–m4
Here’s the issue, if I press the first to select, it will show me the file or directory name in the LCD.
If it’s at the root of a folder or directory it’ll show 2 dots. [..]
Pressing the third button at this point seems to go ‘back’ one step. But it’s tricky to master and easy to get stuck in a folder or set of sub folders if you are not careful.
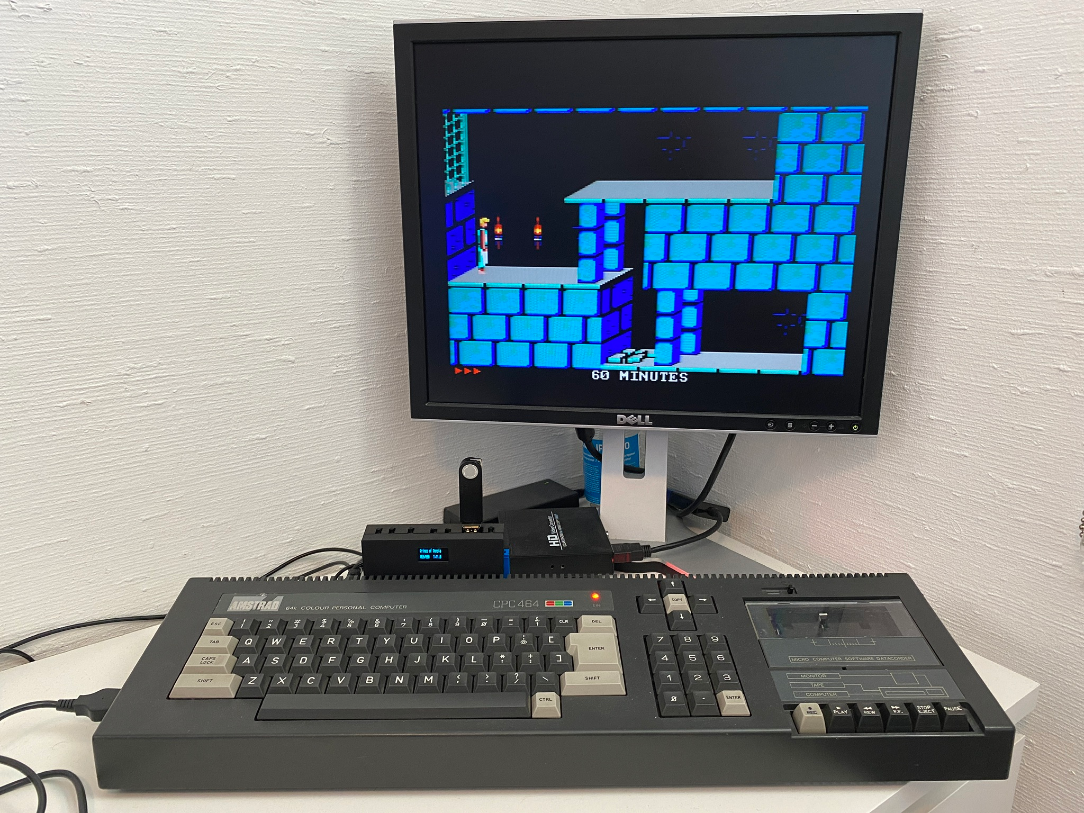
Launching a game is easy, once you’ve selected a .dsk file navigate to the drive letter by typing |a or |b depending on your ABBA switch settings. Then run “disc (or whatever the game is called).
Here you can see Prince of Persia running with ease.
 and here is Robocop, complete with audio ‘speech’ enhancements due to the extra RAM detected.
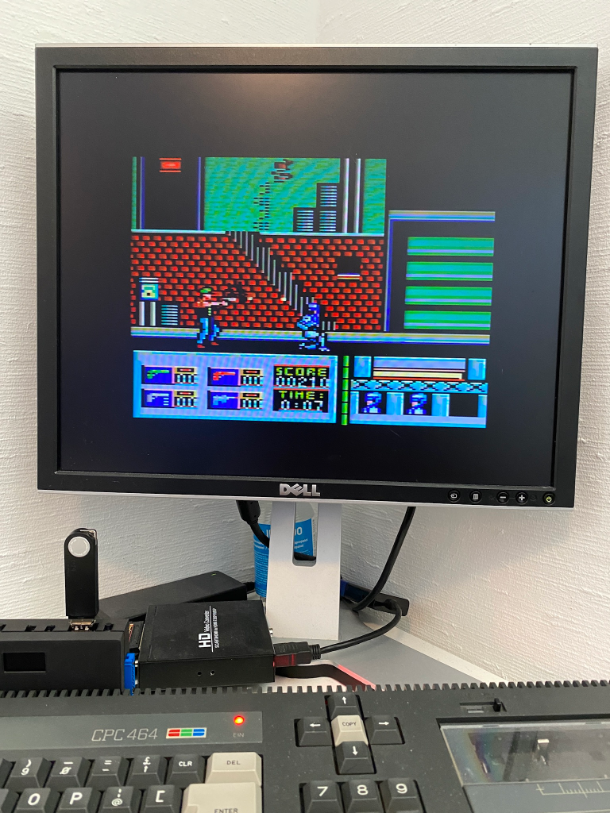
When it loads a game from the USB you can hear it emulate the sounds of reading disks, which is a cool touch, it’ll also show the virtual Track that it’s reading from, a nice touch. Loading games is about as quick as if it was loading from a real disc drive, definitely way faster and more reliable than tape.
If you’d like to buy one of these devices then head over to SellMyRetro.com, but be warned, they are not cheap. 90GBP plus shipping plus customs. I don’t get anything from the link but tell Piotr I sent you 😉
The device is really nice, very nicely 3d printed and feels solid, Piotr is a quality hardware maker and has been doing retro stuff for Amstrad and other hardware for a few years now. This is a great way to support multiple drives on your CPC 464 and to add 512kb of ram and it allows you to store vast amounts of games on a single USB drive.
You can also use this device to attach another disk drive to the CPC so that you essentially have 2 drives (A and B). Your tape deck doesn’t become non-functional either, just type |TAPE to use it.
The 512KB ram will allow you to take advantage of things like voice sampling in RoboCop.
If i have any gripes about it it would the navigation of games when there are folders involved, I find it easy to get ‘stuck’ in a folder particularly if that folder has sub folders, I’ll show what I mean in my coming video. Aside from that the device is 464 only and at this cost that limits it’s use to only Amstrad 464’s and nothing else. That’s a shame. Dandanators or M4 boards can be used on multiple Amstrad devices.
Lastly, as the device is 464 specific, it would be great if it would sit flush with the back of the 464, it doesn’t (or at least it doesn’t on my 464). The top part of the printed 3d case is too low and therefore the DDI5 can’t sit totally flush, but rather at a slight angle, this might cause issues.
Well that’s my quick look at the DDI5, what do you think of this device ? stay tuned for my video, coming soon.
cheers
niall
I blogged about the CPCuiTape here and you can now watch a video where I connect it up and try it out, please check it out and give me a like (and subscribe :p)
It’s amazing the number of active hardware projects available for the CPC computers today, we are literally spoiled for choice and there are some very clever people out there designing new hardware toys for us to play with.
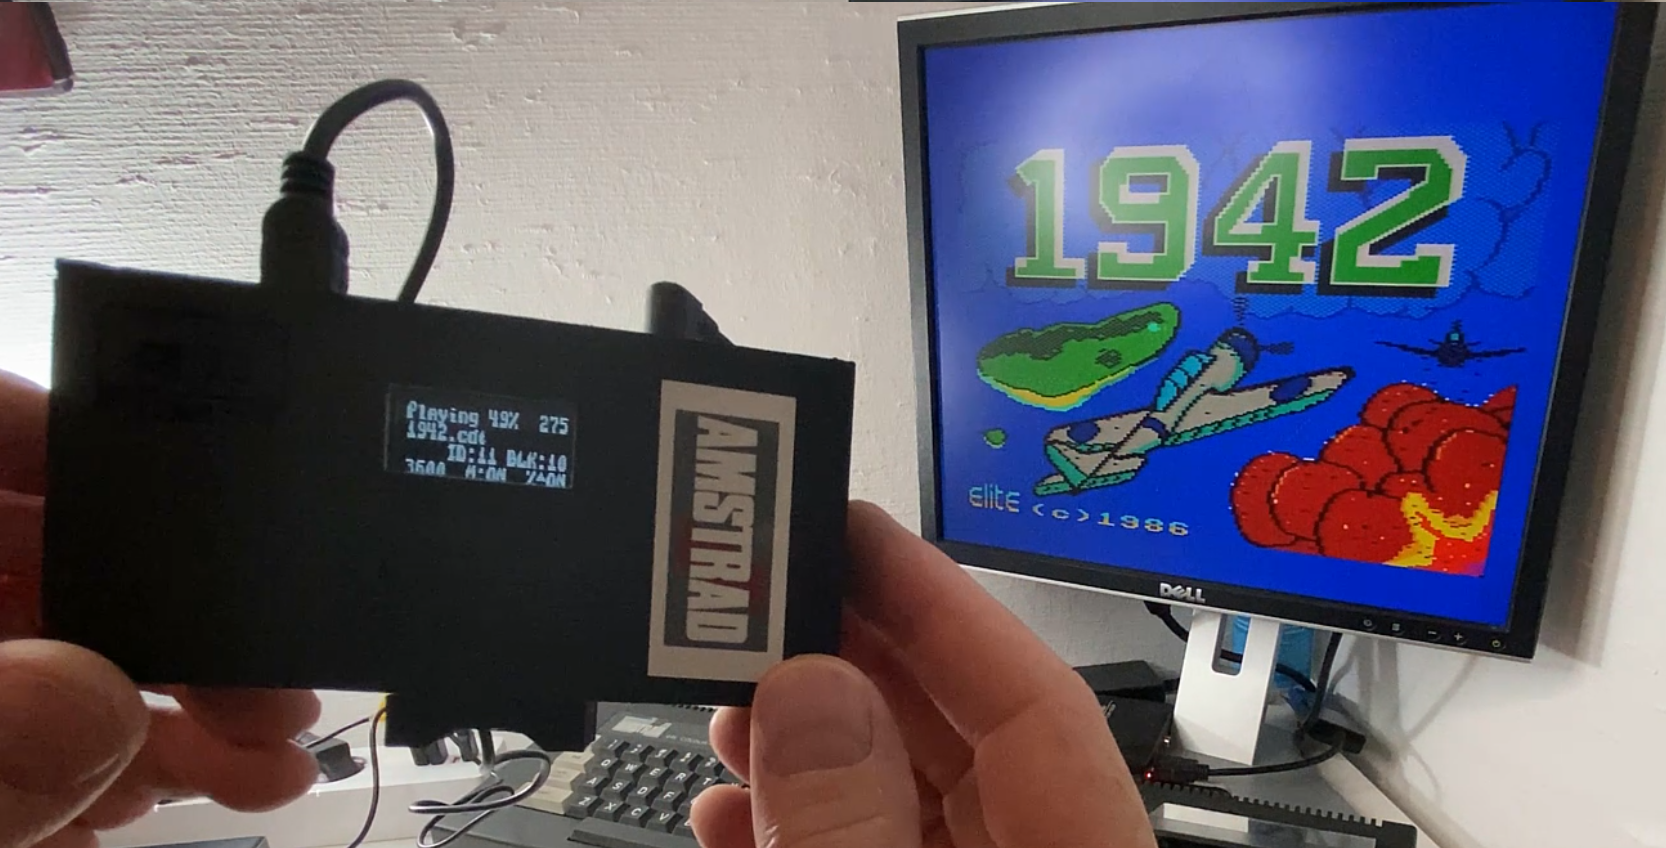
One such device caught my eye and it is called the CPCuiTape, a hardware device based on the MaxDuino firmware and is available for Amstrad CPC computers (and others) from YouMakeRobots.com.
This device gives prolonged life to all those tape games that were converted to digital format (.tzx .tap or .cdt), and allows you to store your entire collection on one SD card.
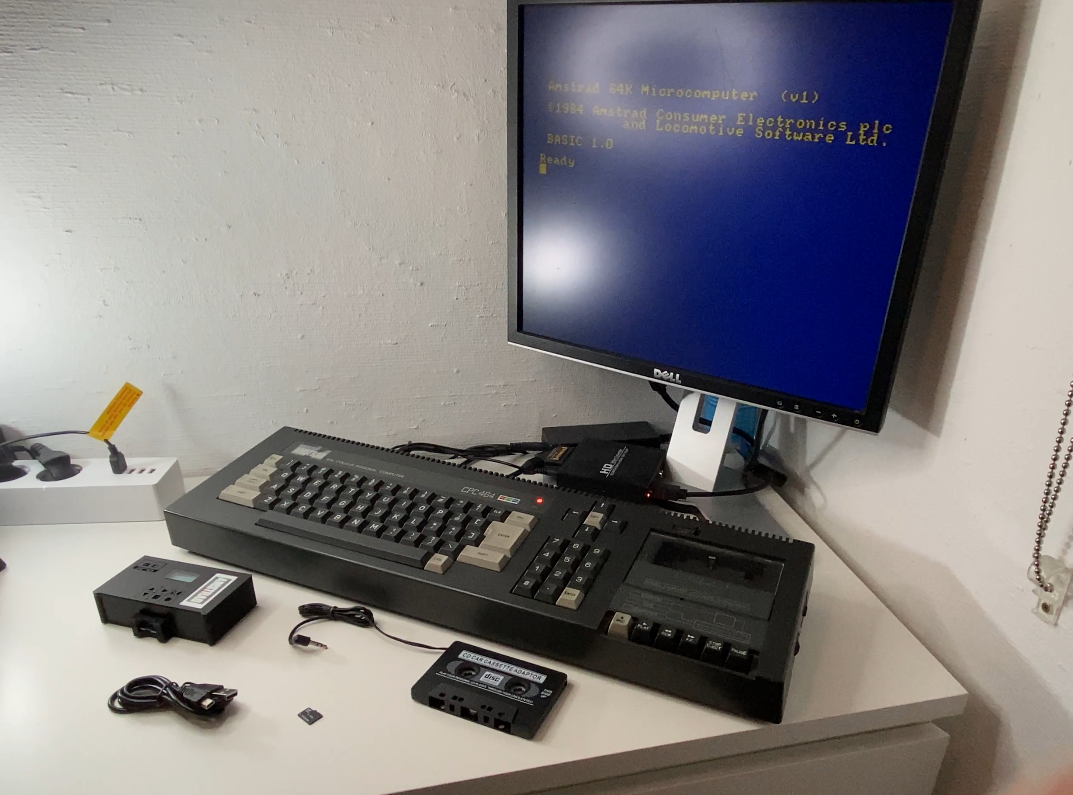
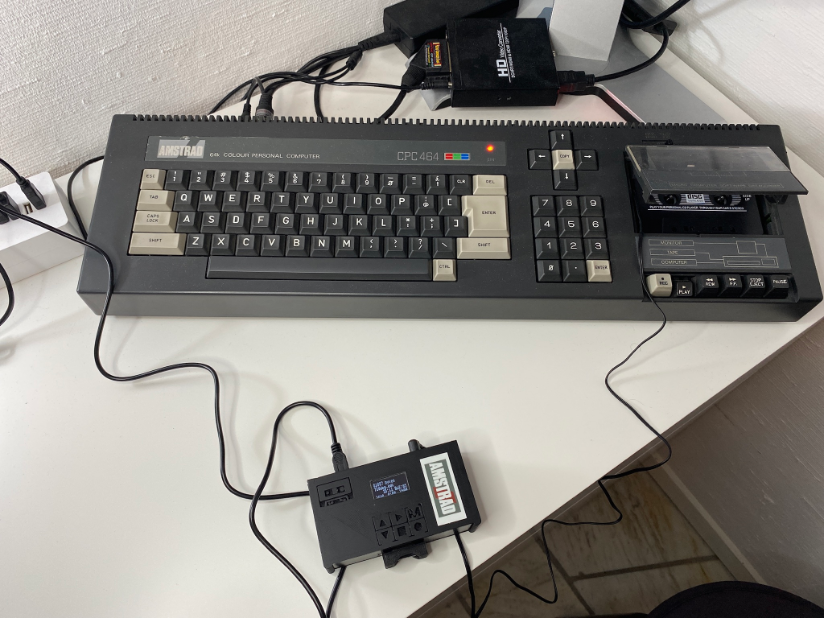
Here you can see my device complete with a usb cable (for power) and a CD Car cassette adaptor (for Amstrad CPC 464 models), in addition I have an SD card which I’ve pre-copied with some CDT files.
 Note: If you want to connect this to a CPC 6128 then you can use the tape in connector on the left of the device in conjunction with the following adaptor.
I downloaded thousands of CDT files by going to the following link and scrolling through near the end, there are a couple of links to RAR/Zip files that you can download. Once done I extracted them onto the FAT32 formatted SD card and was ready to test it.
 I then inserted the SD card into the SD slot in the center of the CPCuitape. Next I connected the USB connector to power and finally inserted the CD Car Cassette adapter into the tape deck.
 Note that you need to actually press the play key on your tape deck to get this to work (in addition to CTRL+Enter and press any key). It doesn’t matter if your tape deck needs new tape belts this will still work as it uses the read head to read the output from the CPCuitape.
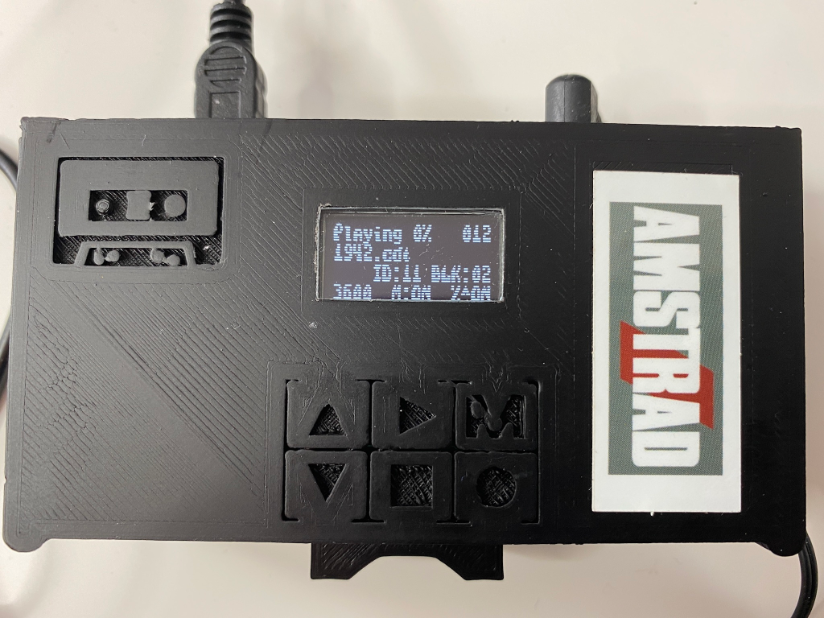 The device itself has a little LCD which shows you the file it’s playing and various other info (such as folders when browsing). The up down arrows or for browsing through the SD card and the Play button is to start playing. The stop button does just that.
Once you’ve started playing a game it’ll appear on the screen and load exactly the same way it would if you were playing from a real cassette tape. I.e. slowly 🙂 and complete with the beep bop tweet tweet noises.
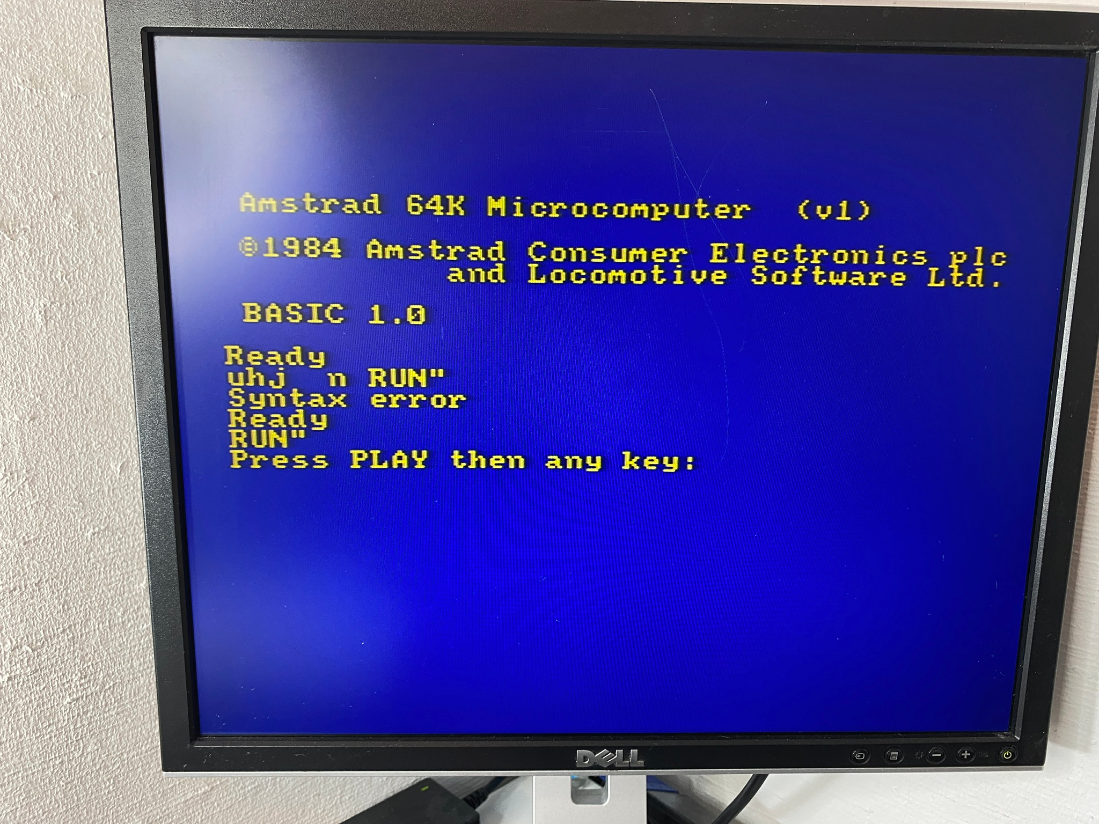 and after a while your game will appear ! Awesome !!!
There are some additional things to keep in mind, SD card class 10 cards work perfectly well (The SDFat library has been improved since that warning was put in the original firmware.) in CAS/TZX/MAXDuino. Also the CD to tape adapters have a head that is more the issue than the read head of the CPC464. It is better to add a 5-PIN DIN cassette port to the same specifications as the 6128 cassette port or an external ear but with the external ear socket you do not get the benefit of Motor Control which you do with the cassette port. (Thanks Duncan Edwards for this update).
Lastly, you cannot record to the CPCuiTape, only play.
Please do Ricky a favor and check out his stuff, you can get a CPCuiTape yourself from the following link, it’s only 29.99 GBP !!
thanks for reading !
cheers
niall
In this video I unpack a 464 + which I bought recently, and then I attempt to connect it up, I also test it with a Dandanator Elite +.
Give it a look and a like 🙂
To connect the Dandanator Elite + to the CPC 464 plus I used this connector from Neotienda, you can get it here https://neotienda.es/index.php?id_product=411…