
Introduction
I’ve already blogged about how you can connect to Wi-Fi using the M4 board and copy games and load ROMs, and here’s a video showing you how to do that from scratch.
I’ve already blogged about how you can connect to Wi-Fi using the M4 board and copy games and load ROMs, and here’s a video showing you how to do that from scratch.
In a previous post I looked at the M4 board from Spinpoint, please check that out and get your CPC connected to Wi-Fi before trying this part.
A ROM (Read Only Memory) is a dedicated chip that stores programs or functionality together in one place and they take up very little of the CPCs’ memory. Each ROM is usually 16K in size. Below are some famous ROMs that were available back in the late 80s’.
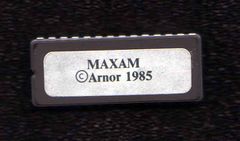
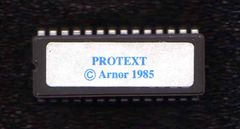
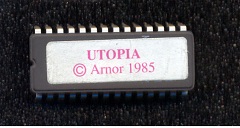
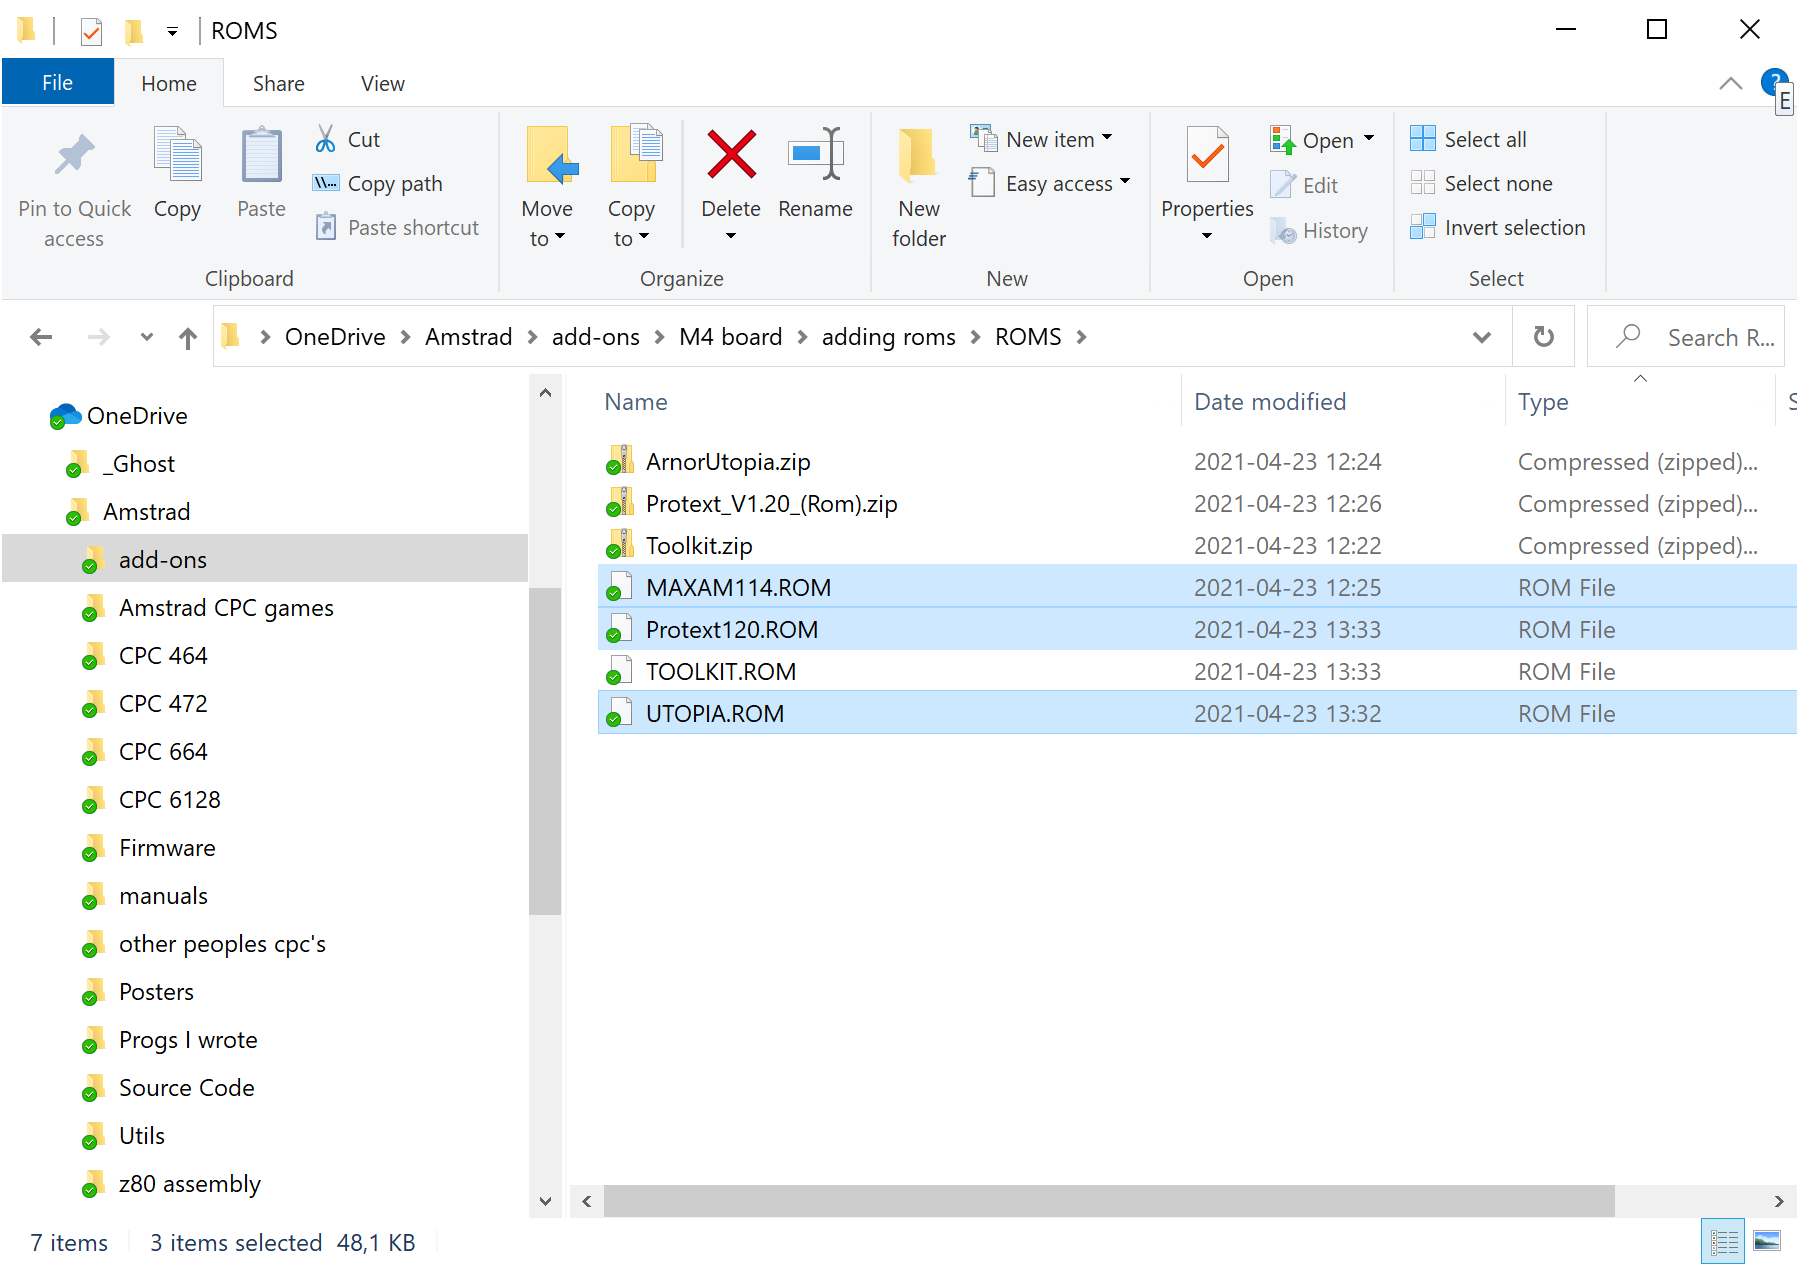
I will use a few ROMs freely available from here in this blog post. Download a few sample ROM files, and unzip them if necessary.
Once your M4 board is connected to Wi-Fi, using a computer that is on the same Wi-Fi network as the CPC, browse to the IP address revealed in the |netstat command. My CPC is using IP address 10.0.0.4 so I’ll use that as the web address.
http://10.0.0.4/ and click on the Roms heading as shown below.
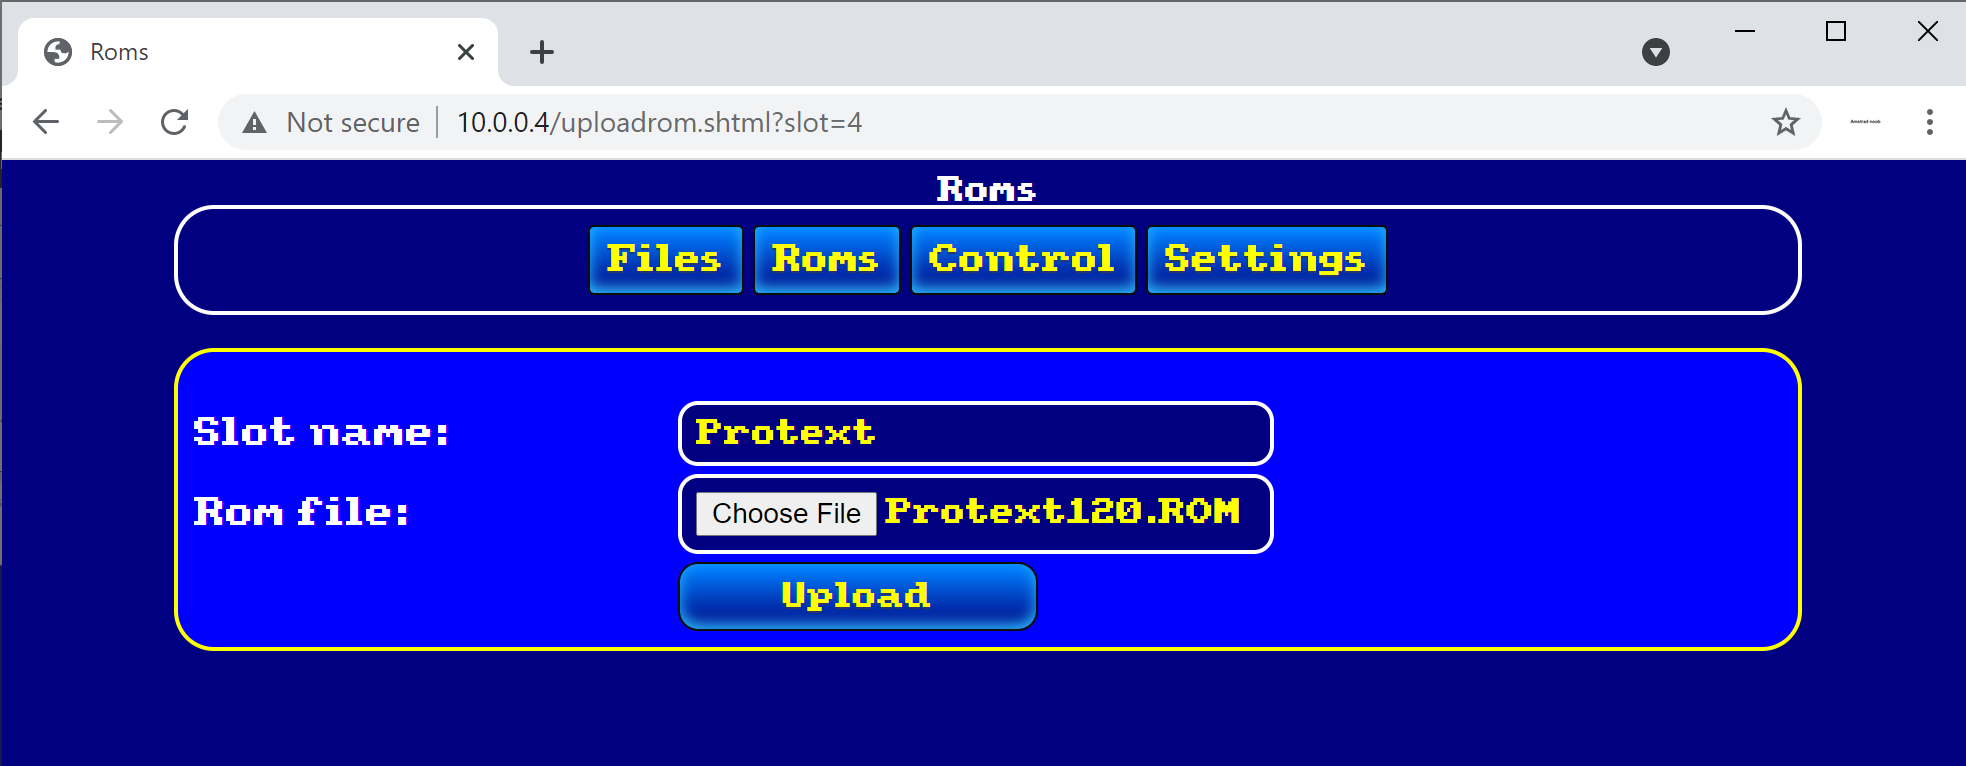
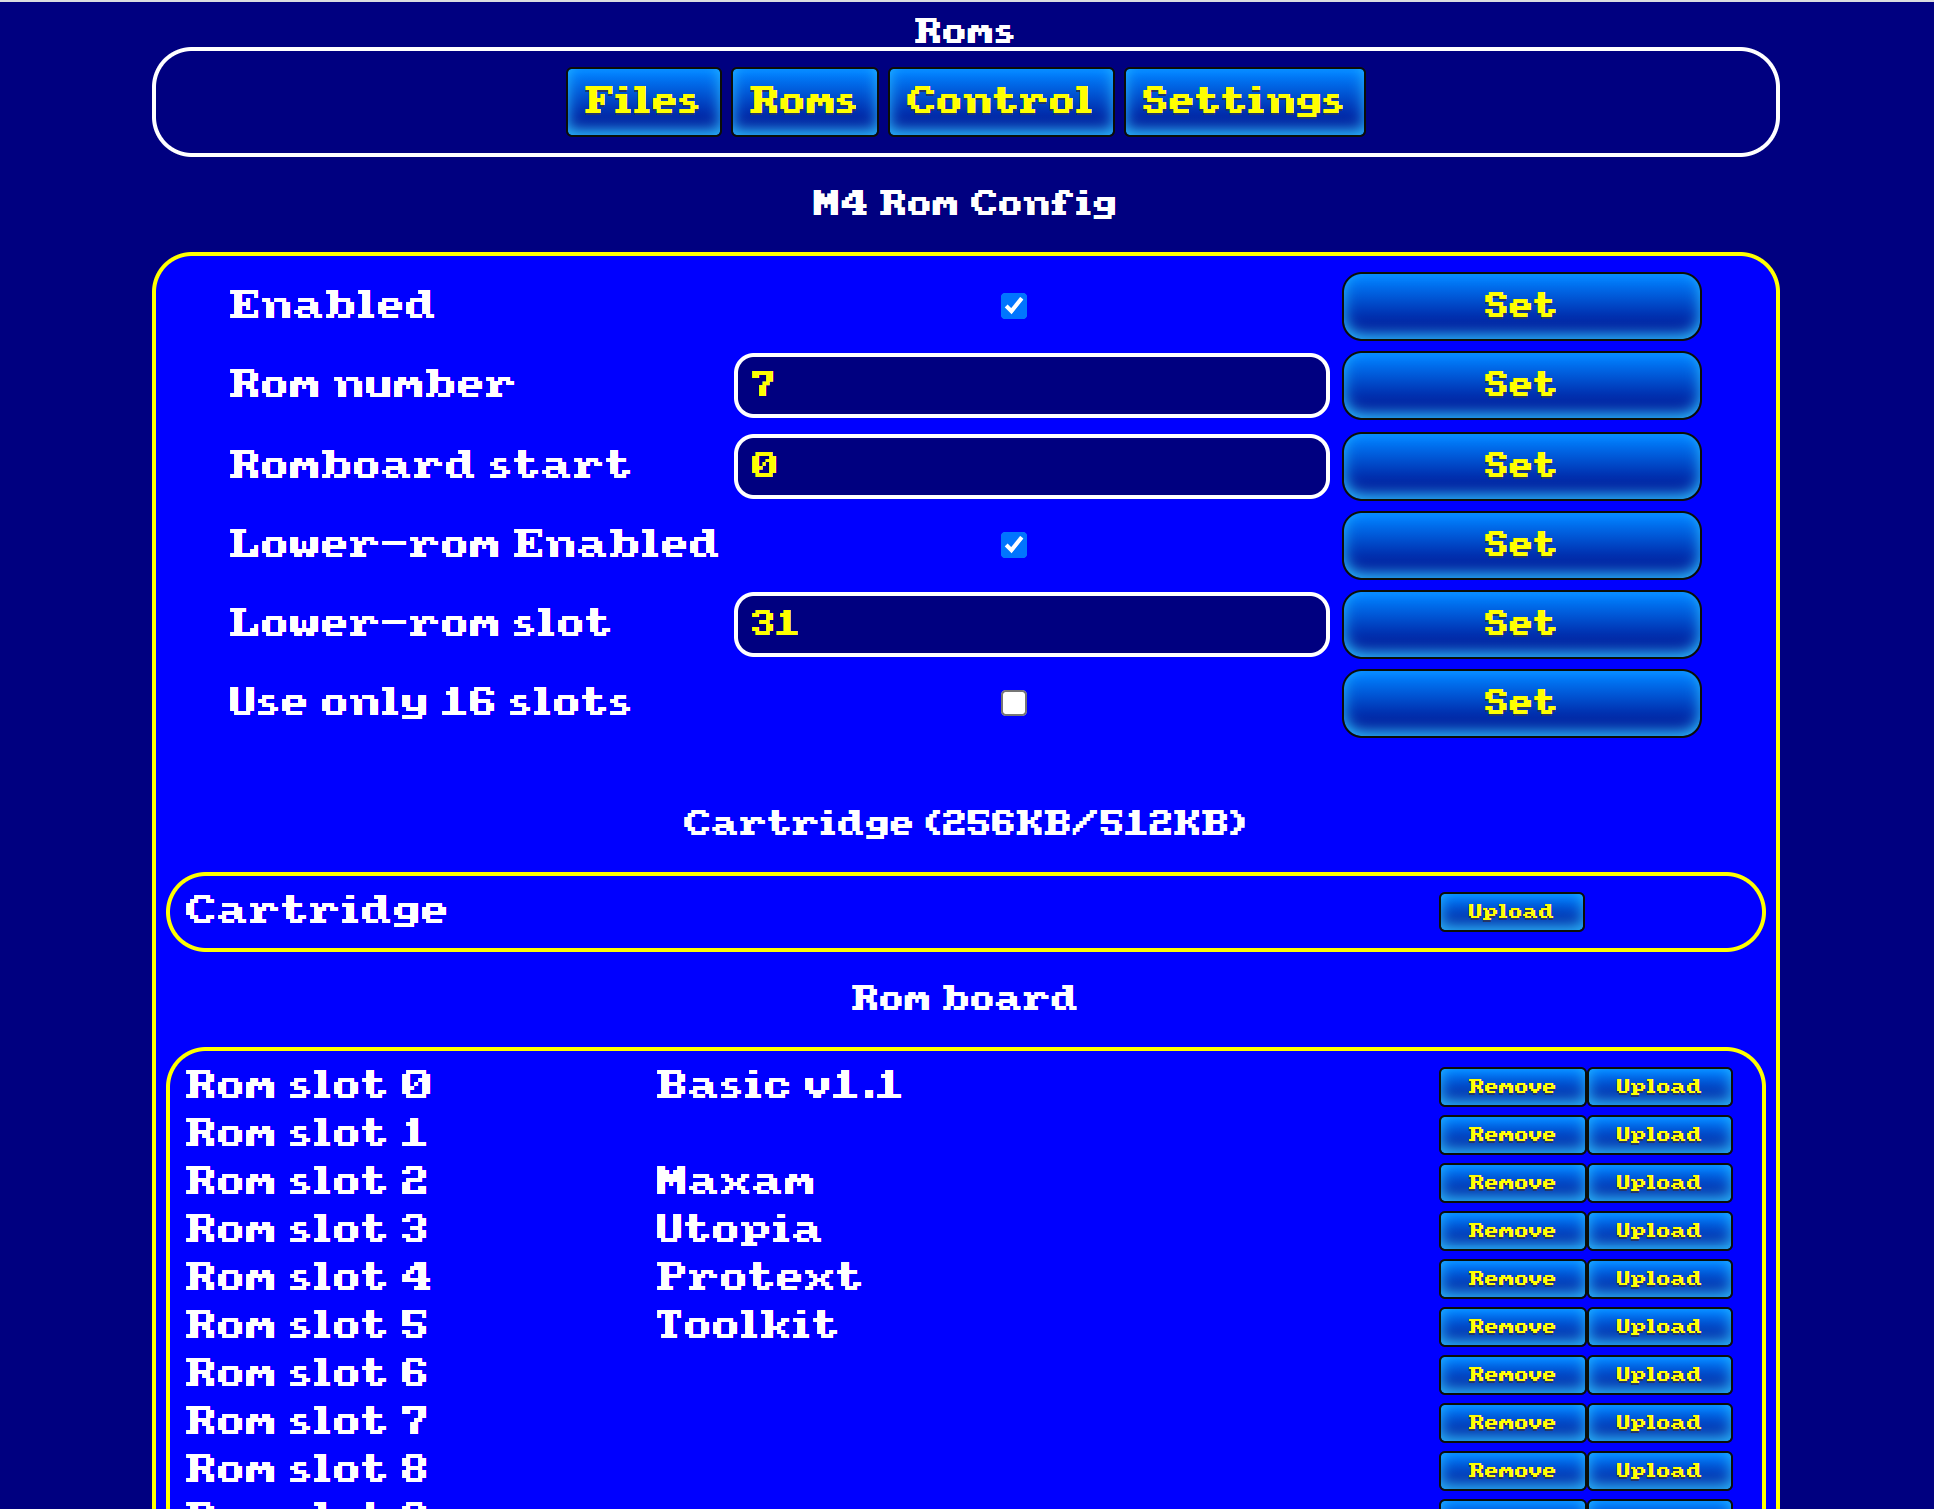
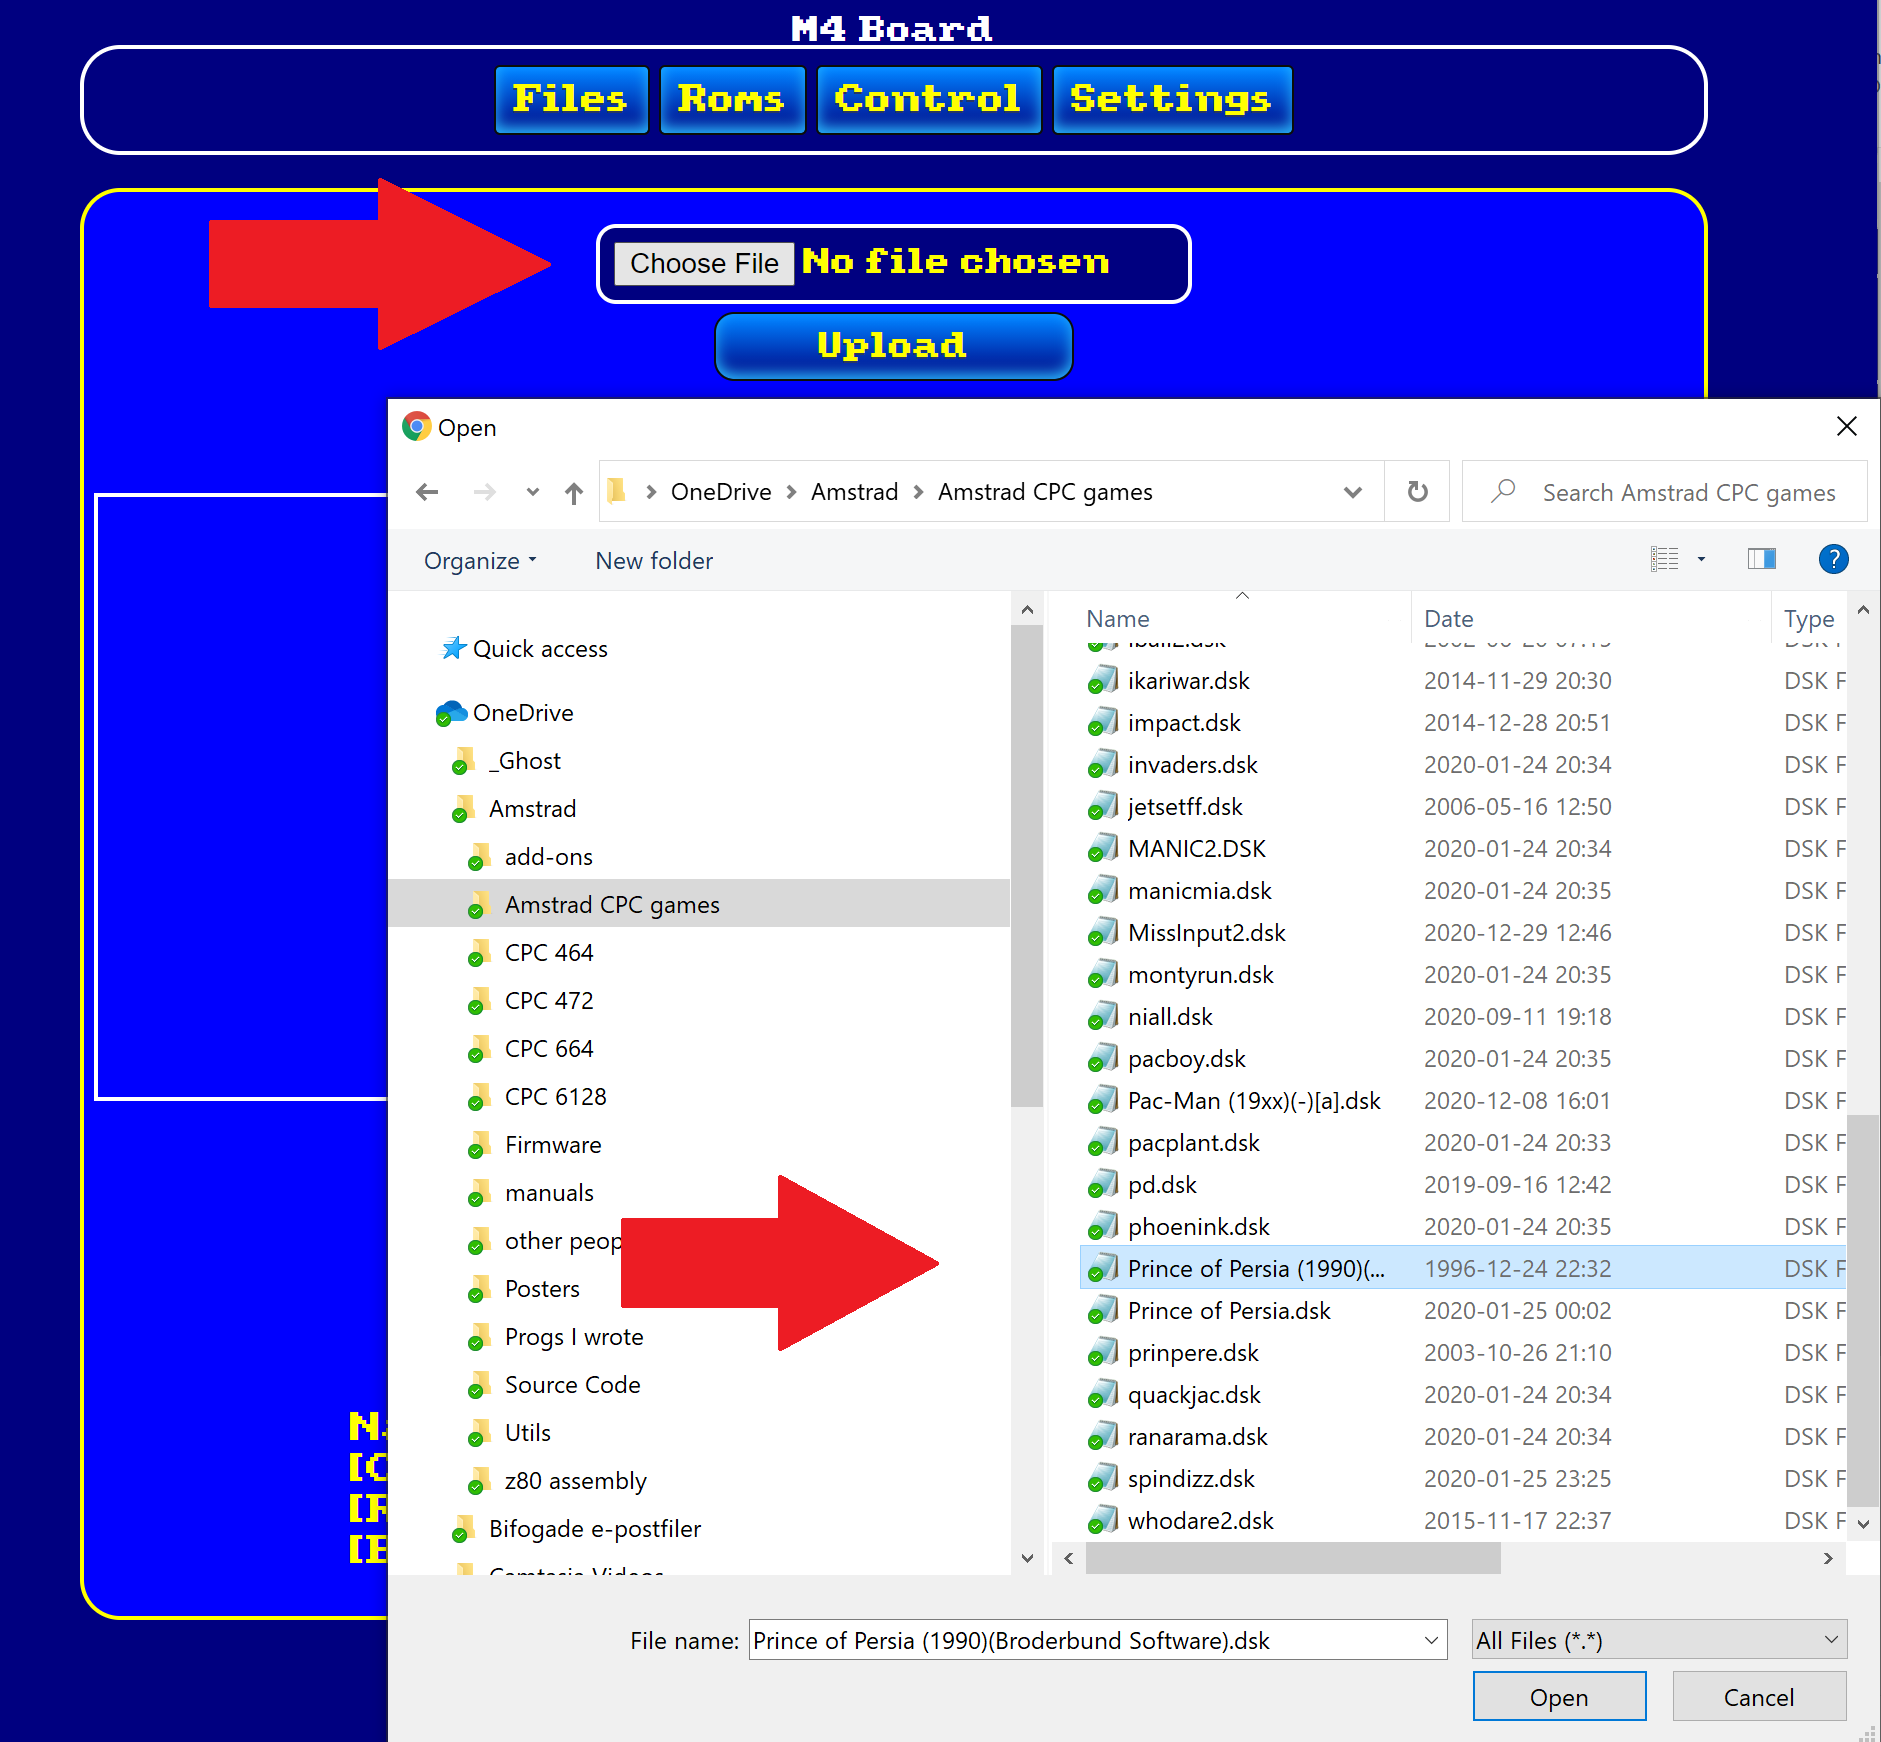
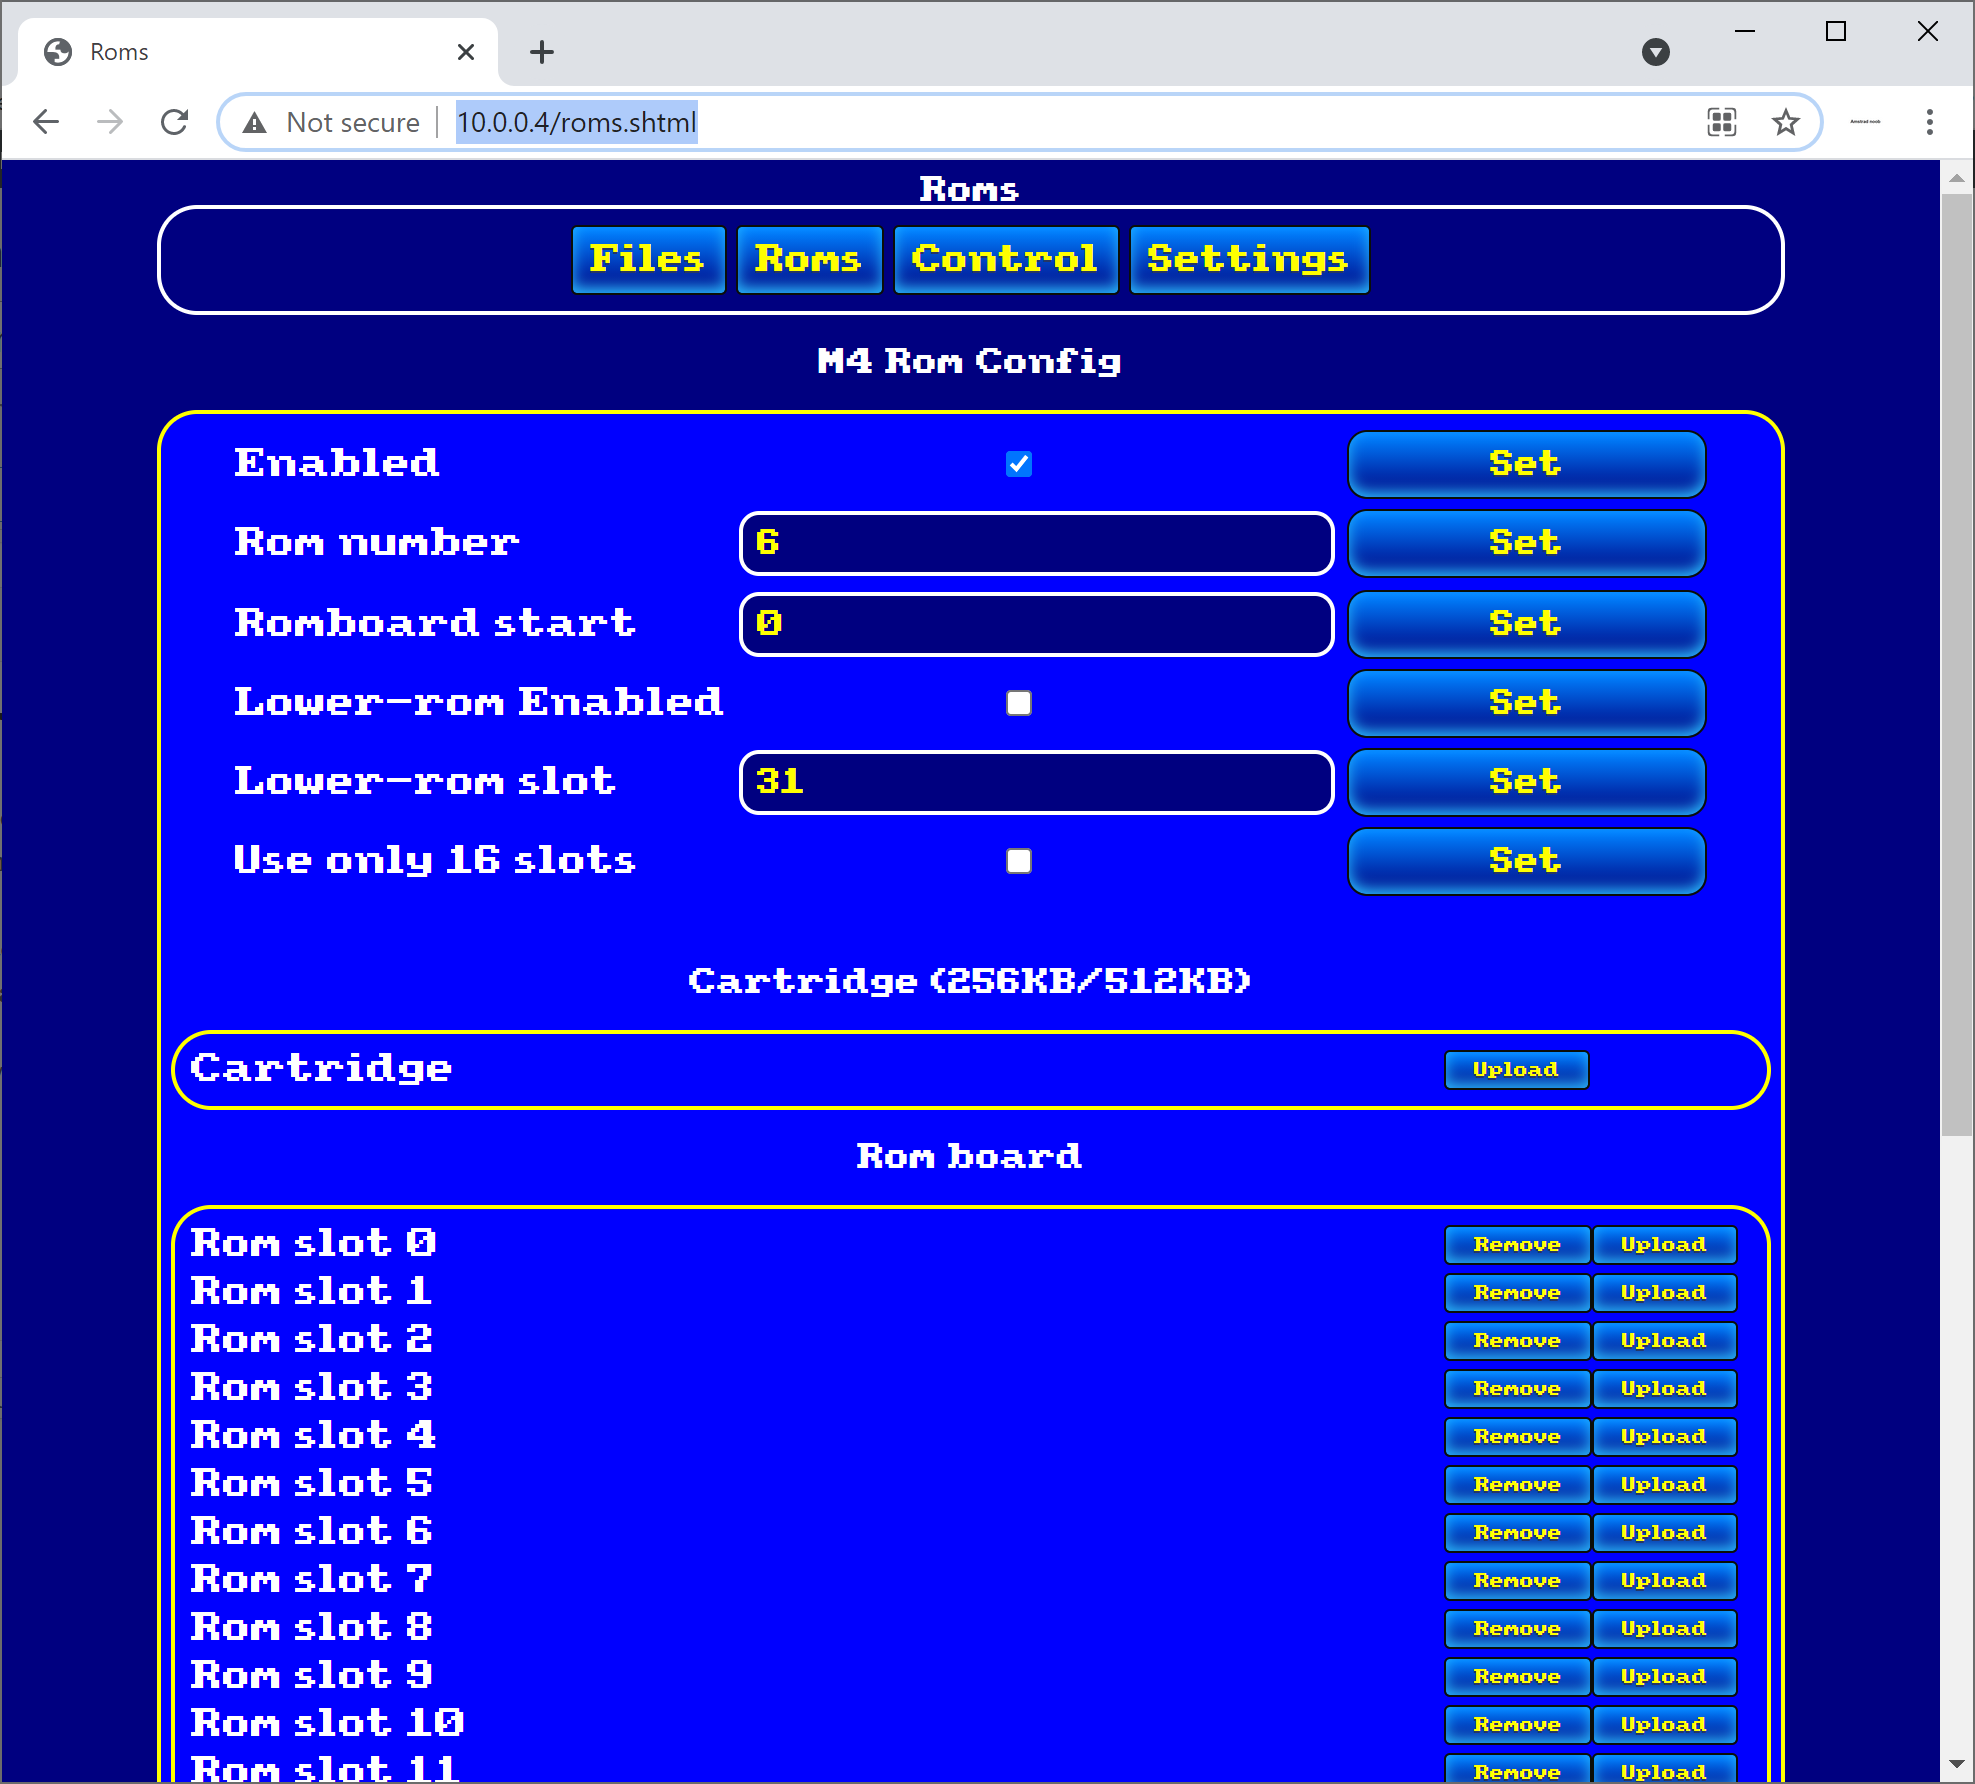 Next, select a free Rom slot, for example Rom slot 4, and choose Upload. Give the Rom a name and then click on Choose File and point to the extracted ROM file.
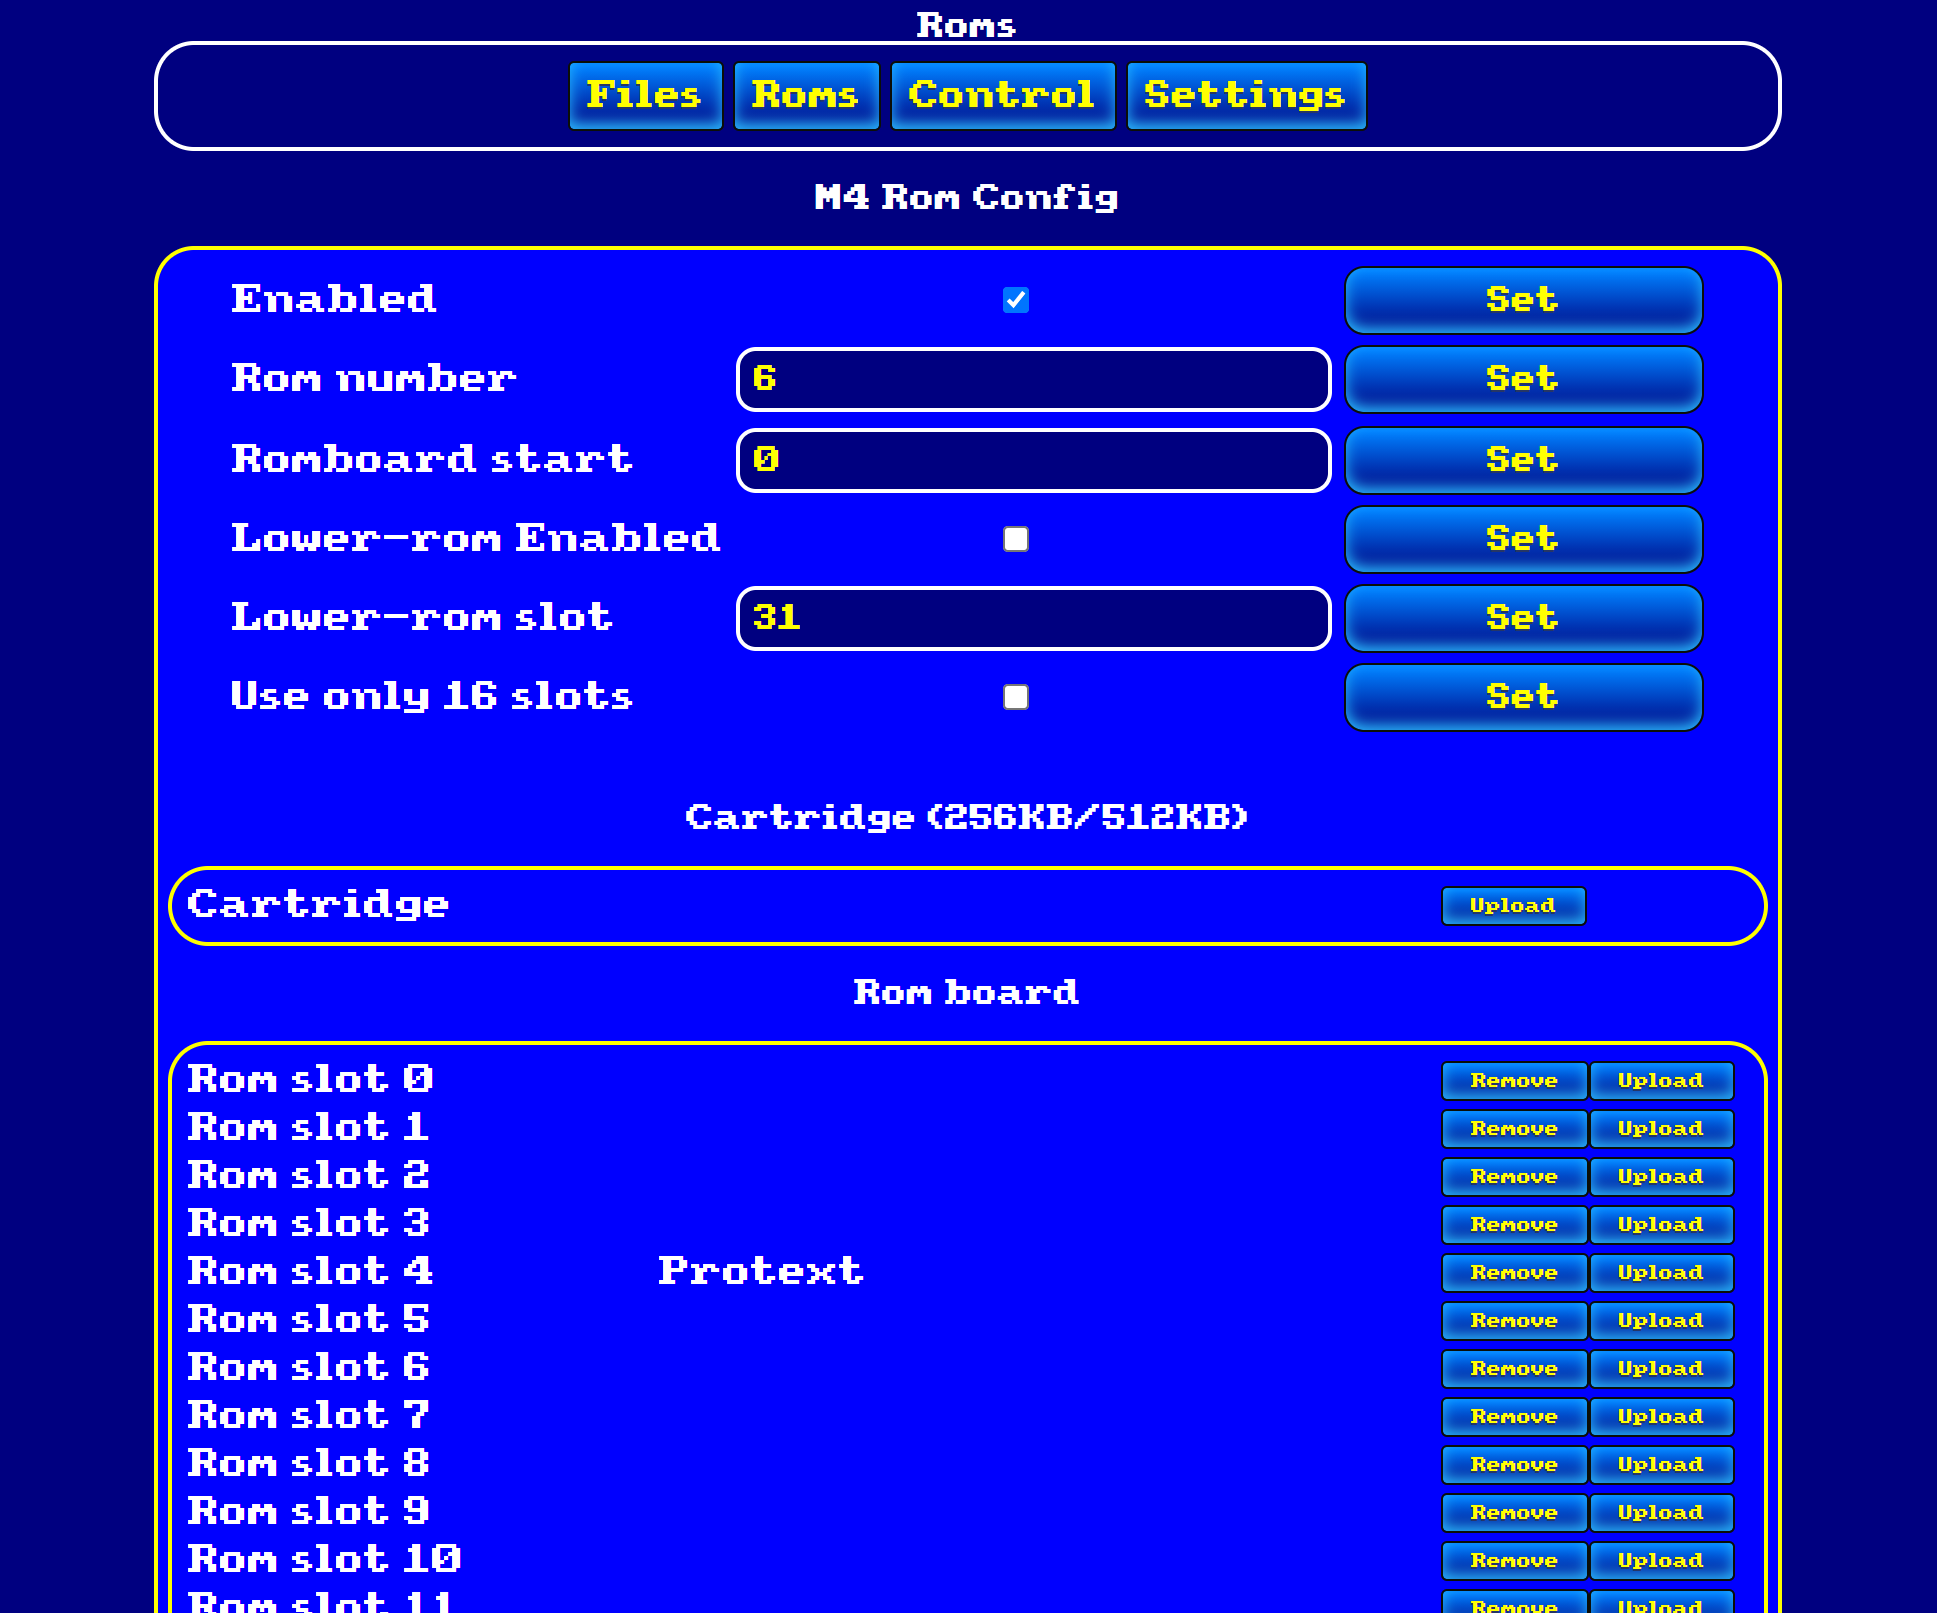
 Finally, click on Upload. After some moments, you’ll see the ROM listed.
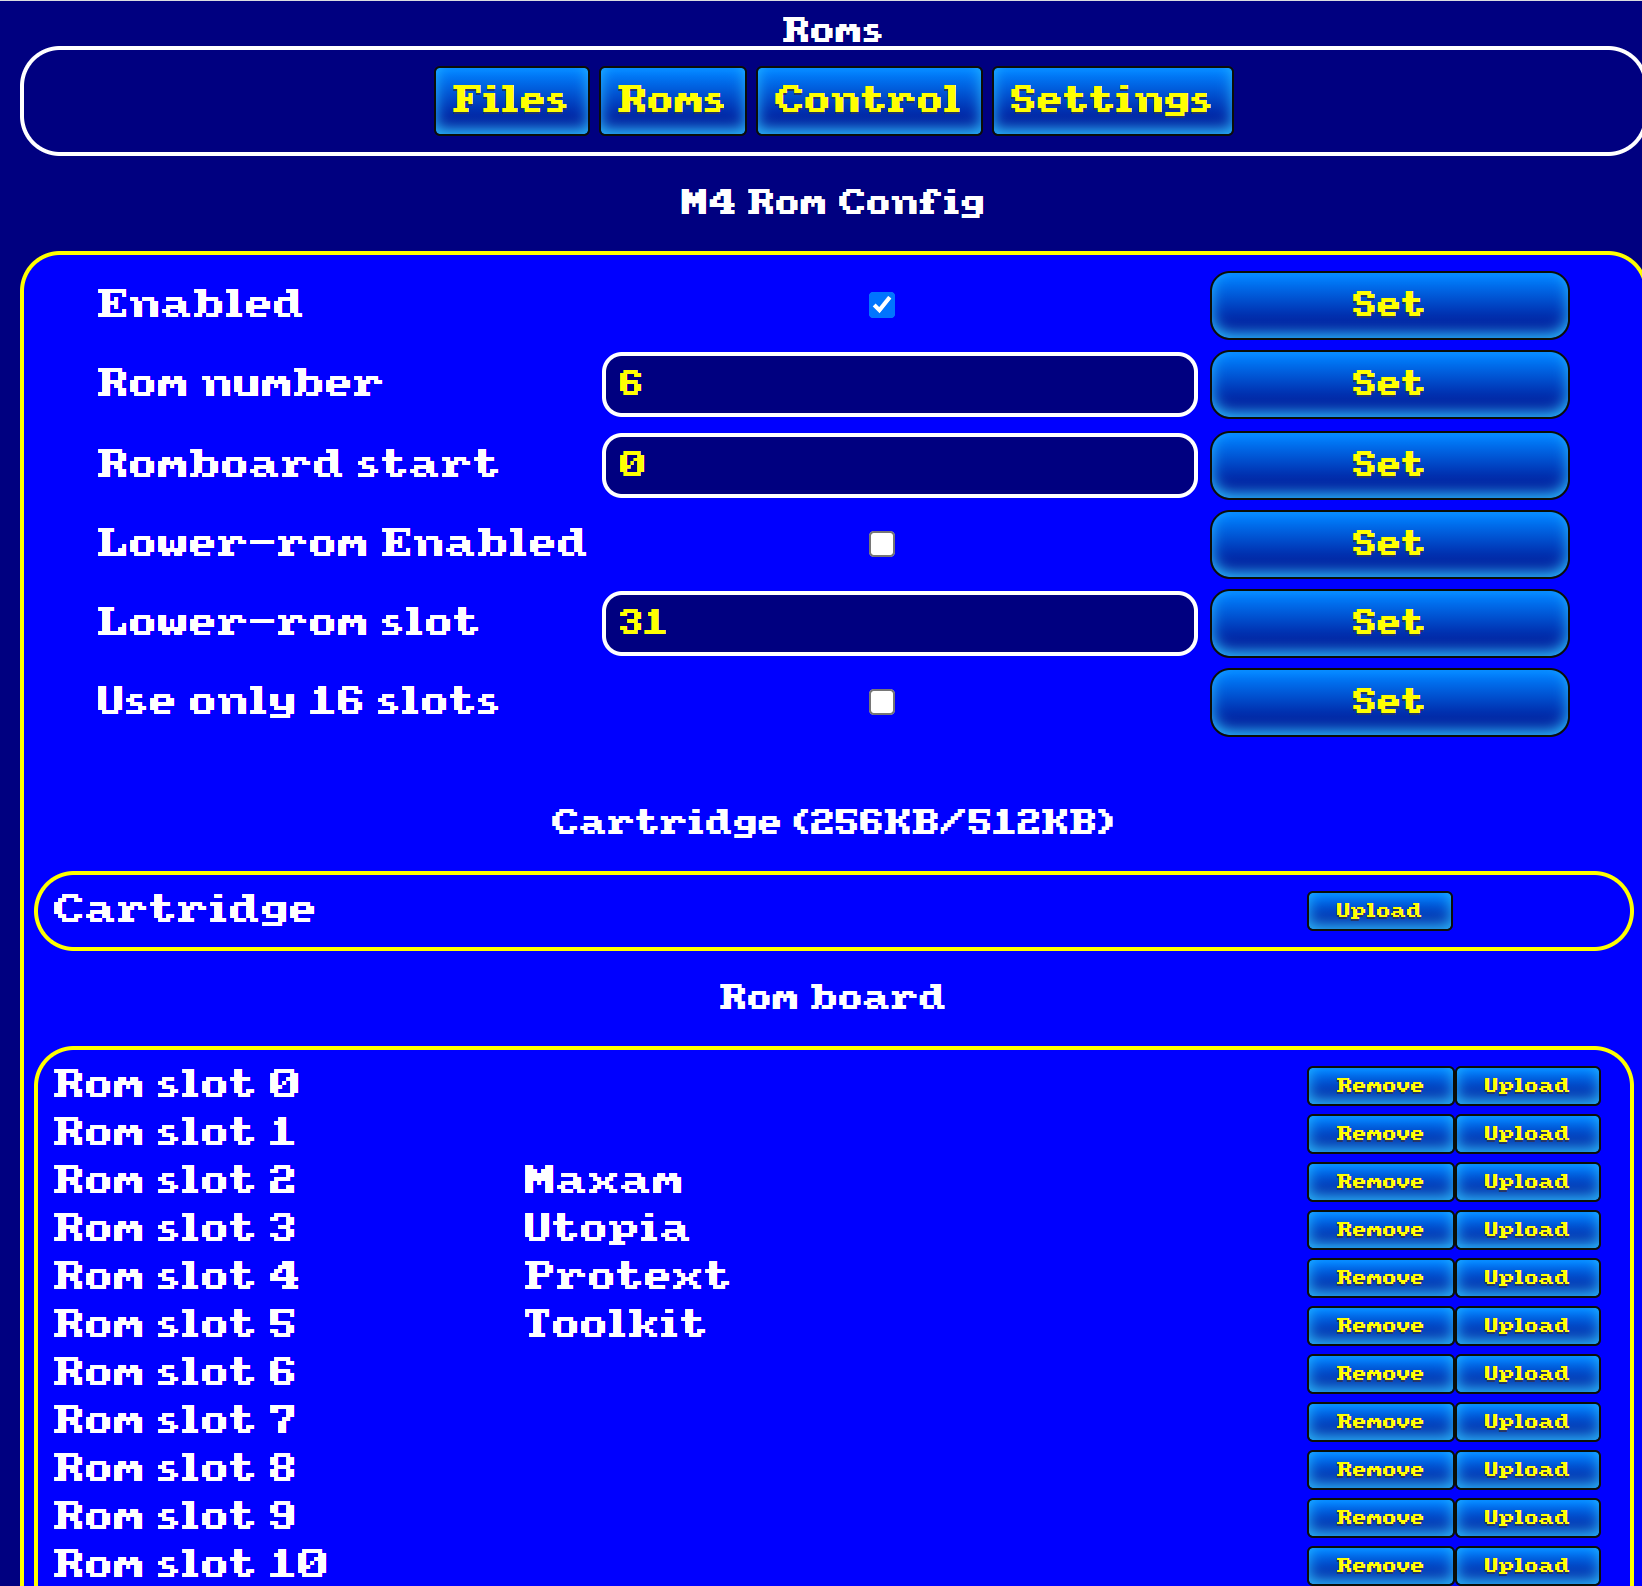
 Add a few more ROM’s but avoid sticking them in ROM slot 6 (used by the M4) or 0 (reserved for BASIC ROM’s).
Here are the ROM’s I uploaded.
 At this point you can power off the CPC and power it on again, you should see your ROM’s listed ! Cool or what !
Next, let’s convert the CPC 464 built in Basic from 1.0 to 1.1. To do this you can use a program created by Duke. You can download it from the CPC if you have setup the WiFi. Make sure to type it exactly as I have it here (case sensitive web server), the file downloaded should be 33k.
a$="spinpoint.org/cpc/ROMUP464.BIN"
|httpget,@a$
or download via your web browser from http://www.spinpoint.org/cpc/R
To use it run the program via…
RUN "ROMUP464.bin
This program will also set the M4 ROM to 7, which is best for compatibility with games. After running the program I was informed to press M4 reset on the board itself and when I did that the CPC revealed the new Basic 1.1 ROM
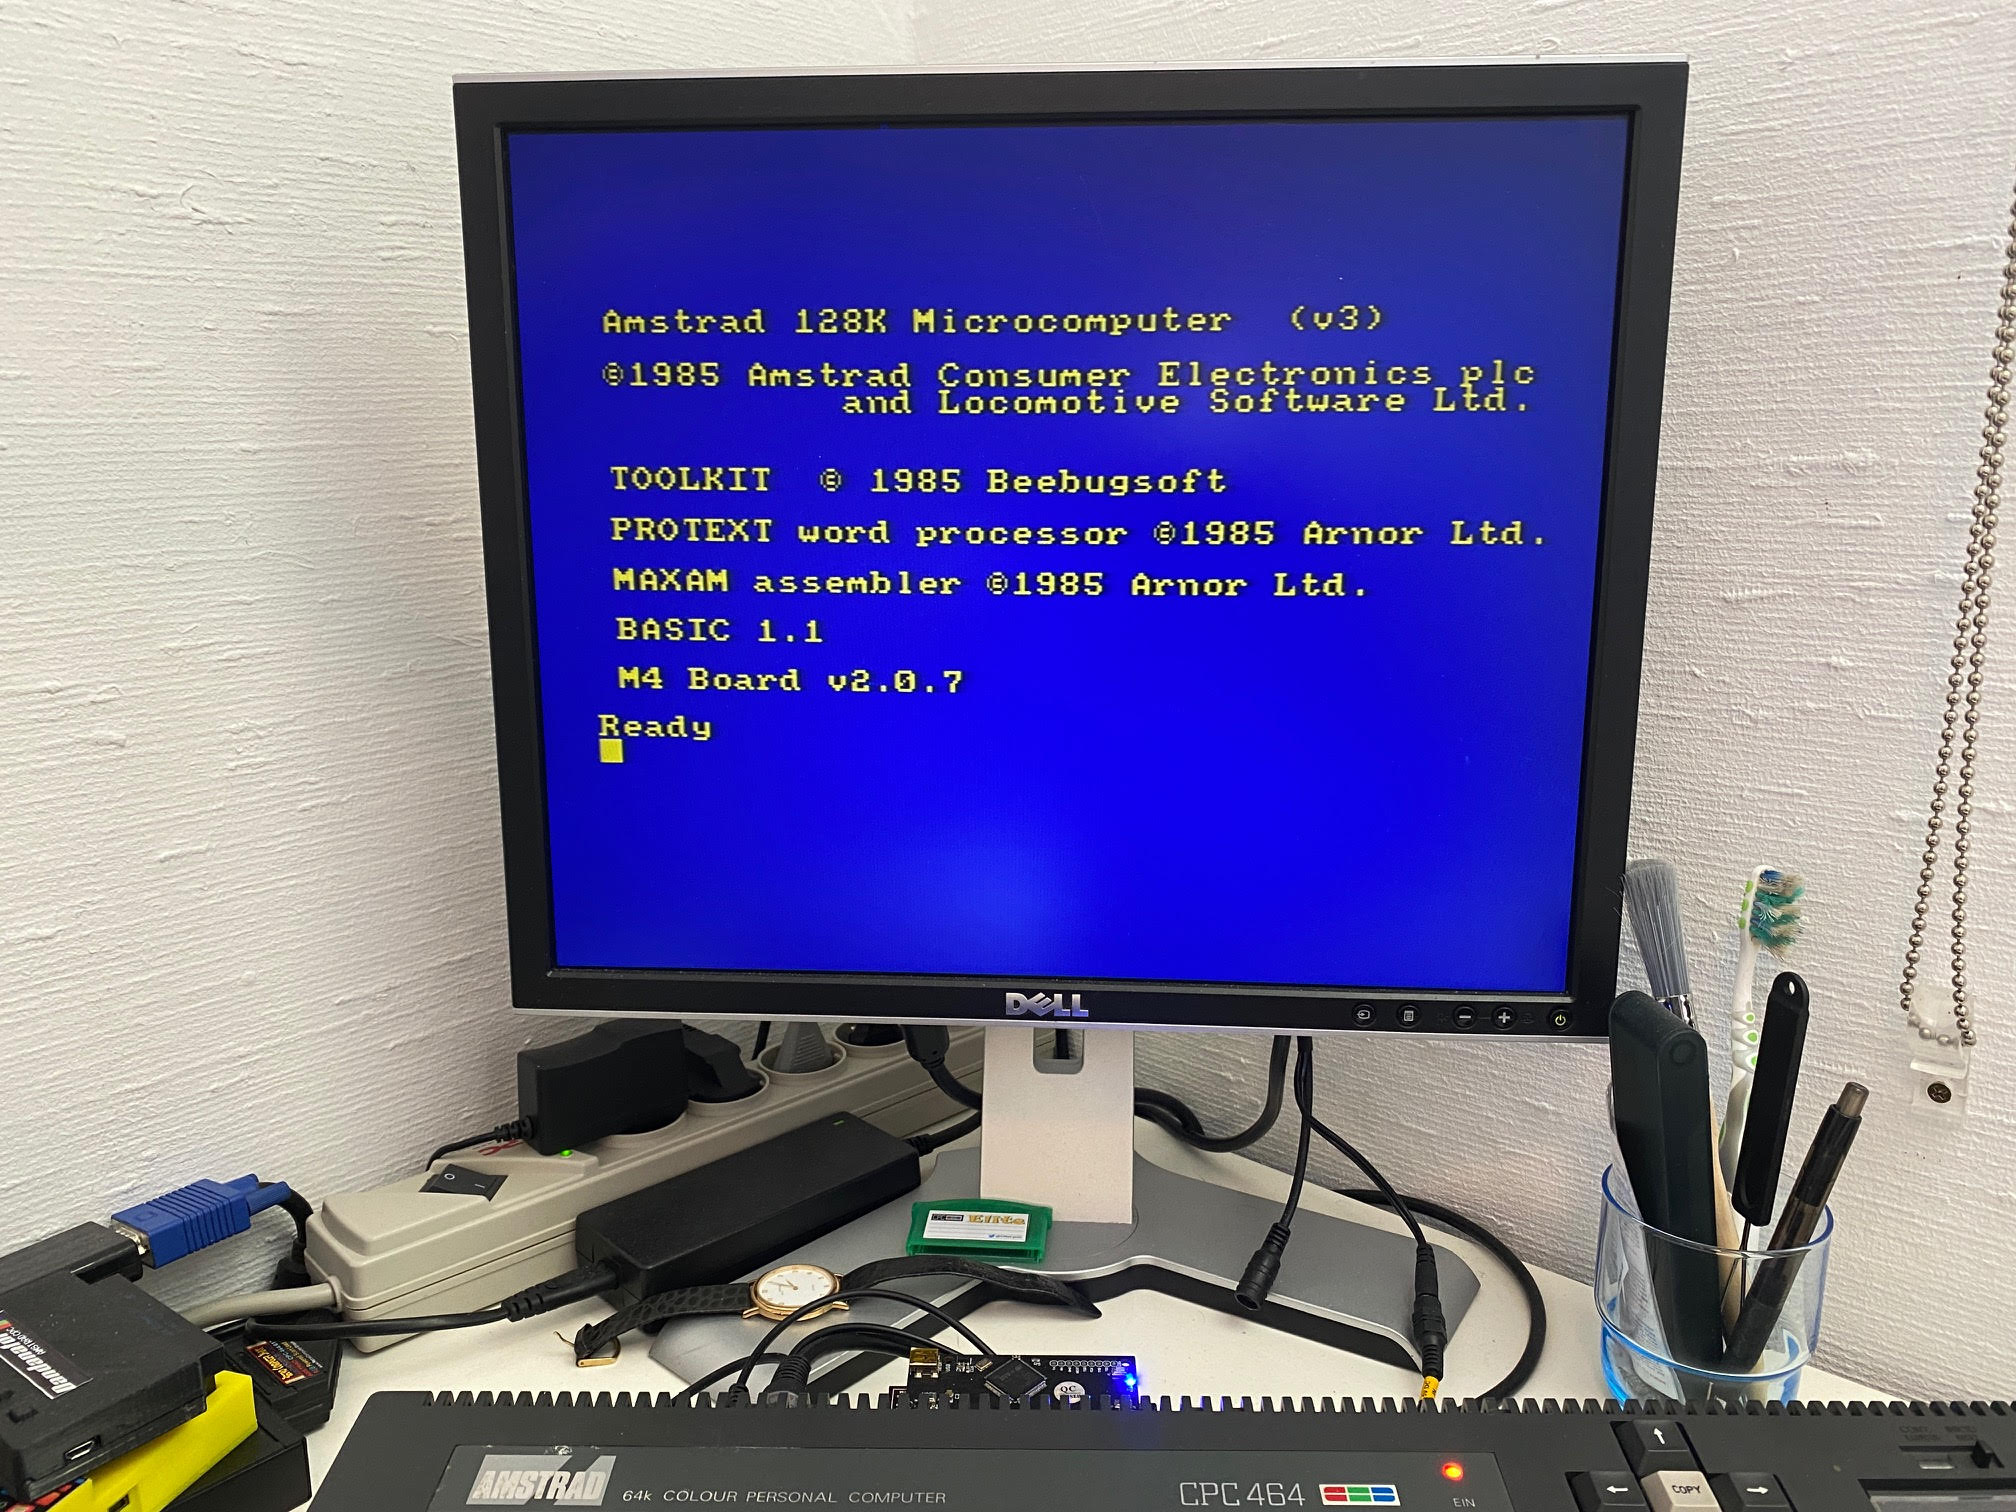
which is again confirmed in the Web browser UI.
Cool !
and if for whatever reason you want to again use Basic 1.0 simply unplug the M4 board.
I’ve seen people referring to the M4 board on various forums and facebook groups so I was intrigued and wanted to see what the fuss was all about. I mean, think about it, an internet connection via Wi-Fi on an Amstrad computer from the mid to late 80’s. This was something I had to try out. So here are my initial thoughts on the M4 board from Spinpoint.
The M4 Board is not new, it is an expansion card from 2016 which enables WIFI access to and from CPC, Romboard and using an SD-Card as a mass storage device. That’s right the device first surfaced in 2016, and they are still in production today and you can still buy them. You can read more about it at http://www.spinpoint.org/cpc/m4info.txt
First of all, you’ll want to acquire one, to do so is relatively simple, head over to http://www.spinpoint.org and leave a comment asking how to buy one. I emailed him directly and got a quote for the board with EDGE connector and shipping for 47.5 Euros. Not cheap, but a lot of functionality to play with for the coming years.
In the photo below you can see my M4 board plugged directly into the back of my Schneider coloured CPC 464. It reveals itself at post, along with a version number of the firmware.
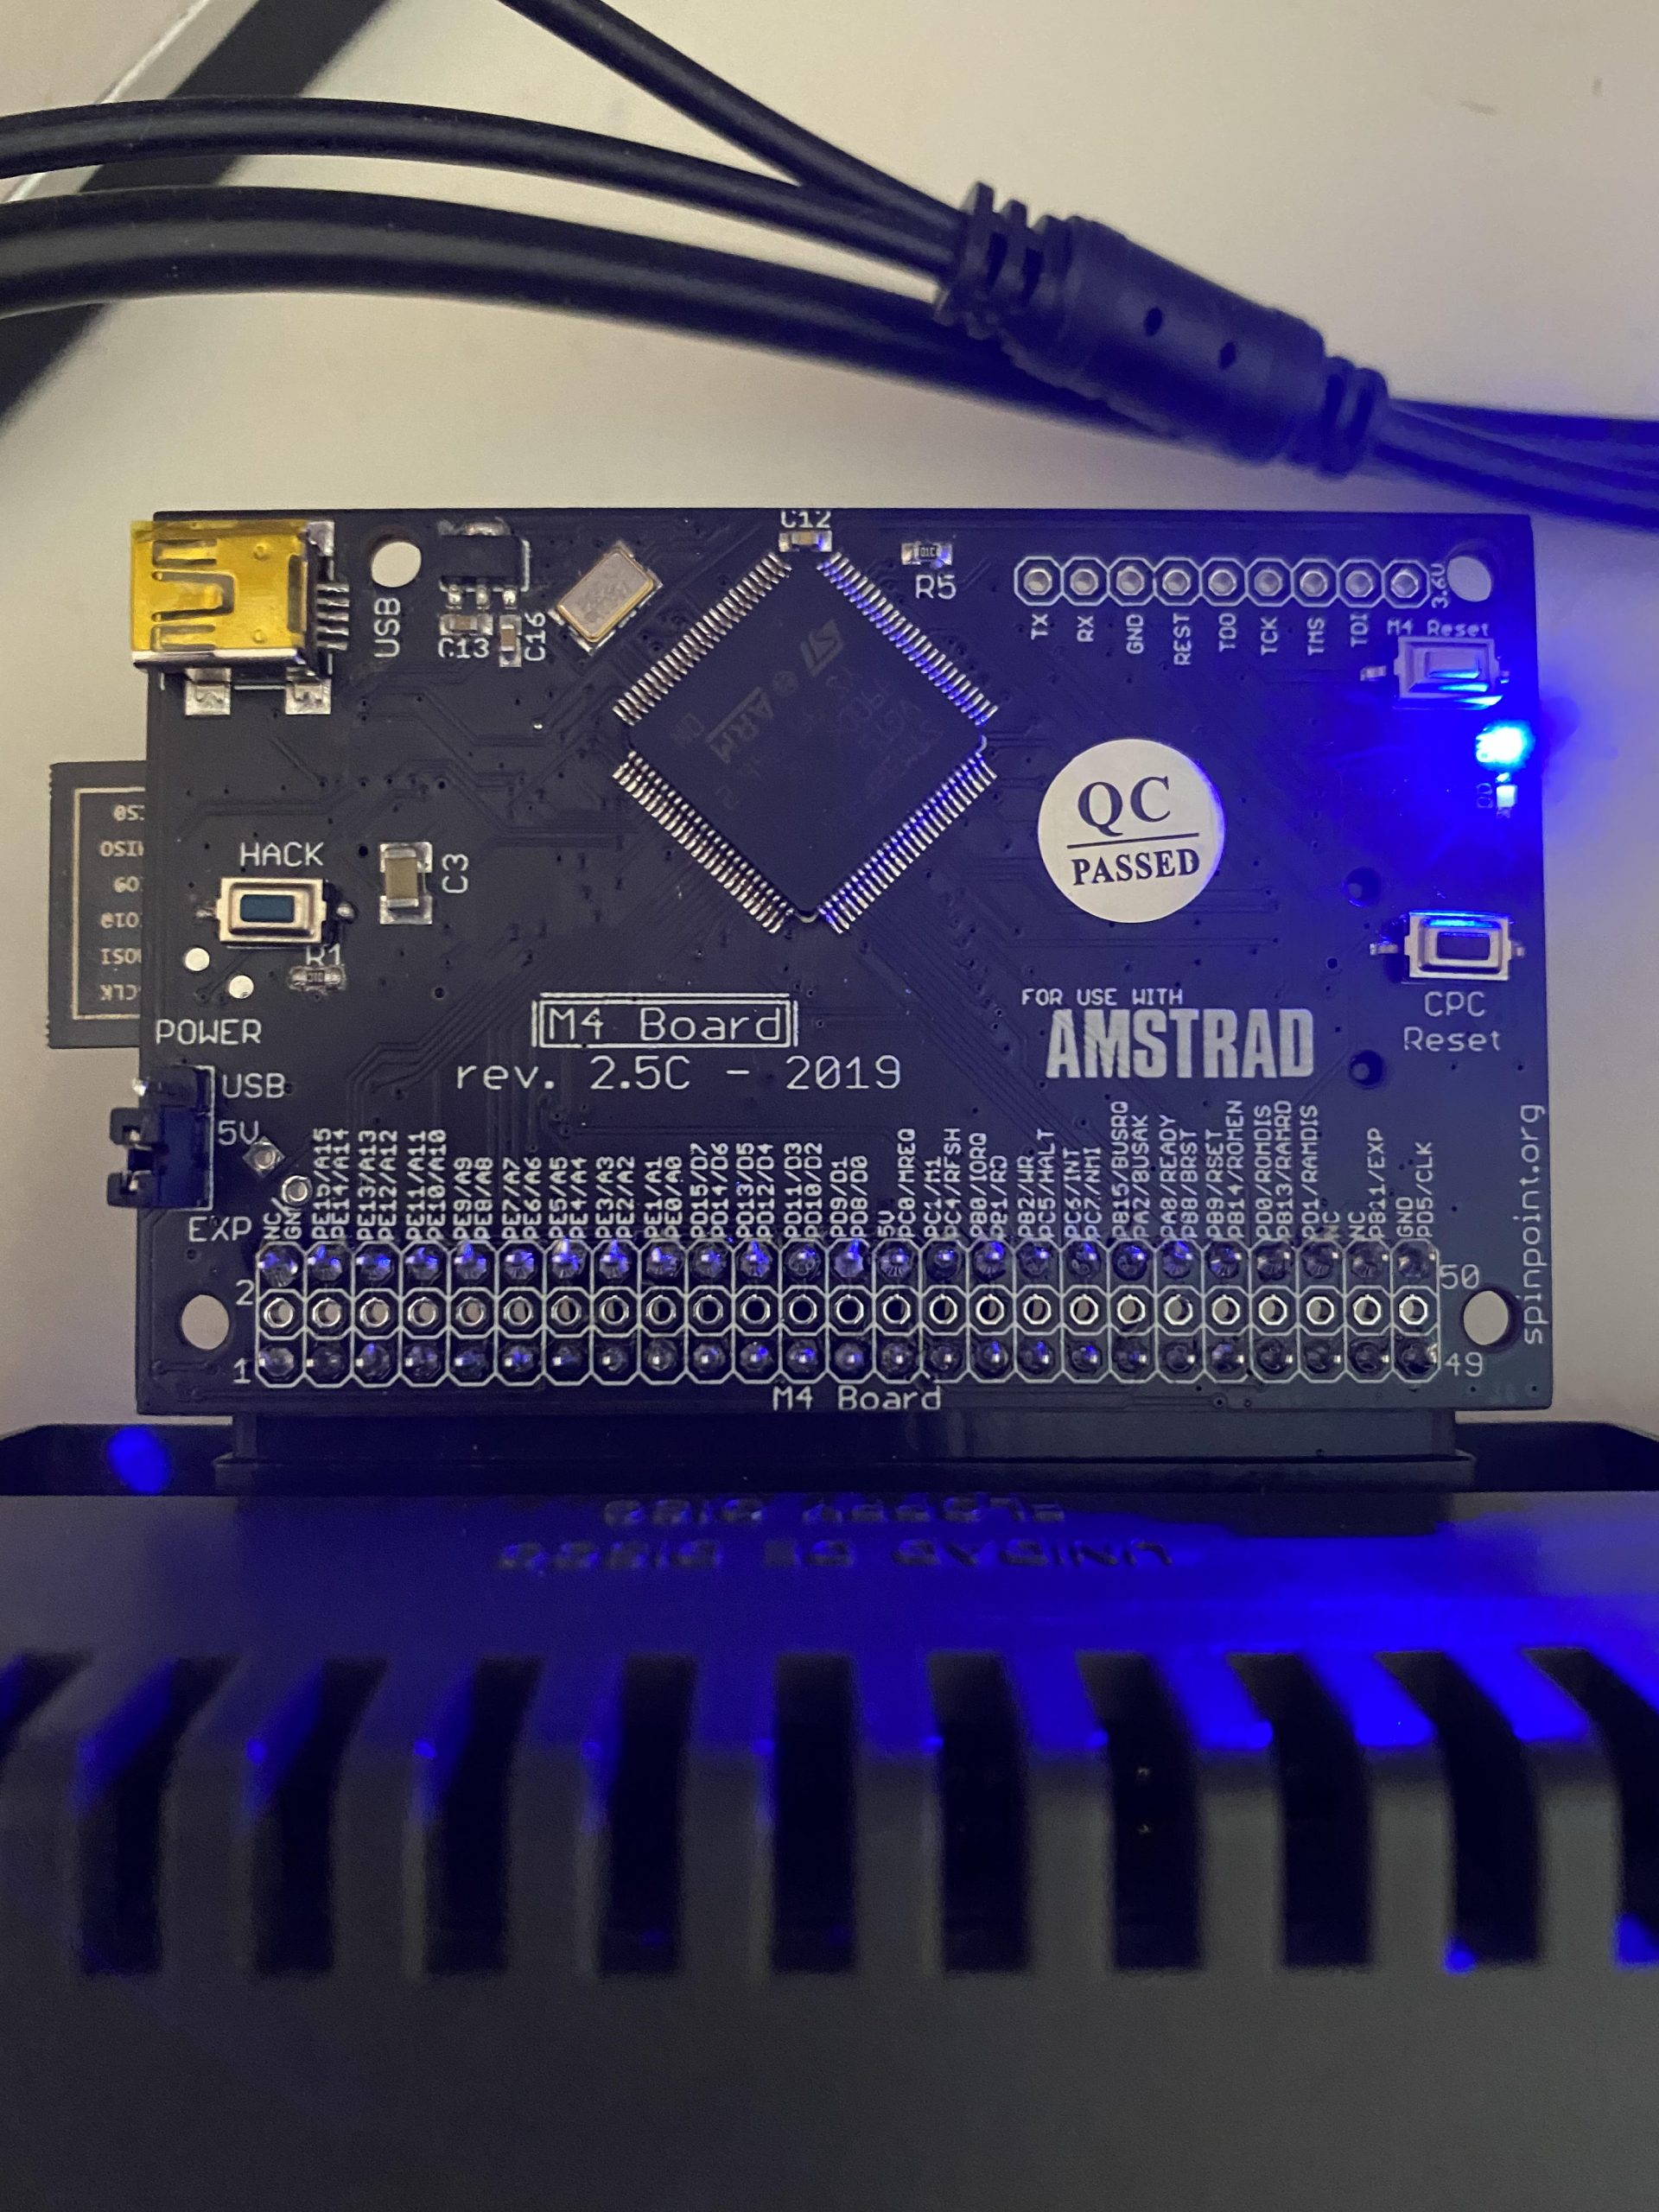
 A closer look. Here you can see the board is extremely well laid out with a main chip in the center and connectors and buttons scattered around, everything is very well labelled. for those so inclined, my board is dated 2019 even though I purchased it in April 2021, I guess he has a bunch of those older PCB’s still lying around.
 The board offers more than the cool Wi-Fi abilities, you can also plug in an SD card to gain access to gazillions of games copied to the card, you can also store up to 32 ROMs on it, and that’s a pretty cool function indeed. In this blog post we will take a look at getting it connected to Wi-Fi and copying some games from a PC to the local storage.
Before starting, insert a FAT32 formatted SD card into the SD slot. This is needed to store information such as your Wi-Fi settings.
To get connected to Wi-Fi you’ll need to use the |netset command along with some parameters so it knows how to connect. Below is an example of that on a CPC 6128.
|netset,"name=CPC6128, ssid=Amstrad, pw=amstrad-noob.com, dhcp=1, dns1=8.8.8.8, dns2=8.8.4.4, ntp=time.windows.com"
Note: Don’t worry if you make a typo, the CPC has a very nice ‘copy’ ability so you can copy commands previously typed by holding down SHIFT, then move the cursor to where you want to start copying, then press COPY, it’s that easy.
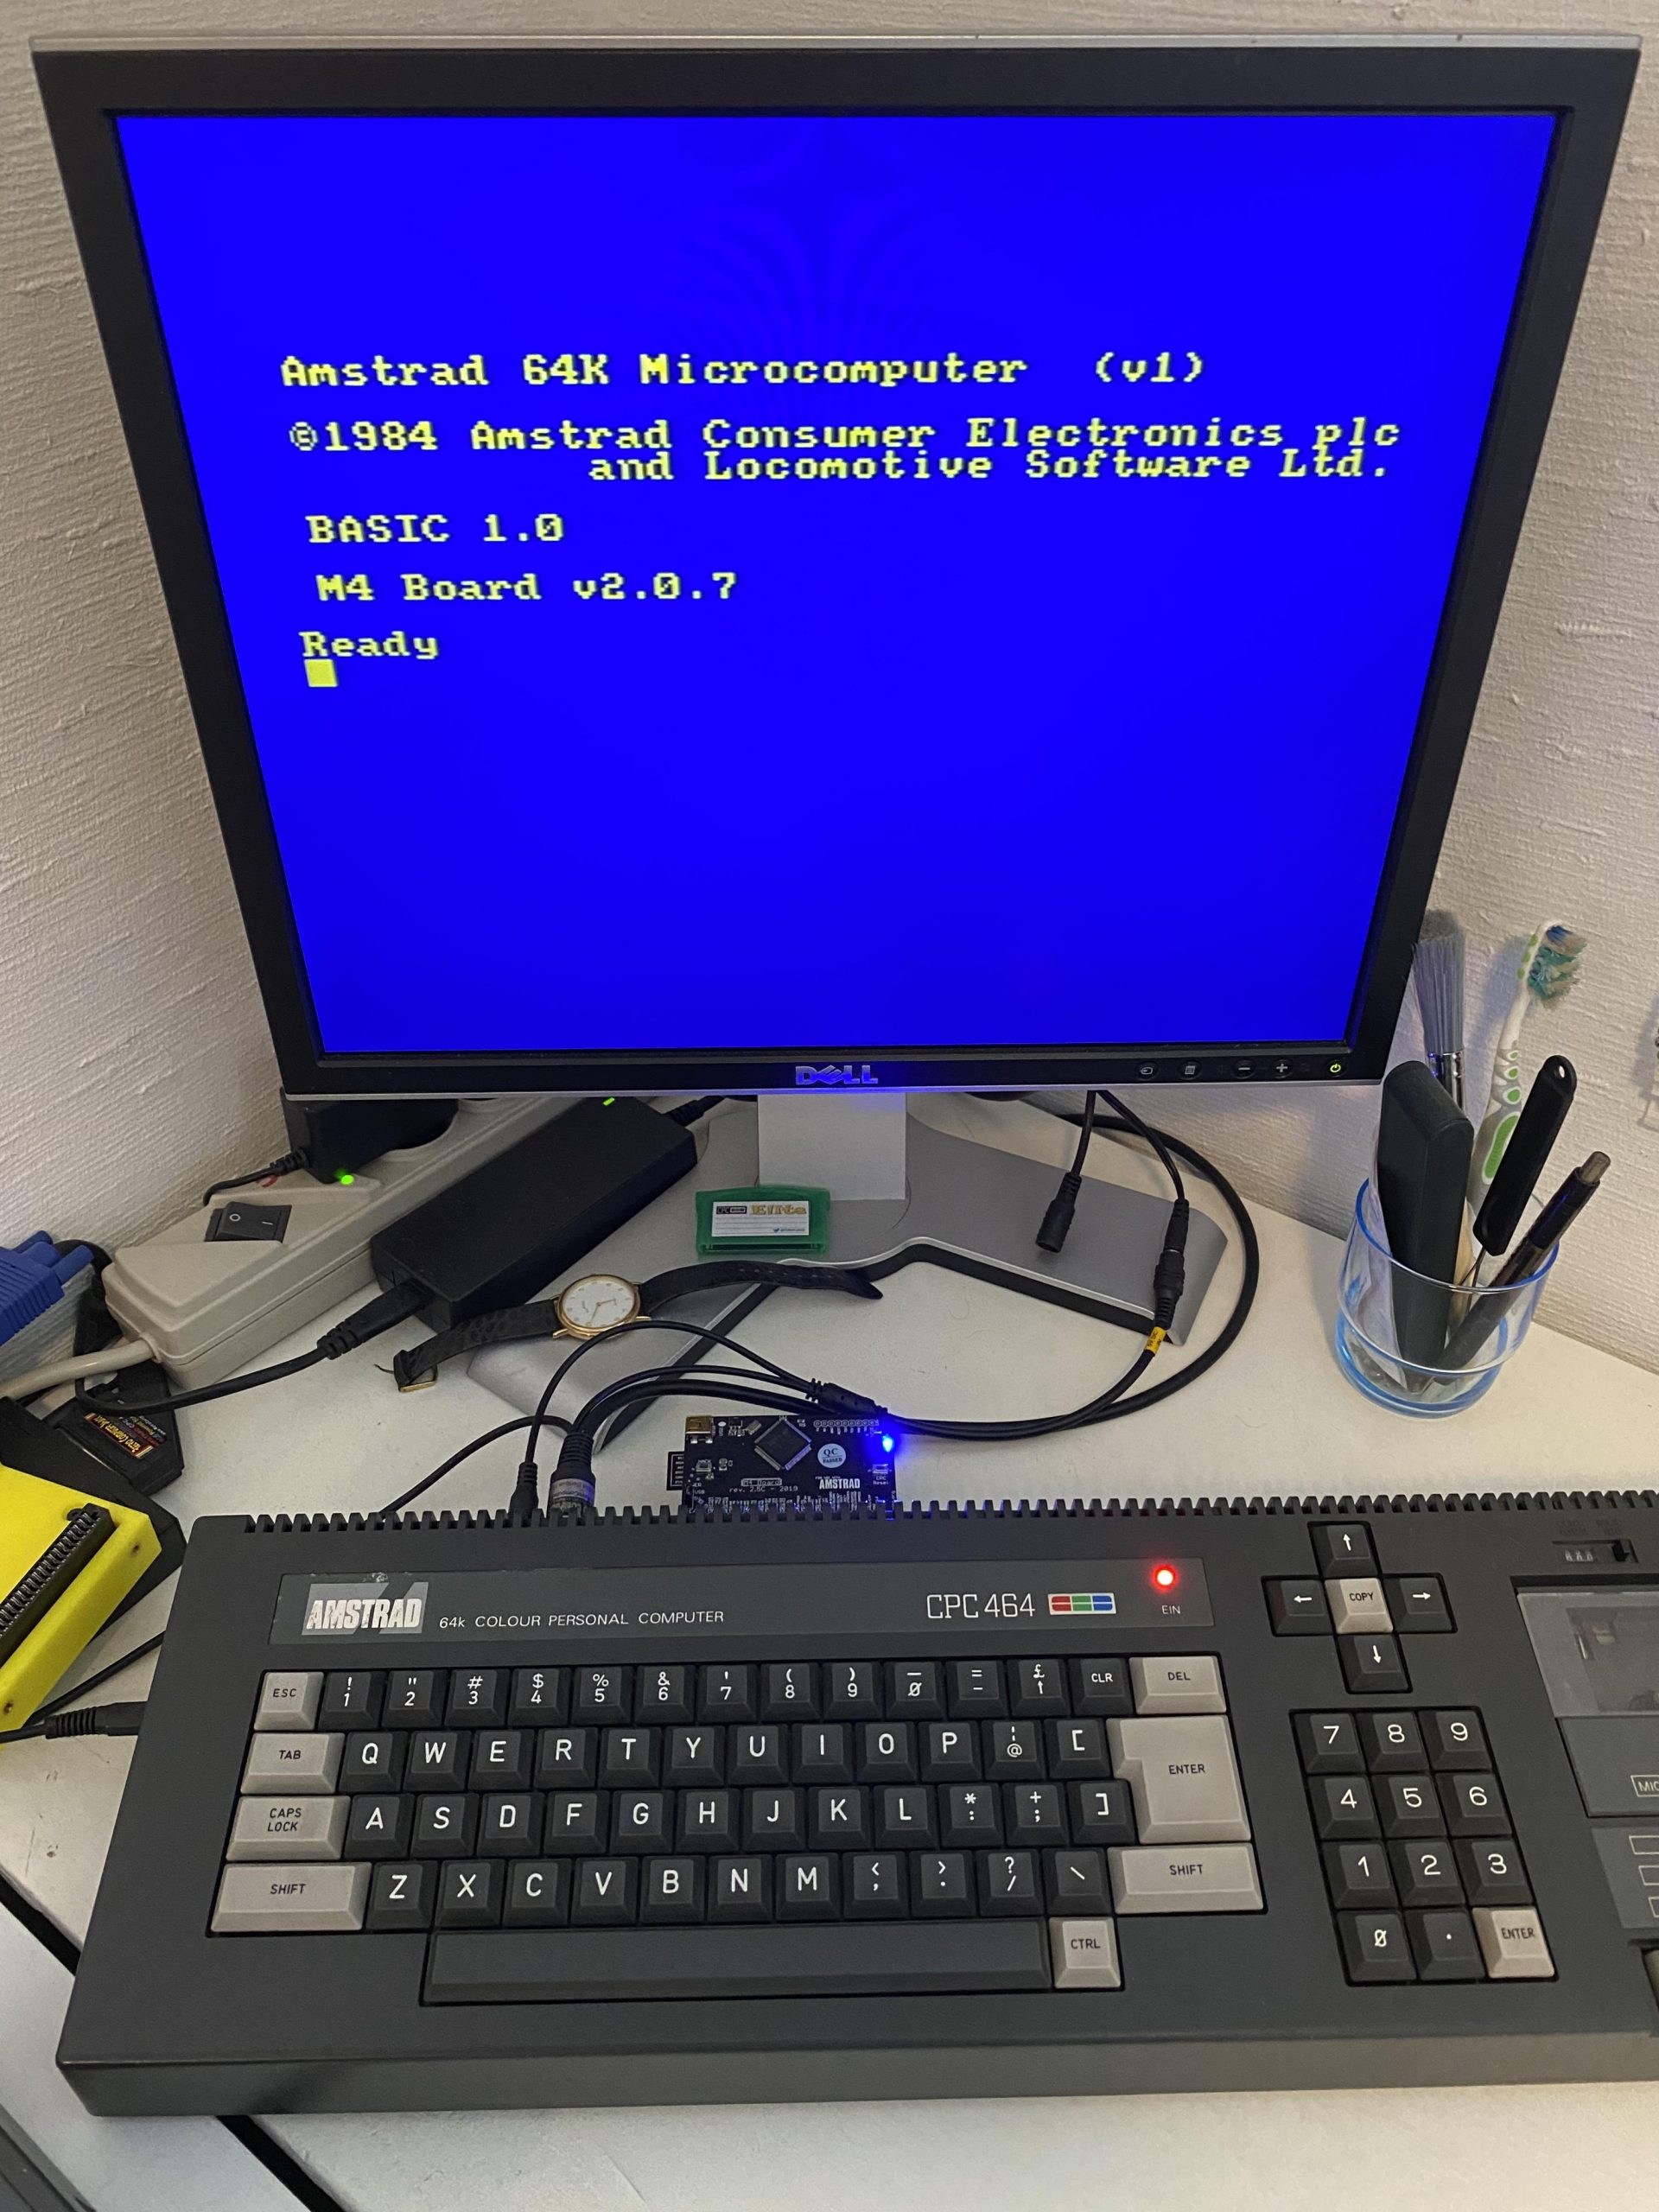
I’m using a CPC 464 in this blog post so if you try entering the above you’ll get a
“Type mismatch“
error shown here.
The solution (on a CPC 464) is to assign a variable to the input as basic 1.0 doesn’t work well with this. So if you are using an Amstrad CPC 464 try this.
noob$="name=CPC464, ssid=Amstrad, pw=amstrad-noob.com, dhcp=1, dns1=8.8.8.8, dns2=8.8.4.4, ntp=time.windows.com"
If all went well, the output should say:
“Ready”
Next type
|netset,@noob$
This tells the M4 board to use the settings you applied using the variable as input for the parameters.
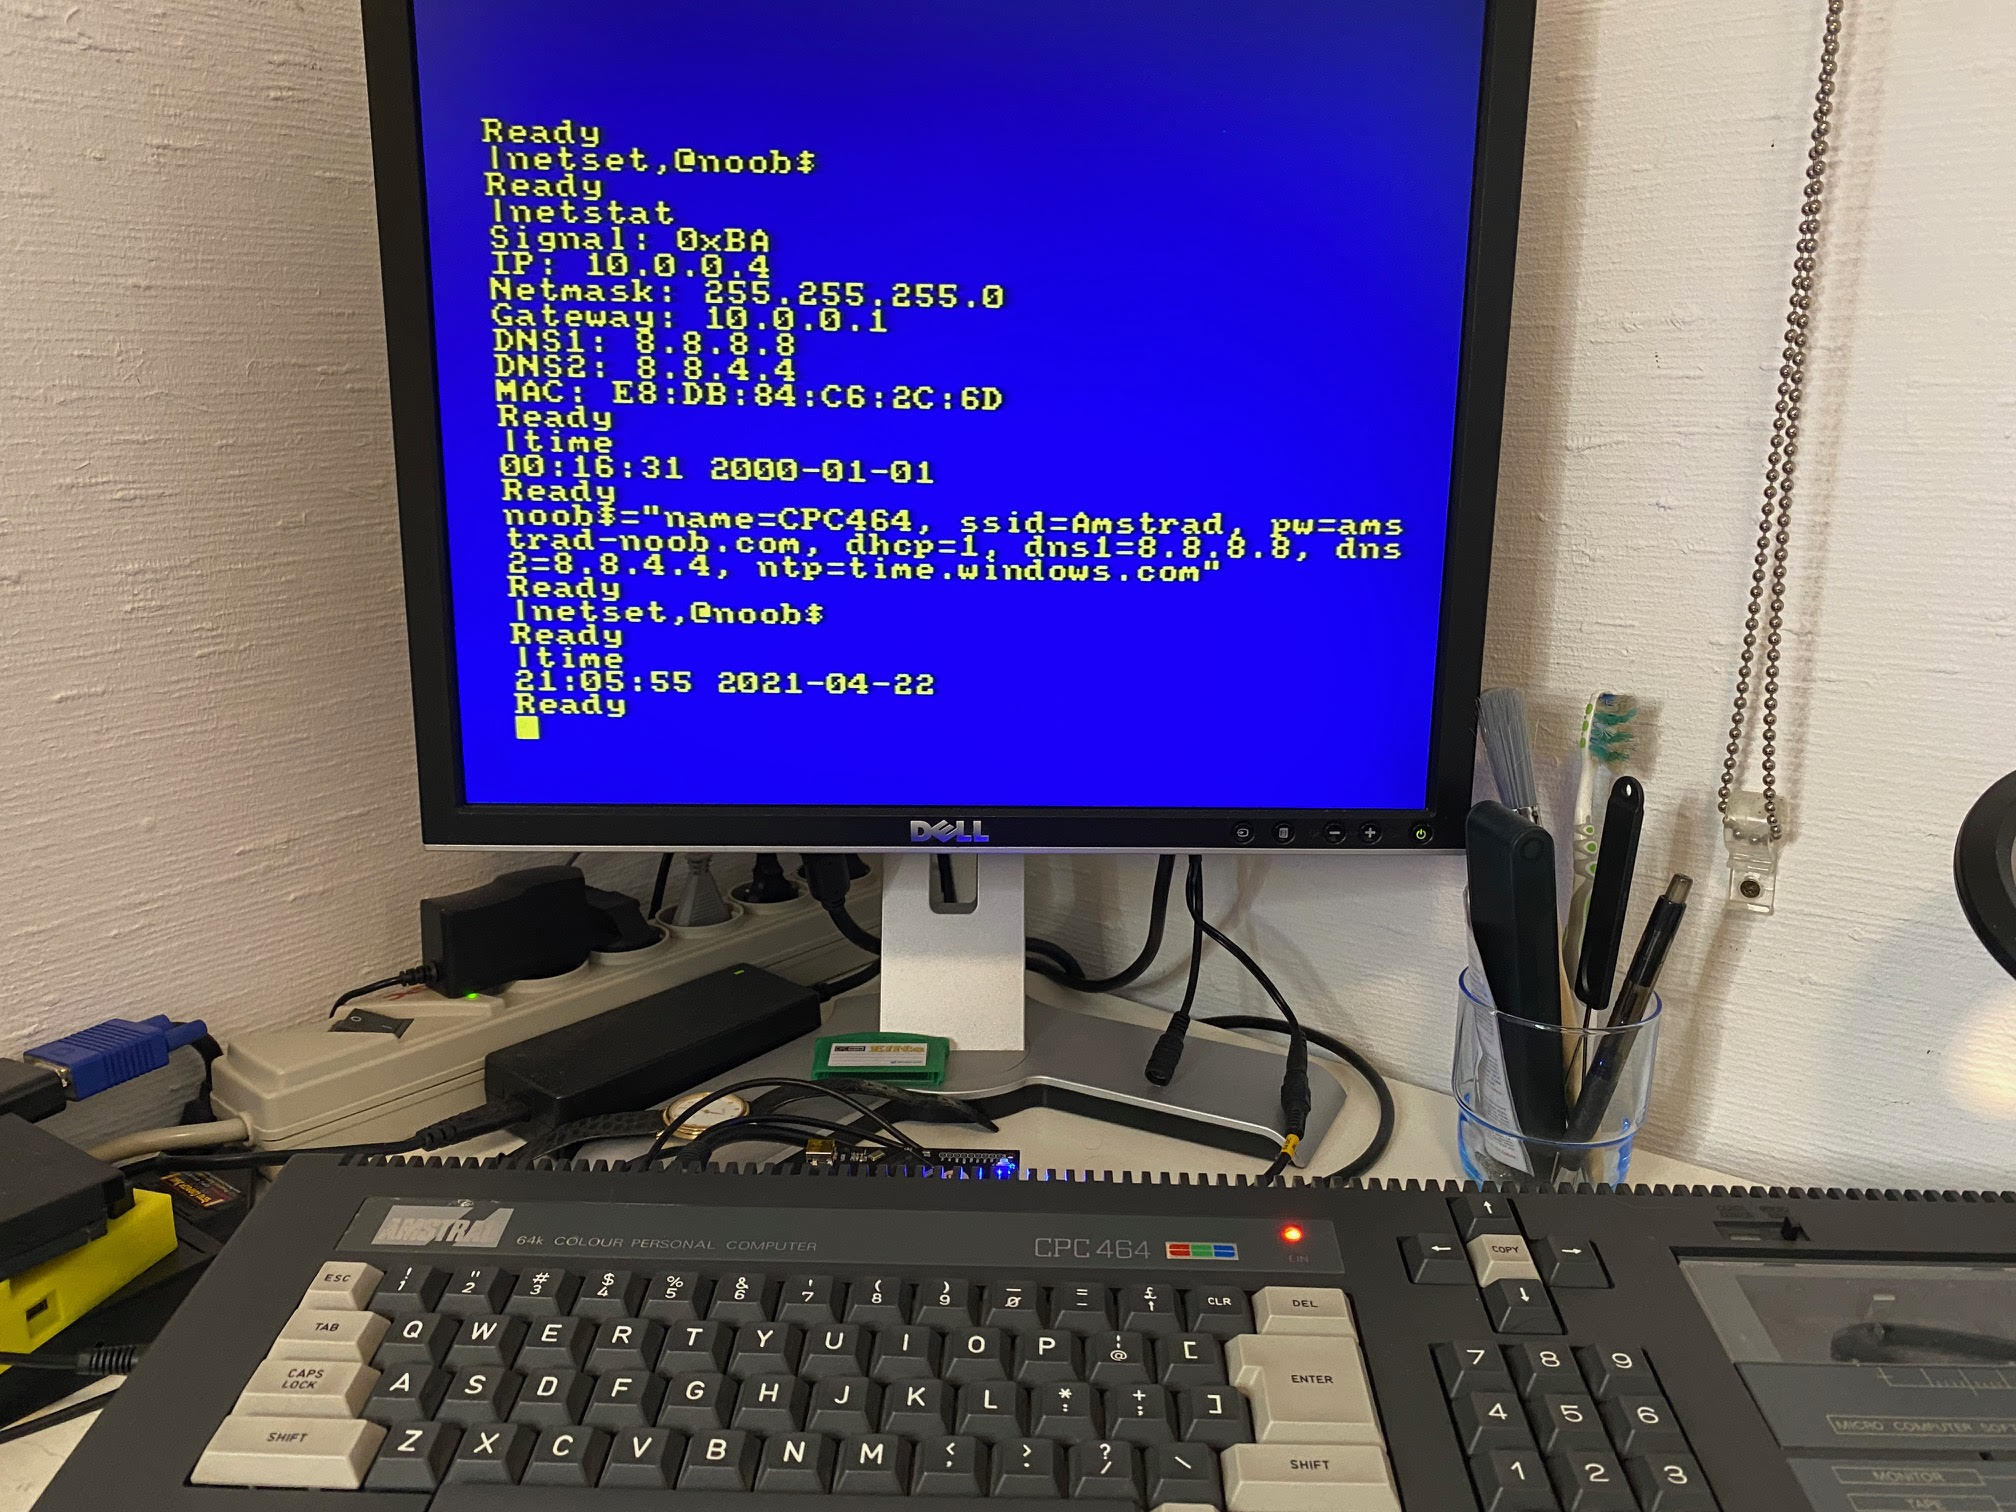
If all went well, the output should say:
“Ready”
Next type
|netstat
It should reveal your current internet settings including mac address, dns settings and IP address.
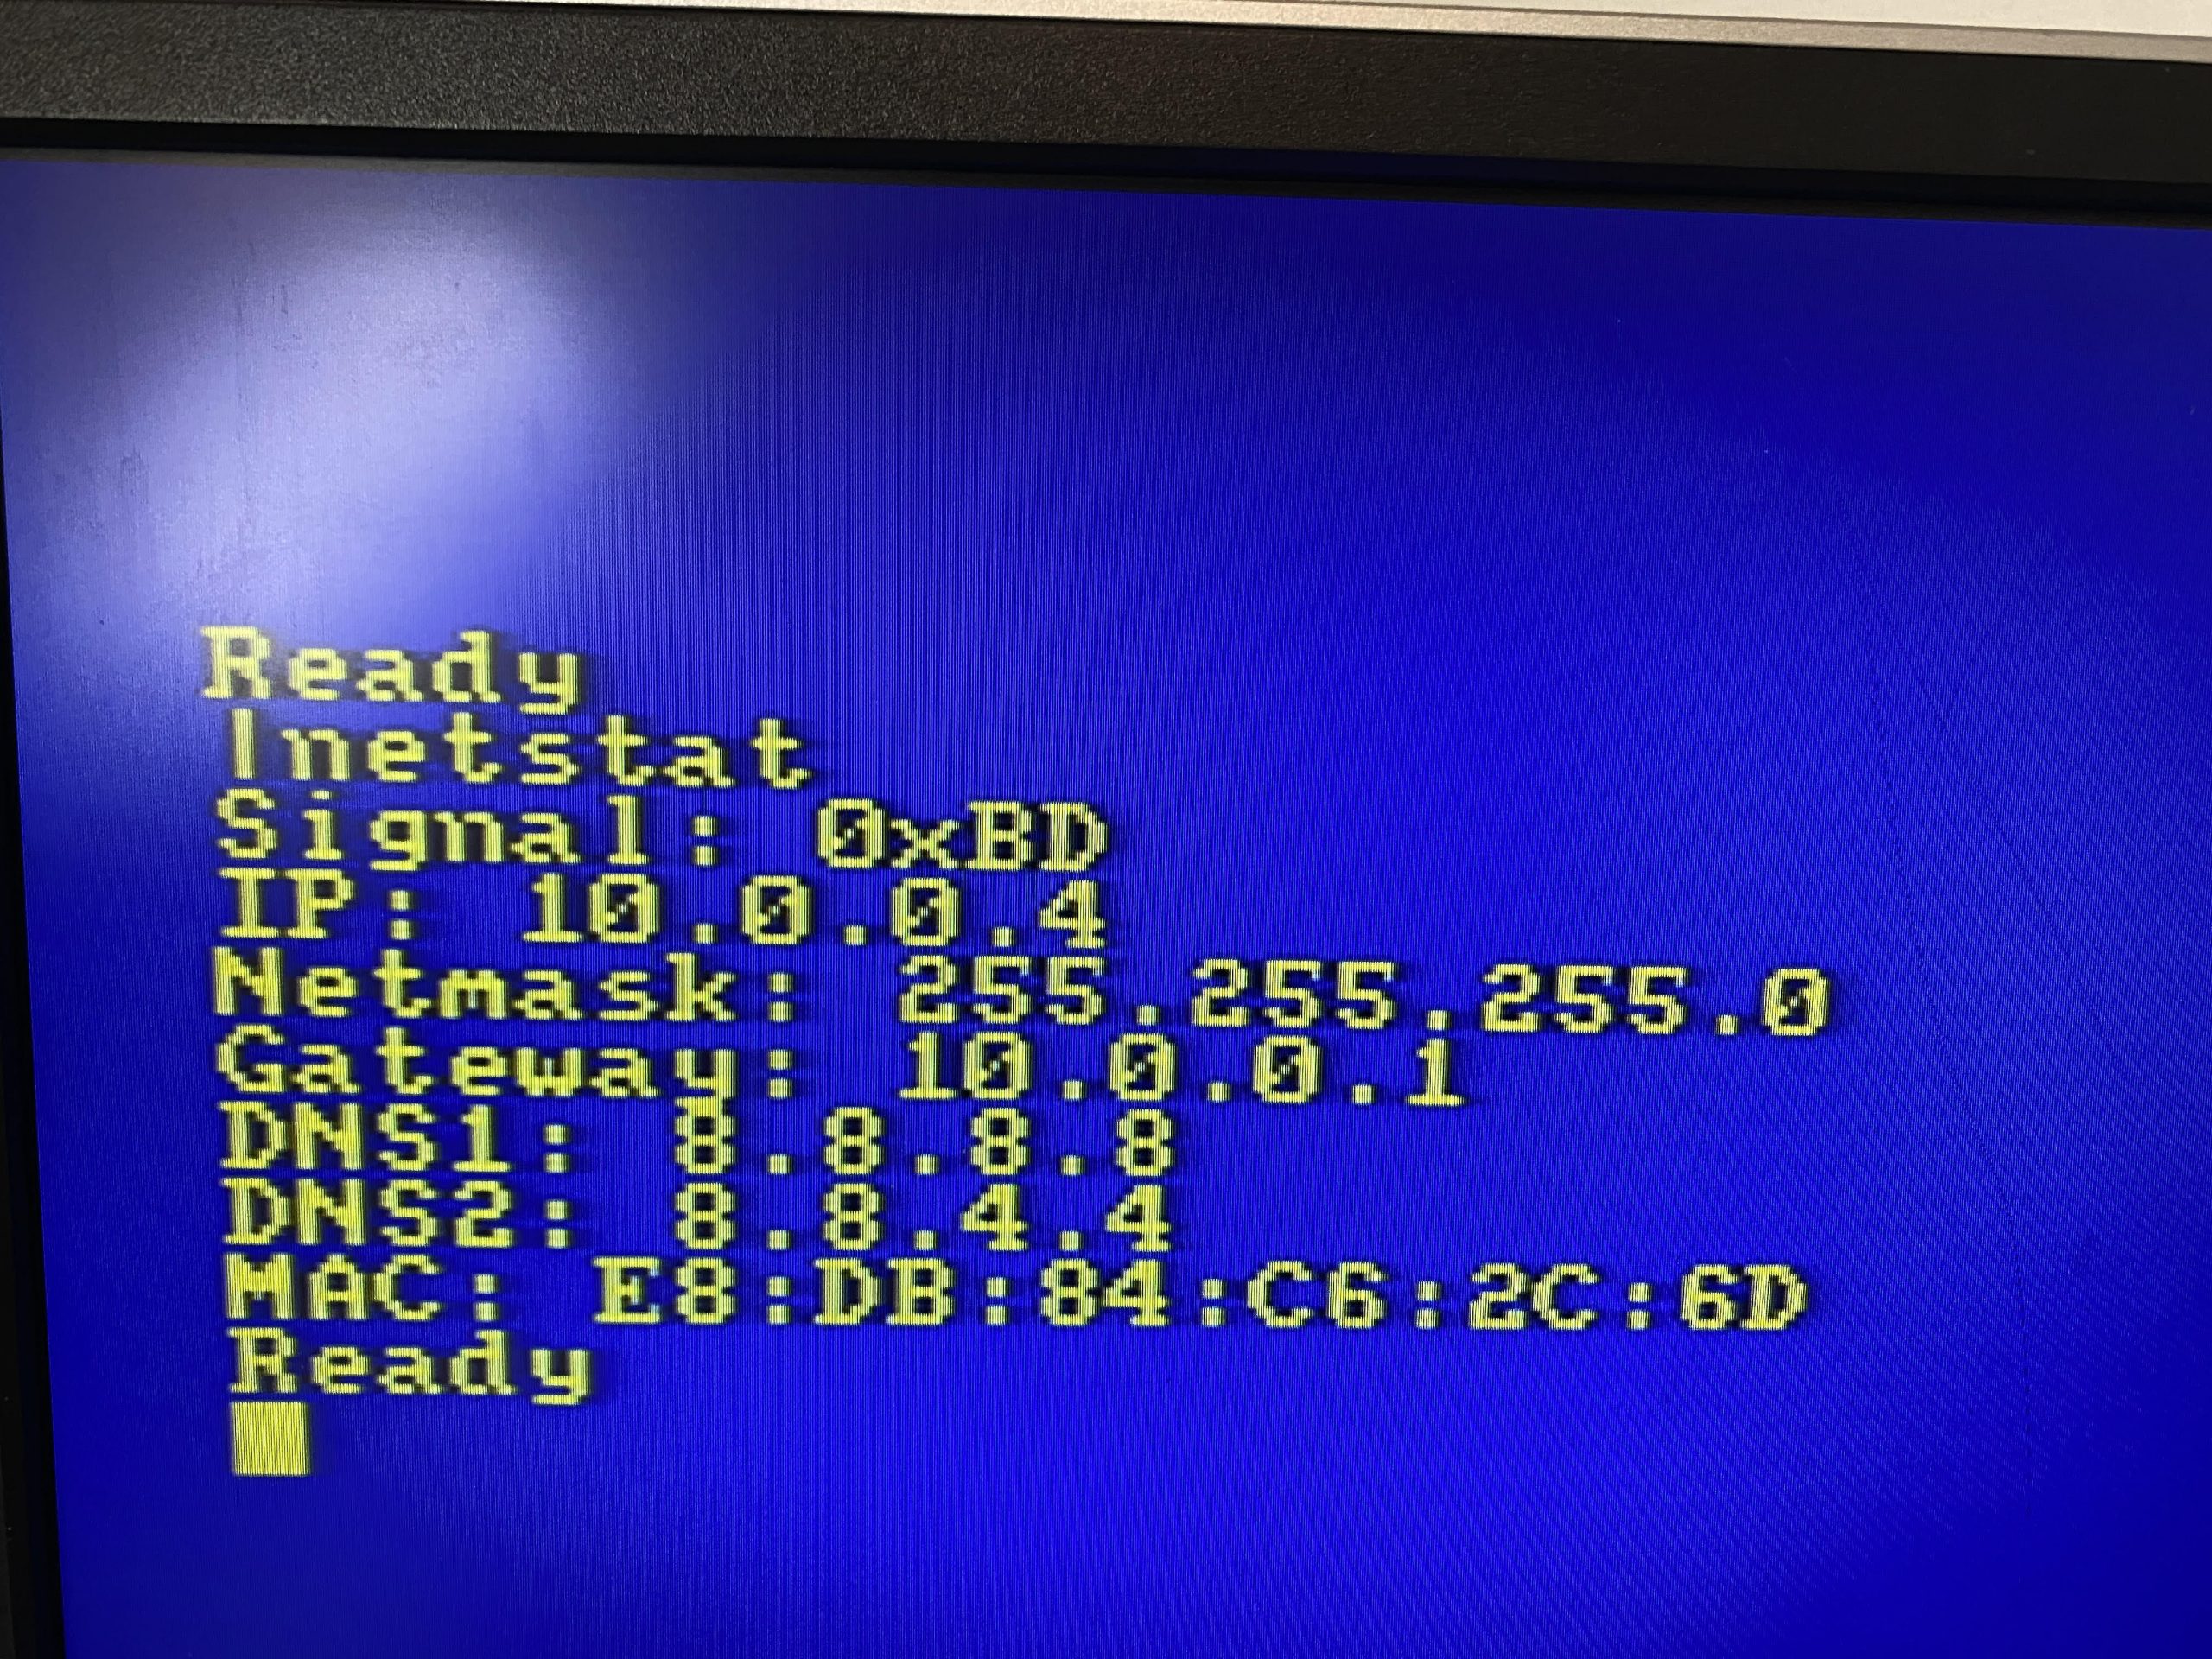
If it doesn’t and instead says “No AP found” or “Connecting” try the command again.
If it stays on “No AP found” make sure to type the SSID using the exact same case (upper/lower) as you can see the SSID being reported on your normal computer. So if your SSID shows up as “Amstrad” then use that SSID in your parameters, for example “amstrad” won’t work, it must be “Amstrad” in this example.
To prove things are working type
|time
it should retrieve the time from the NTP server specified in the parameters, it took a few attempts but as you can see it is reporting today’s date/time below.
How Awesome ! The date and time are synced via the internet on an Amstrad CPC !!!
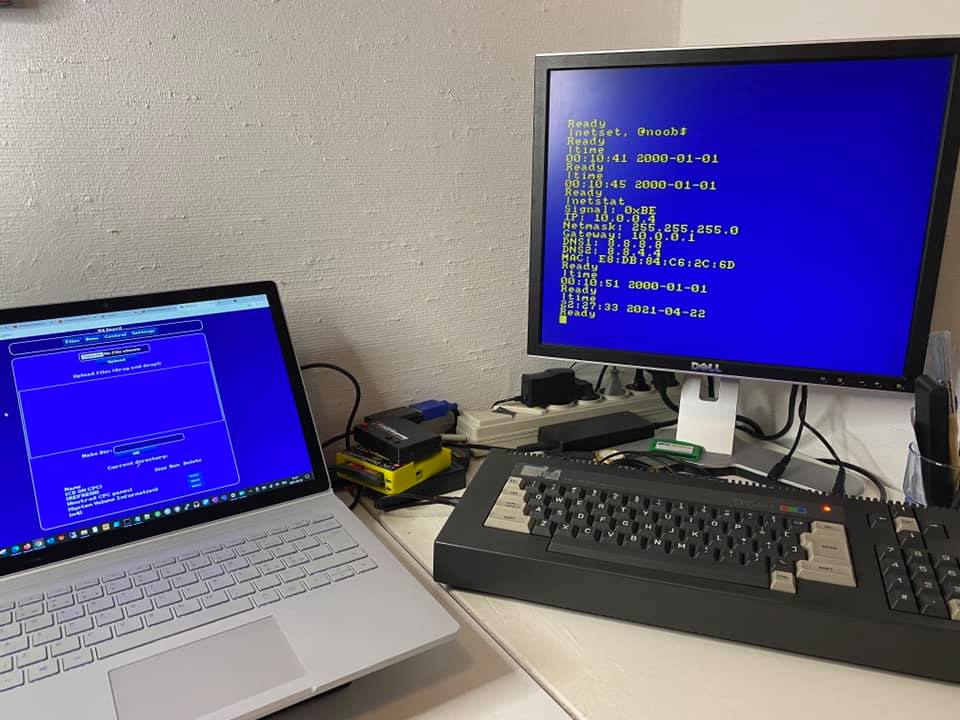
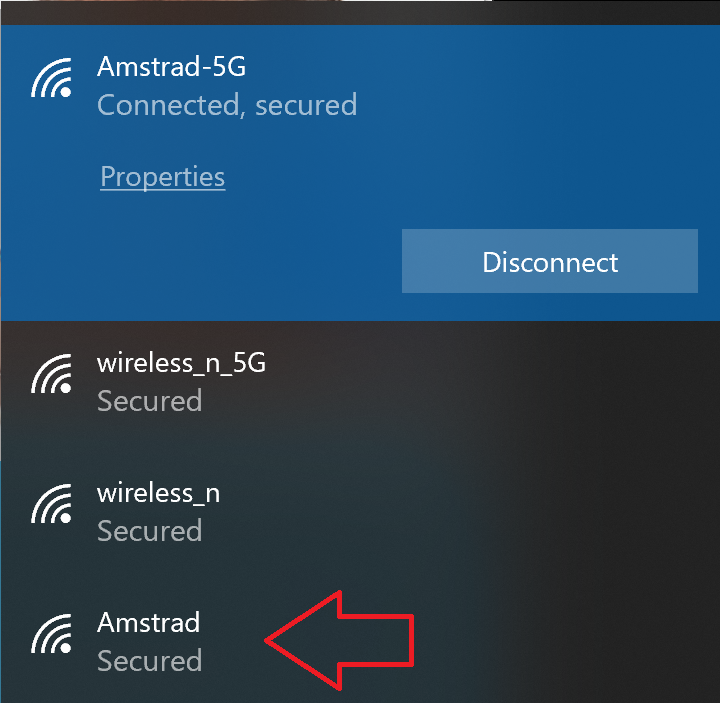
Next, on a Windows (or other internet connected computer), make sure that you are first connected to the same network router as your CPC is connected to, mine is a Netgear router for this test. In the Netgear admin interface i can see that both this computer (Surface Book 2) and the CPC (CPC464) are connected.
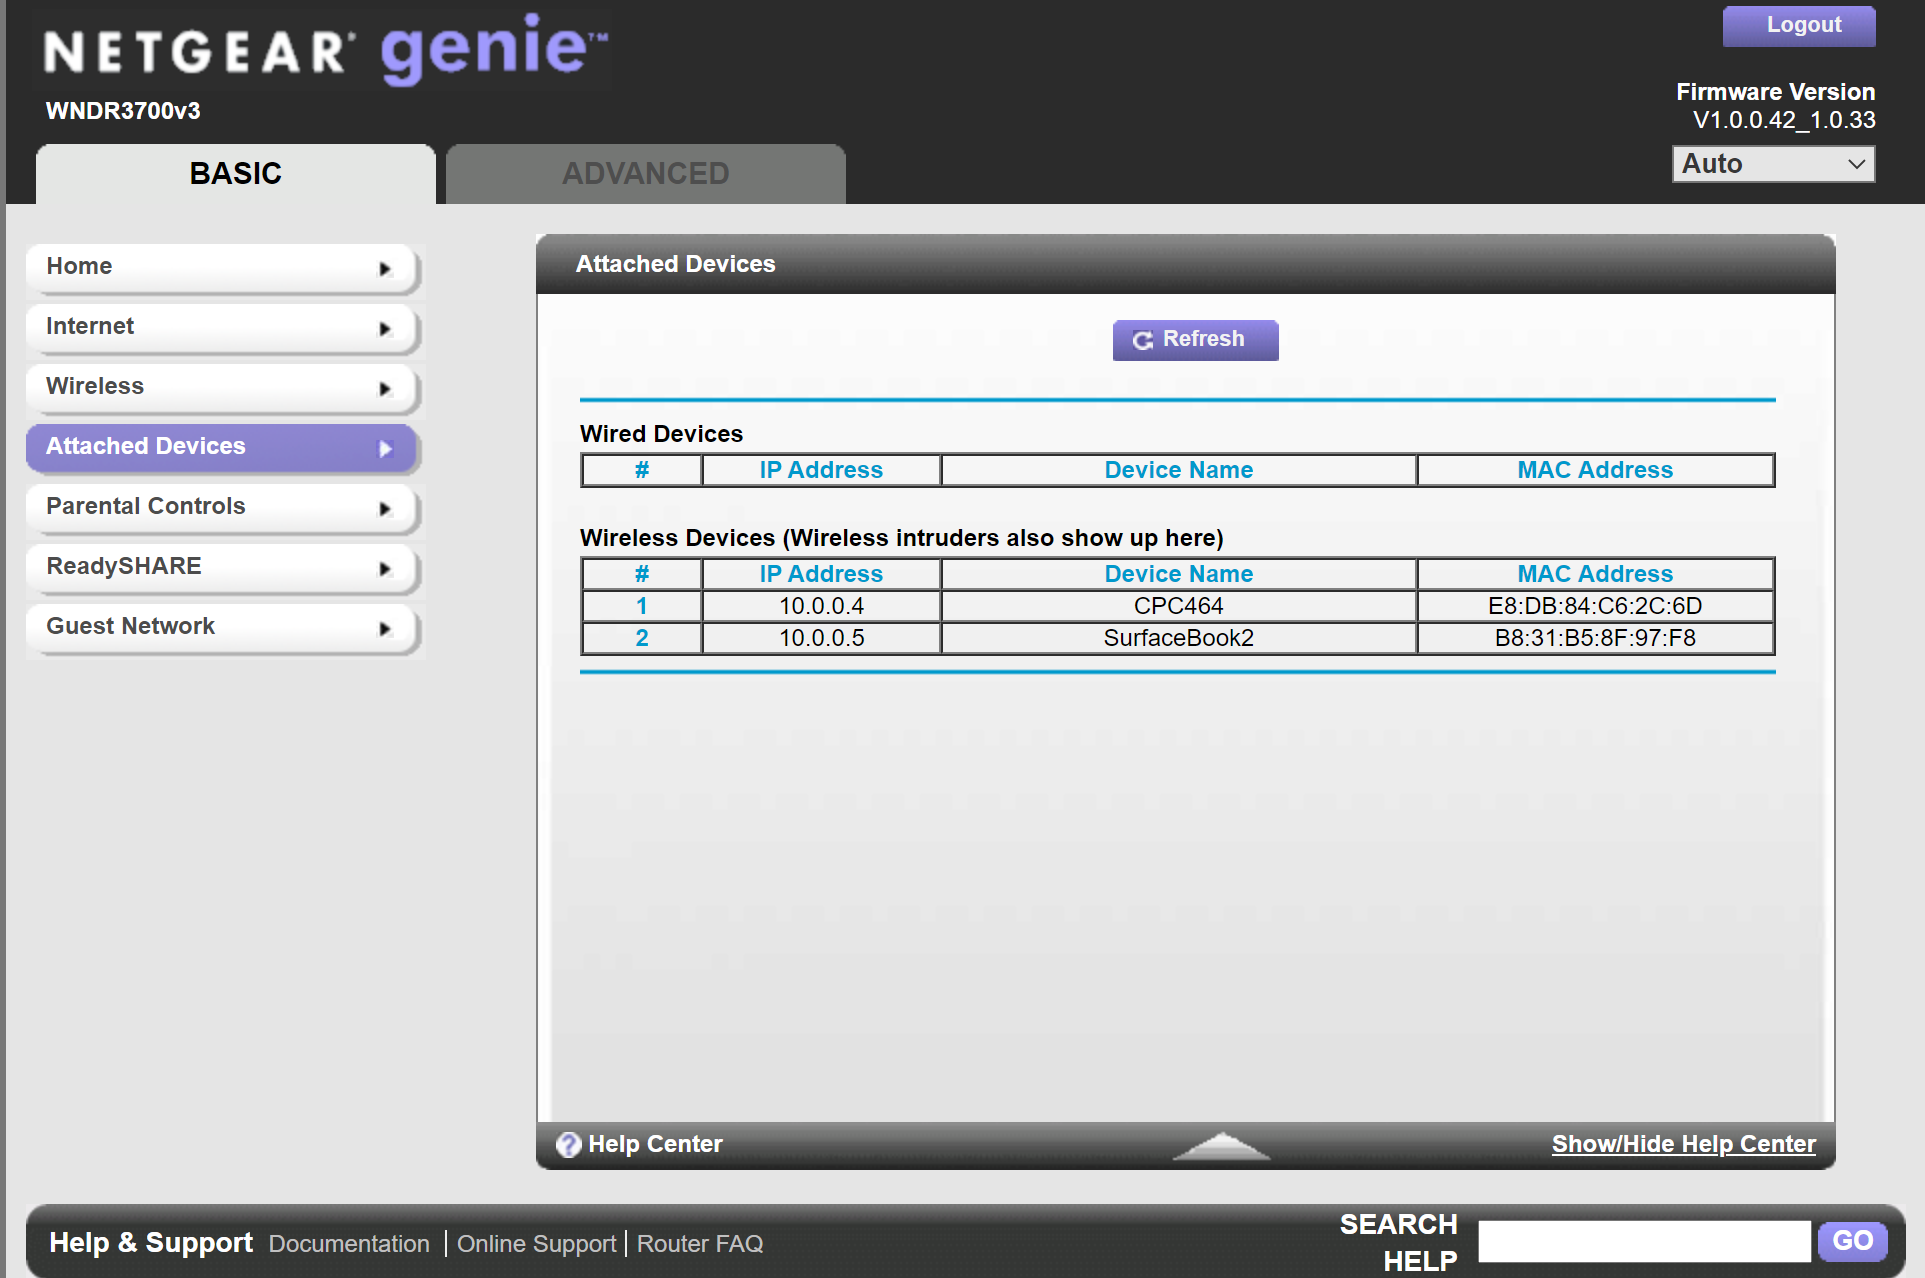 Now that I know both computers are on the SAME network, I can do stuff on the Windows PC. Browse to the IP address of your CPC in a web browser in the following format http://x.x.x.x where x.x.x.x is the ip address revealed using |netstat
You should see something like this in your web browser.
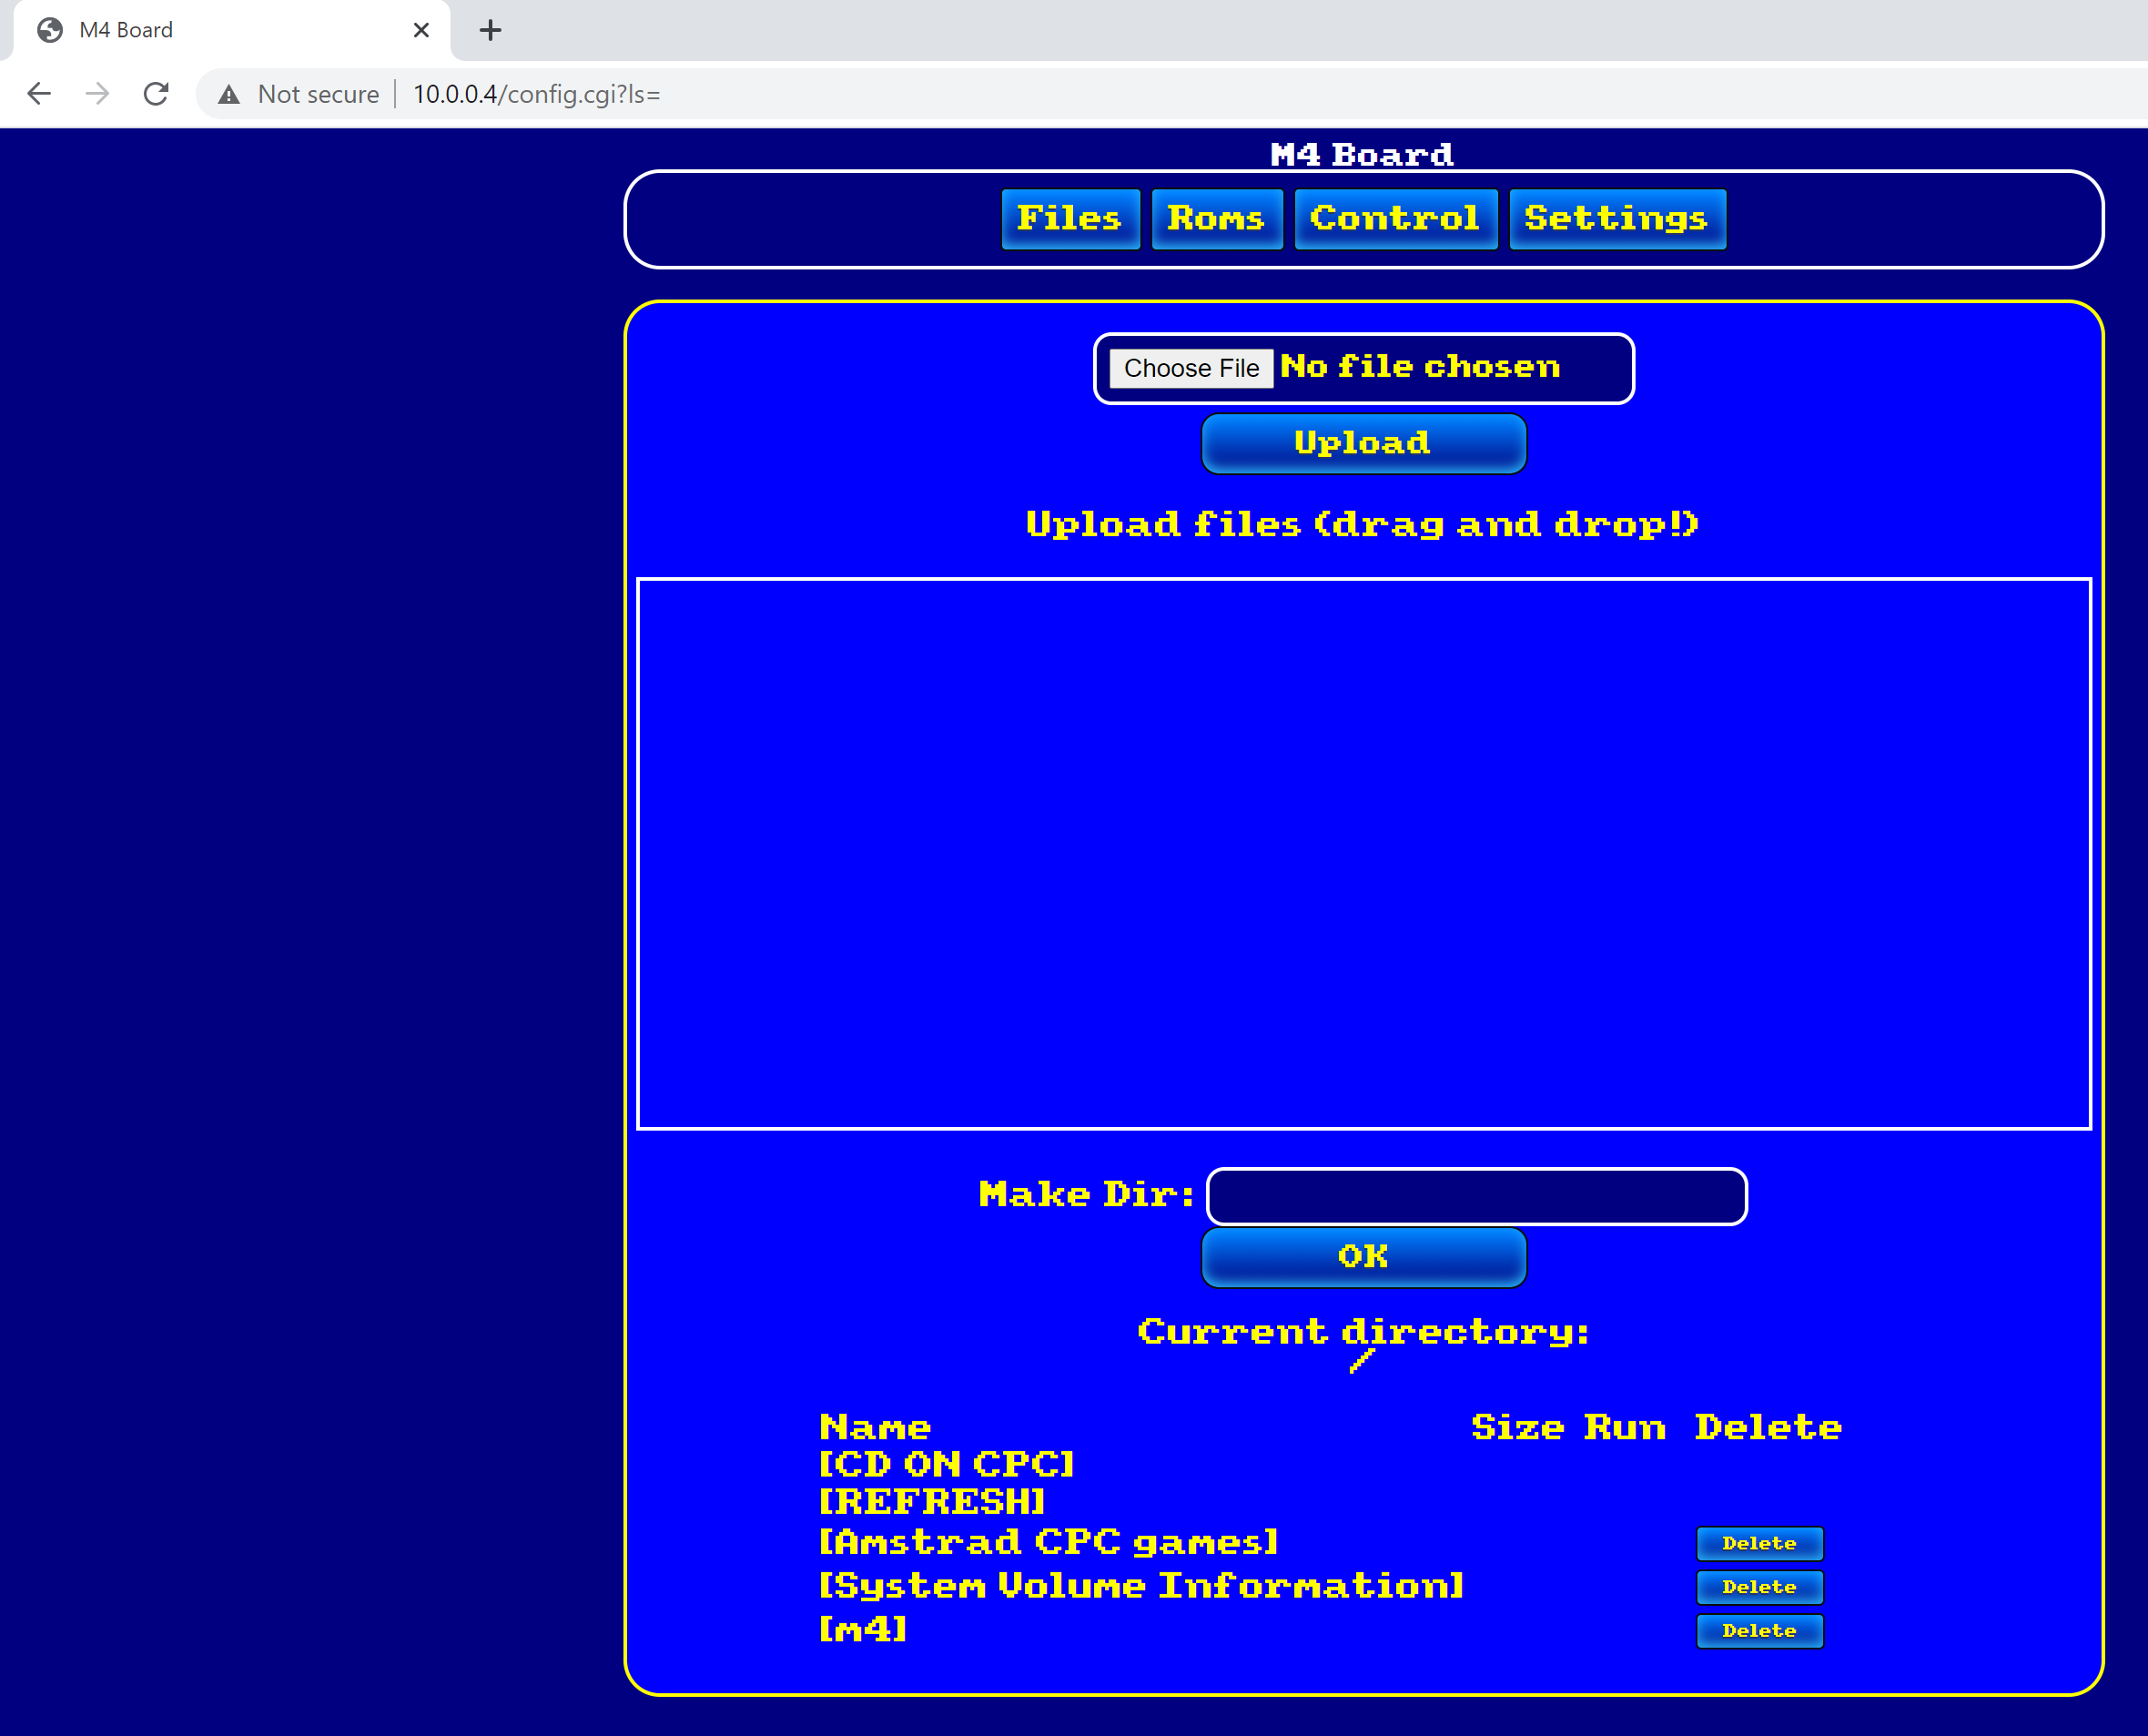 As you can see you have a bunch of options there, in this blog post I will only try and run a game by copying it to the M4 from a Windows computer. In the Make Dir: section, enter GAMES and press OK.
It appears in the view like below.
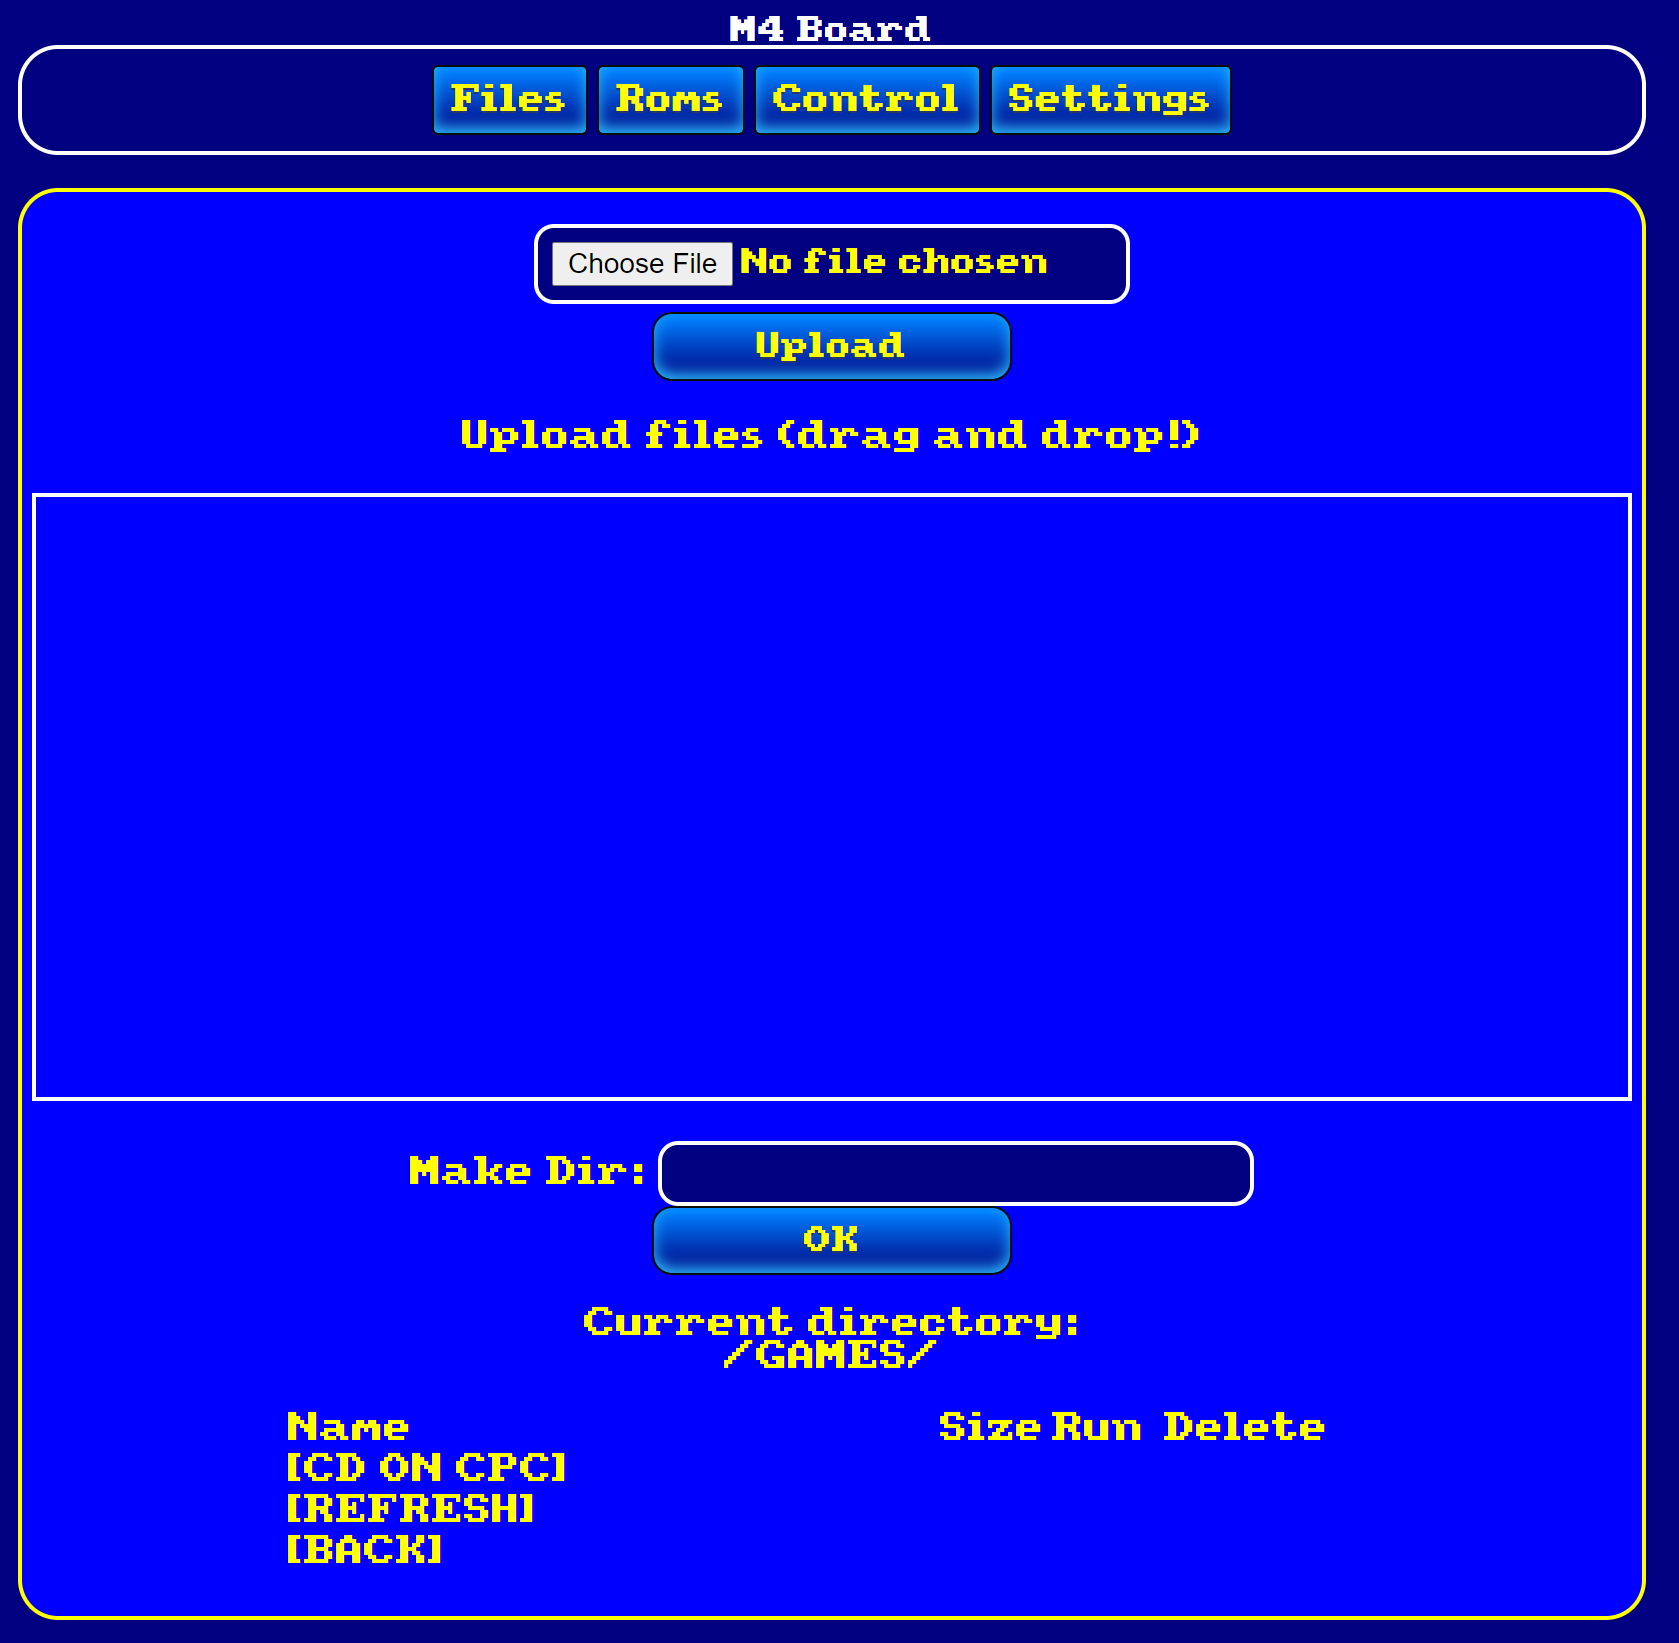
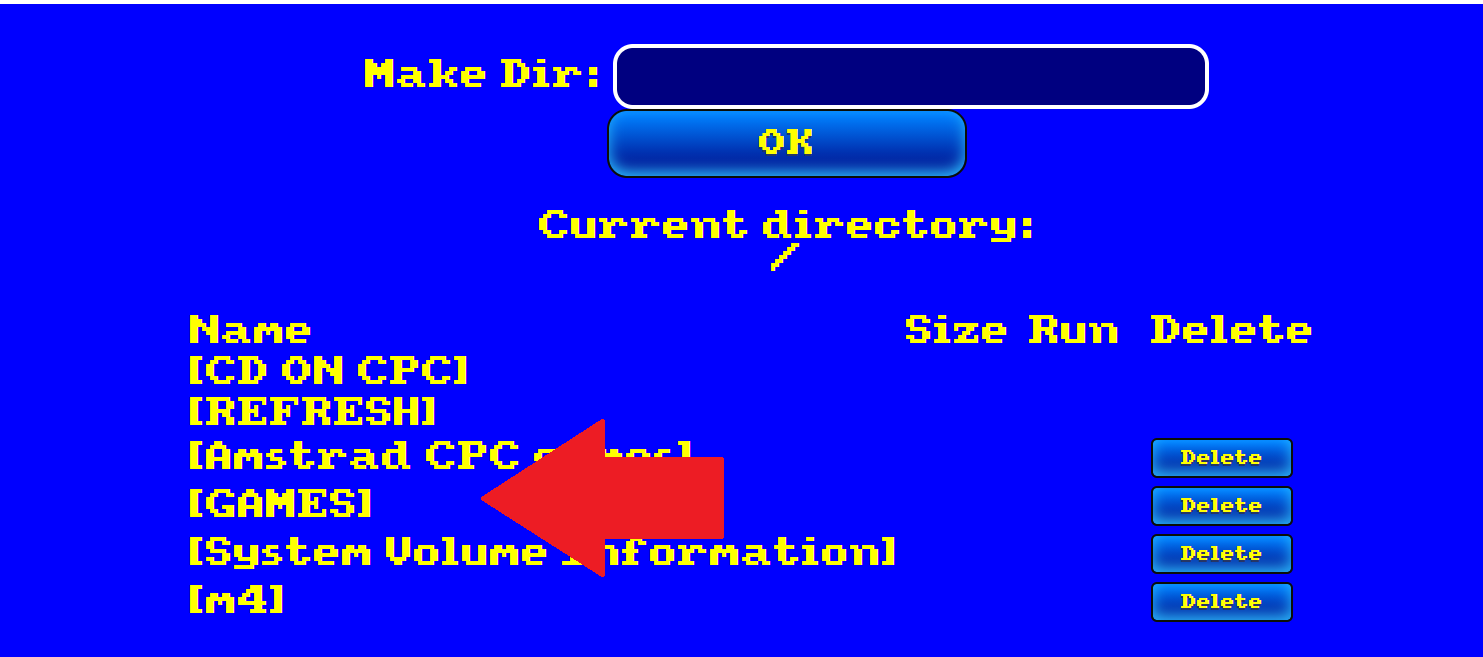 Next, click the GAMES directory you just created and you should see that it’s listed as the current directory
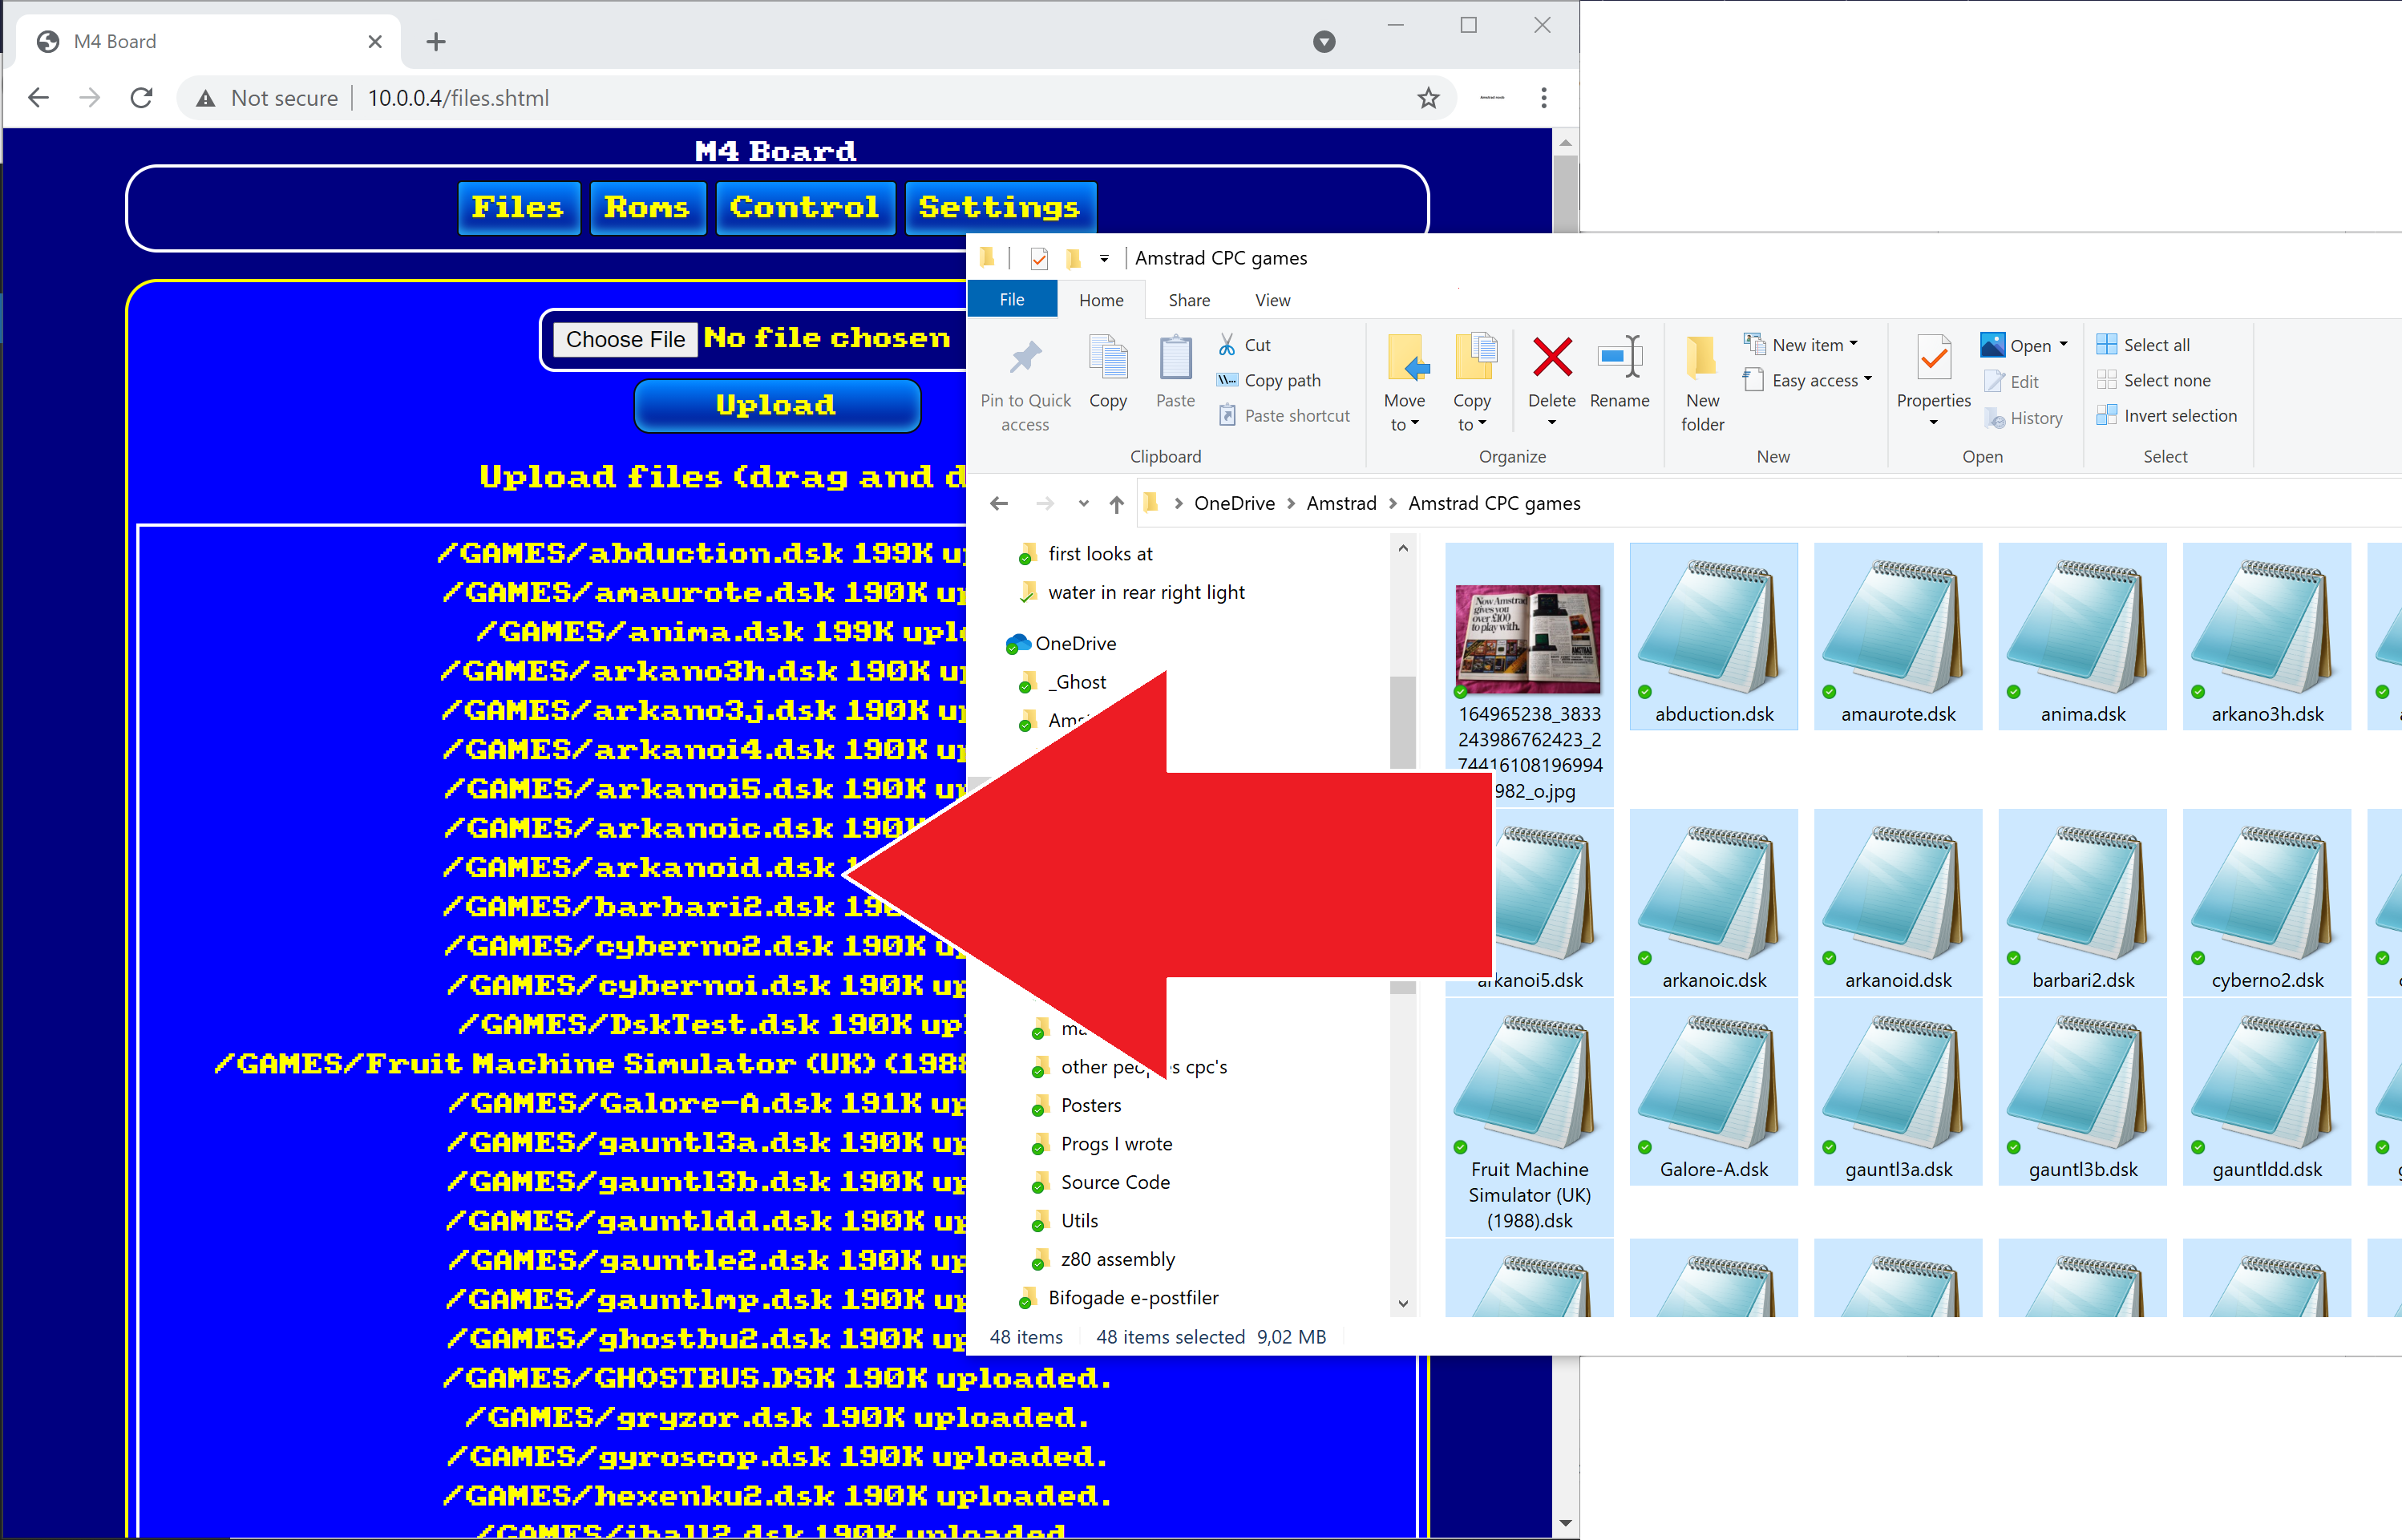
 Next, you can select Choose file, select one game, and select Upload to upload one game..
 Or drag and drop some games…by selecting a bunch and dropping them into the square, this did make my browser show some ‘unresponsive errors’ but just wait… and it will work.
After mine was done copying all the files it looked like the blue box on the left of the screenshot below.
 So now that’s done, back to the CPC !
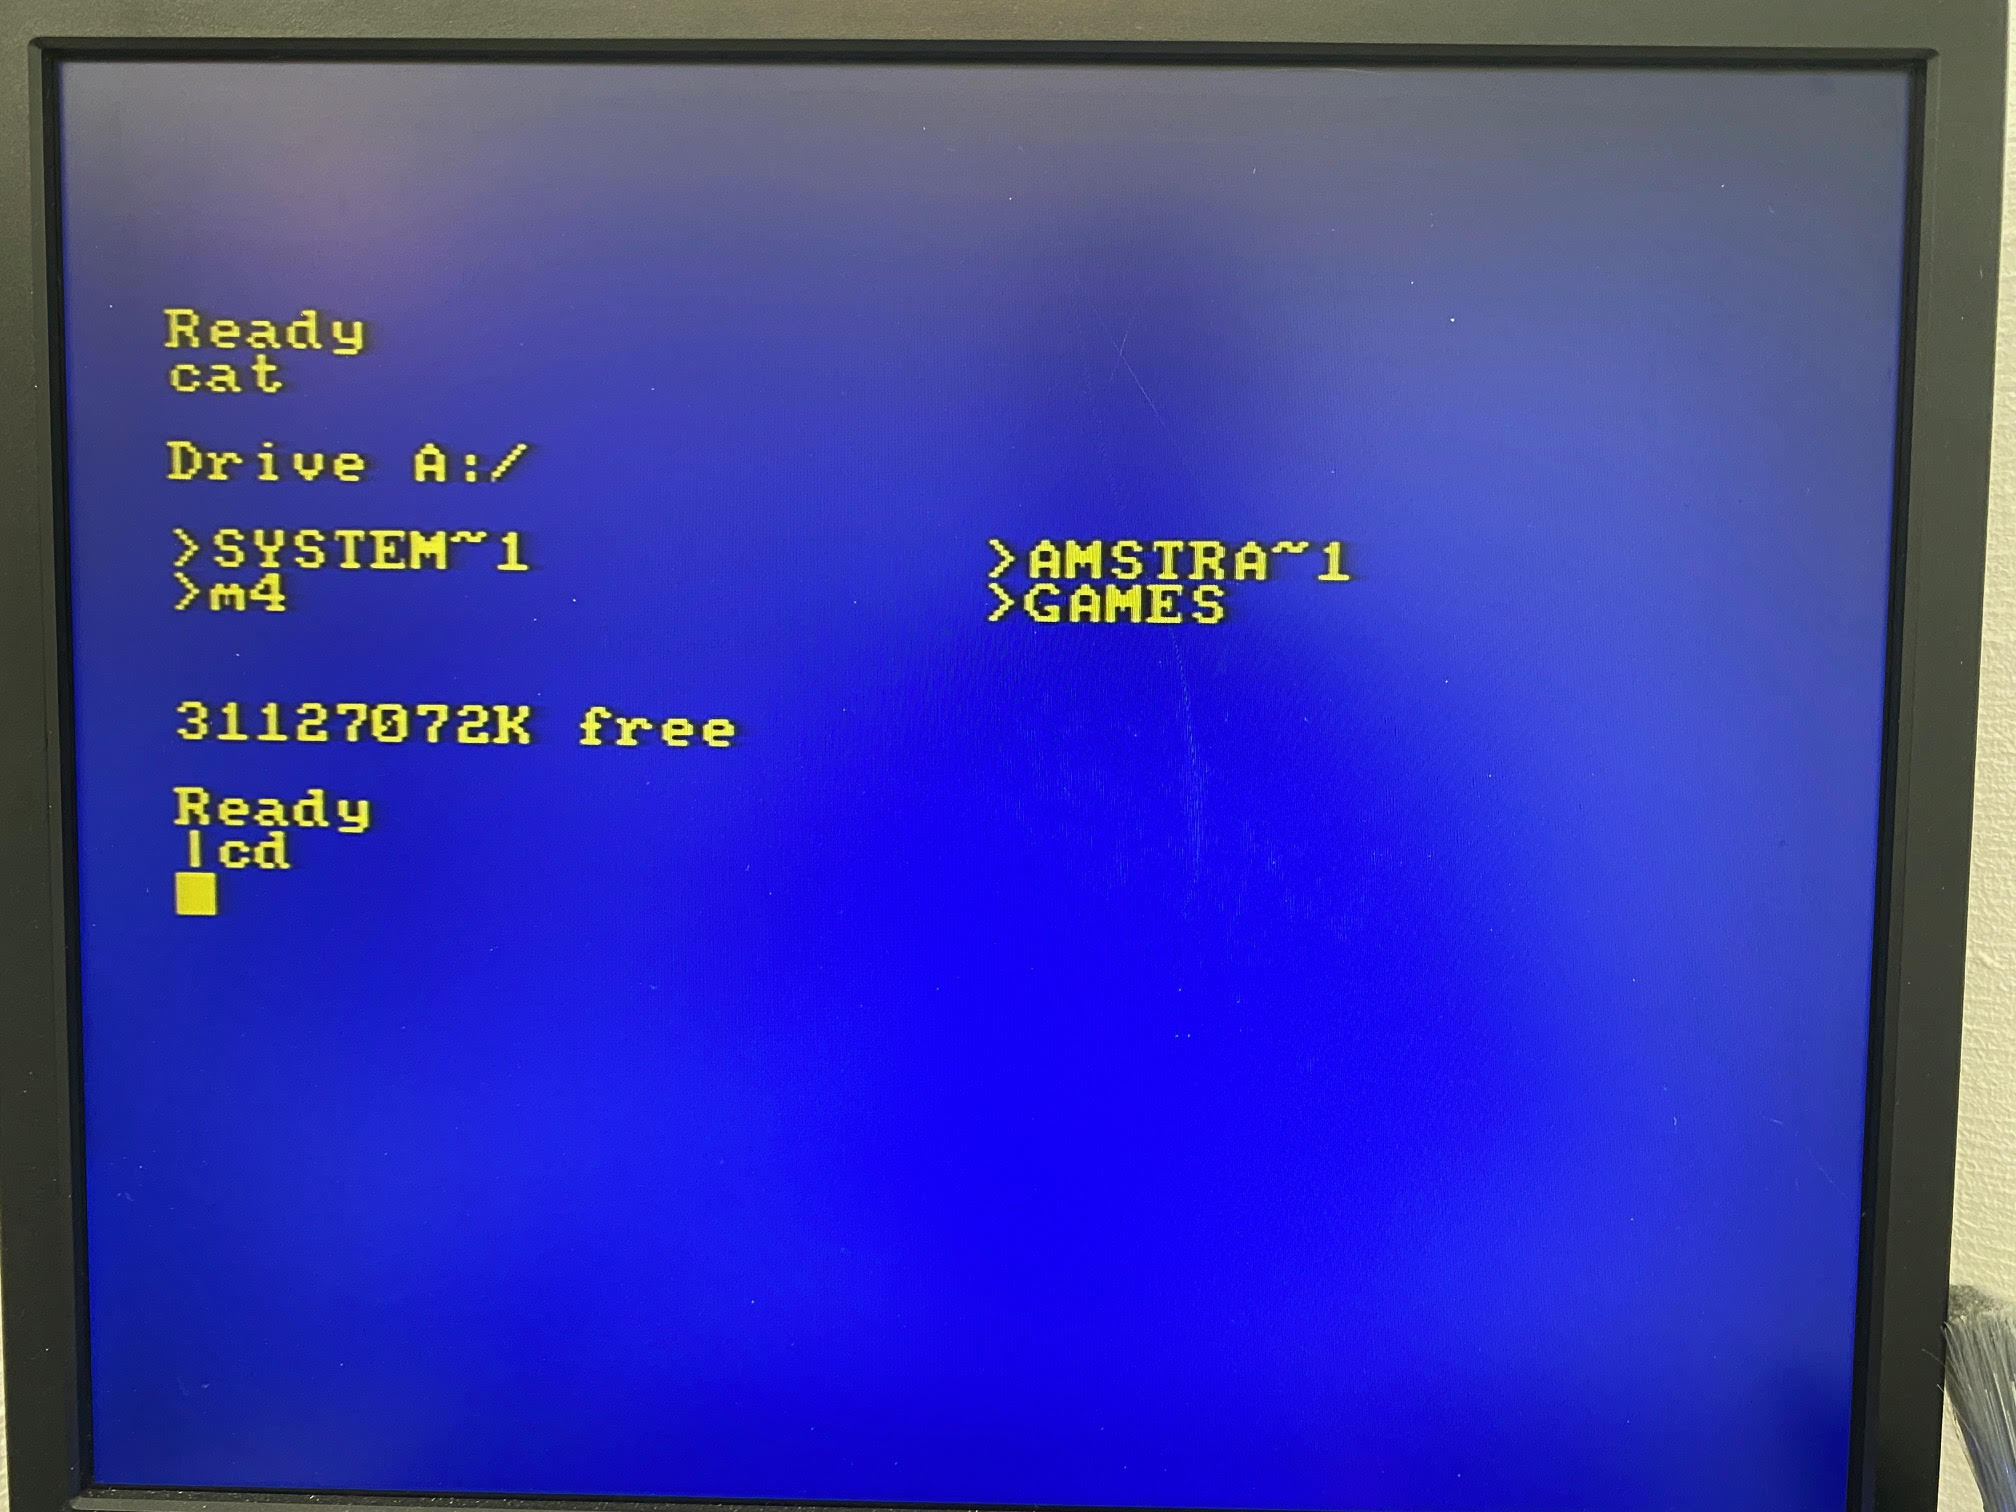
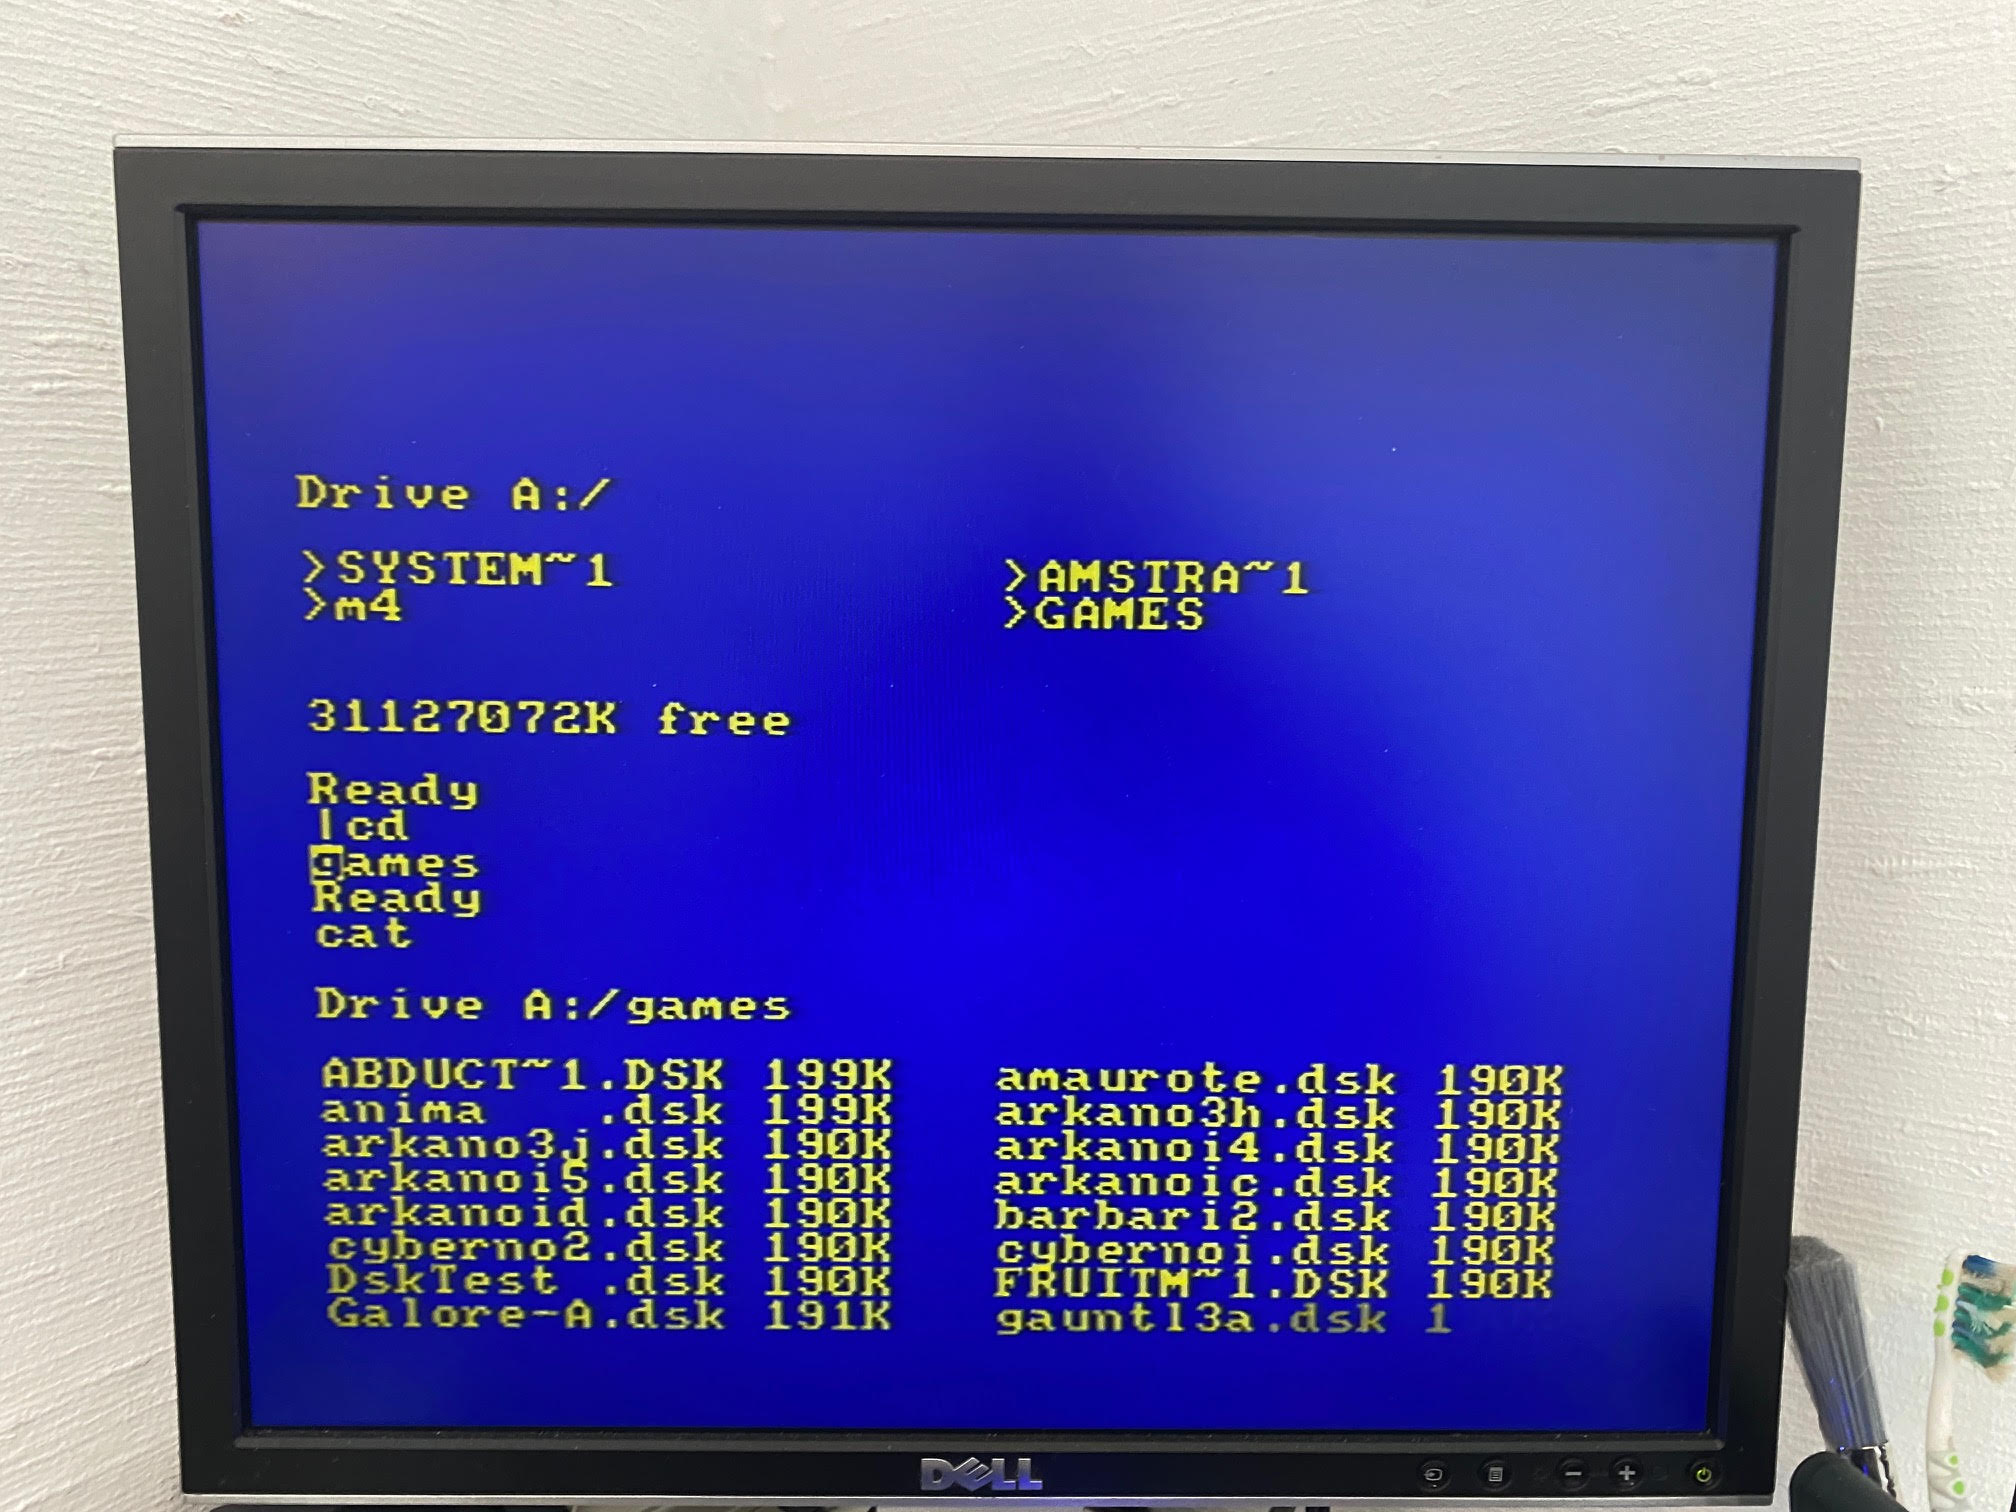
On the CPC type cat, You should see the GAMES directory (and others) you just created.
Note: on CPC's with Basic 1.0 (CPC464), RSX commands work in a different way, you can't pass the parameters directly to the rsx.
You will have to do it using a variable.
Ie. change into a sub directory called "DISCS". Type:  A$="DISCS":|cd,@A$
To make it easier to navigate for basic 1.0 users a prompt was built into |cd command.
You can press |cd (enter) then type or use cursor copy for the name.
As I’m using a CPC464 with Basic 1.0 in this blog post, I had to use the tip above ^
So first I typed cat followed by pressing |cd and enter, this then prompts you to type something so I typed the name of the directory, games and pressed enter again, it said Ready.
 At this point I can type cat again to see what is in that directory.
As you can see all my games are in DSK format (disk). To launch them, use the |cd command and press enter. Next, enter the name of the game disk, eg: whodare2.dsk
If all went well, it has mounted that disk and you can see the contents of the disk itself using cat.
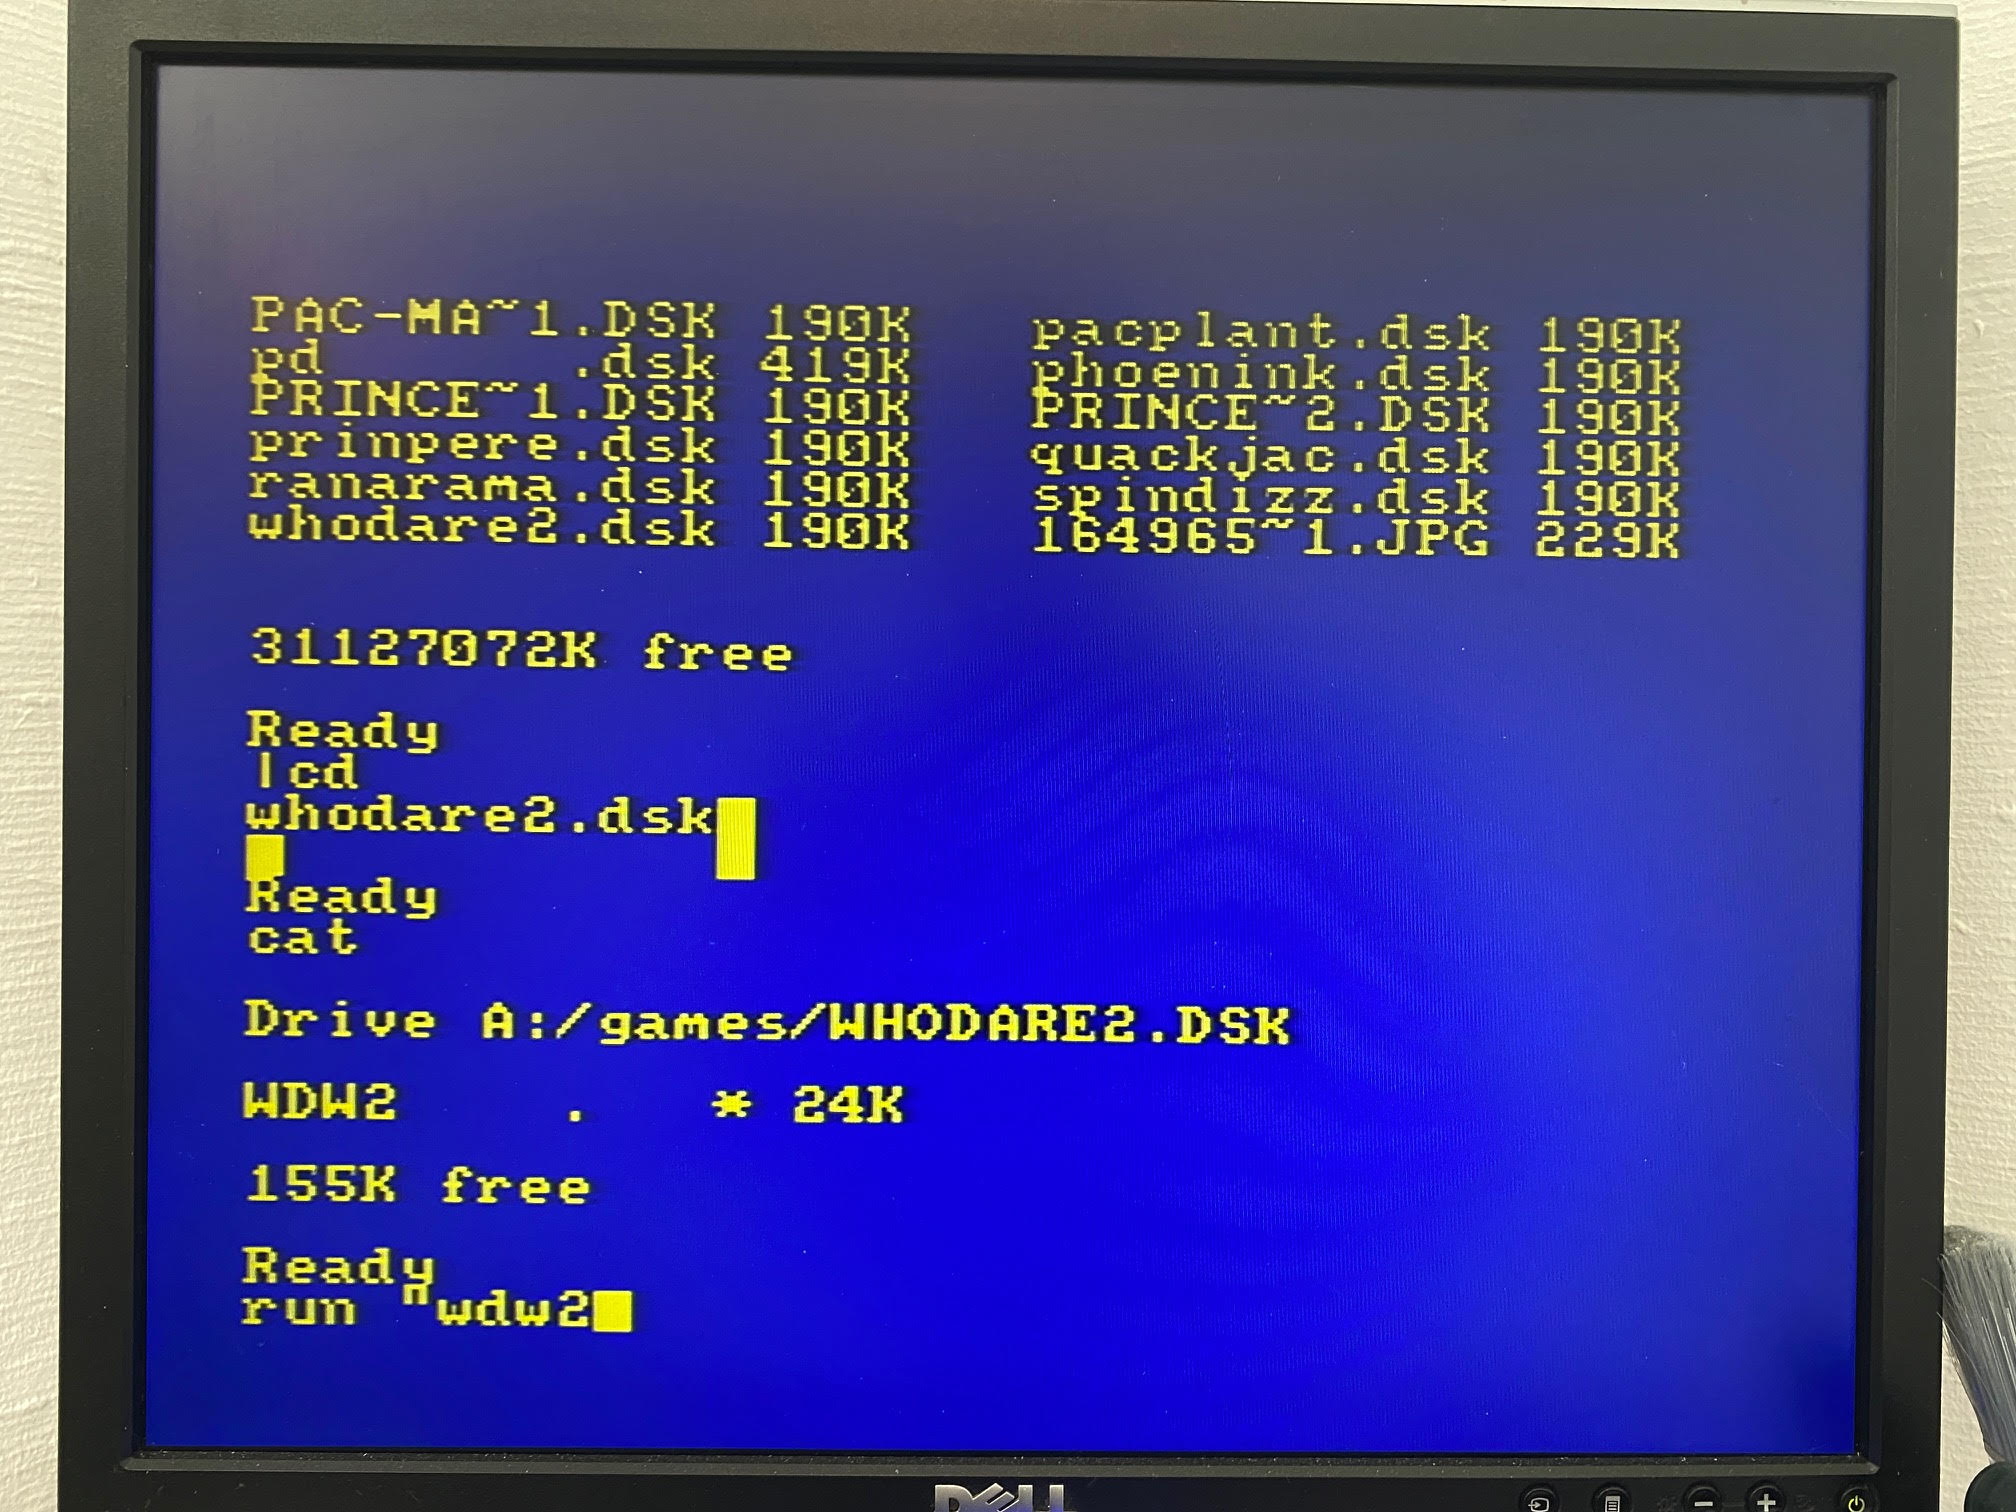
finally, to run the game type the name of the game as normal
eg run “wdw2
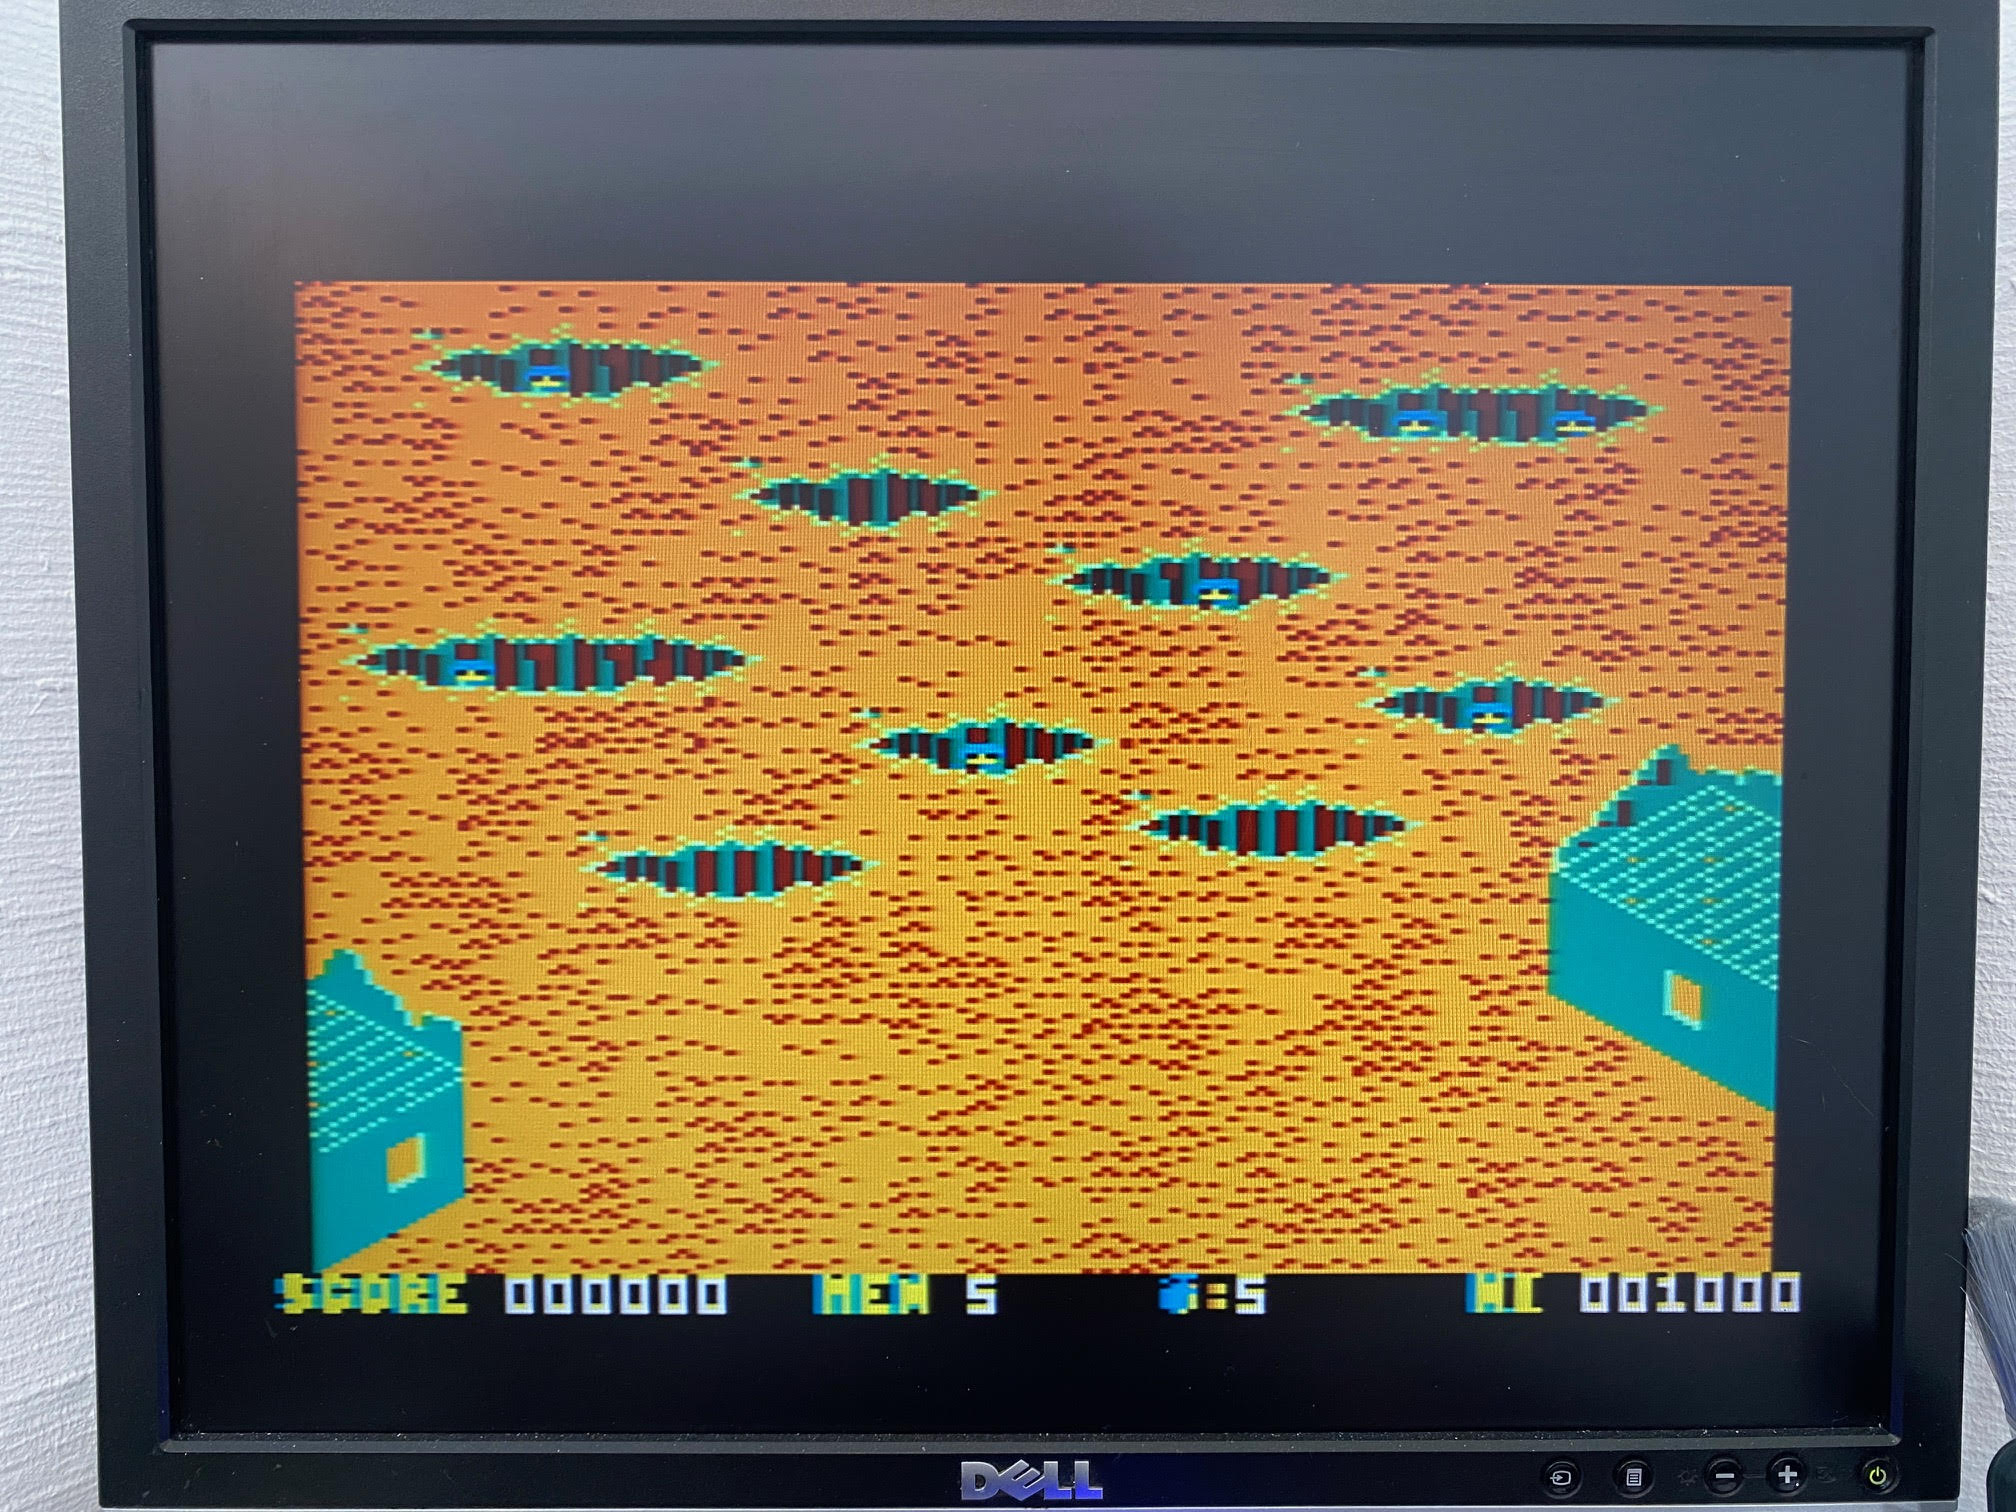
Success !
Now that you have connected to Wi-Fi it’s time to test downloading something. I wanted to first create a directory to store games downloaded from the internet called “www”. To create a directory type |mkdir, “dirname
but… as this is a CPC464 I had to do it this way.
dir$=”www”
|mkdir,@dir$
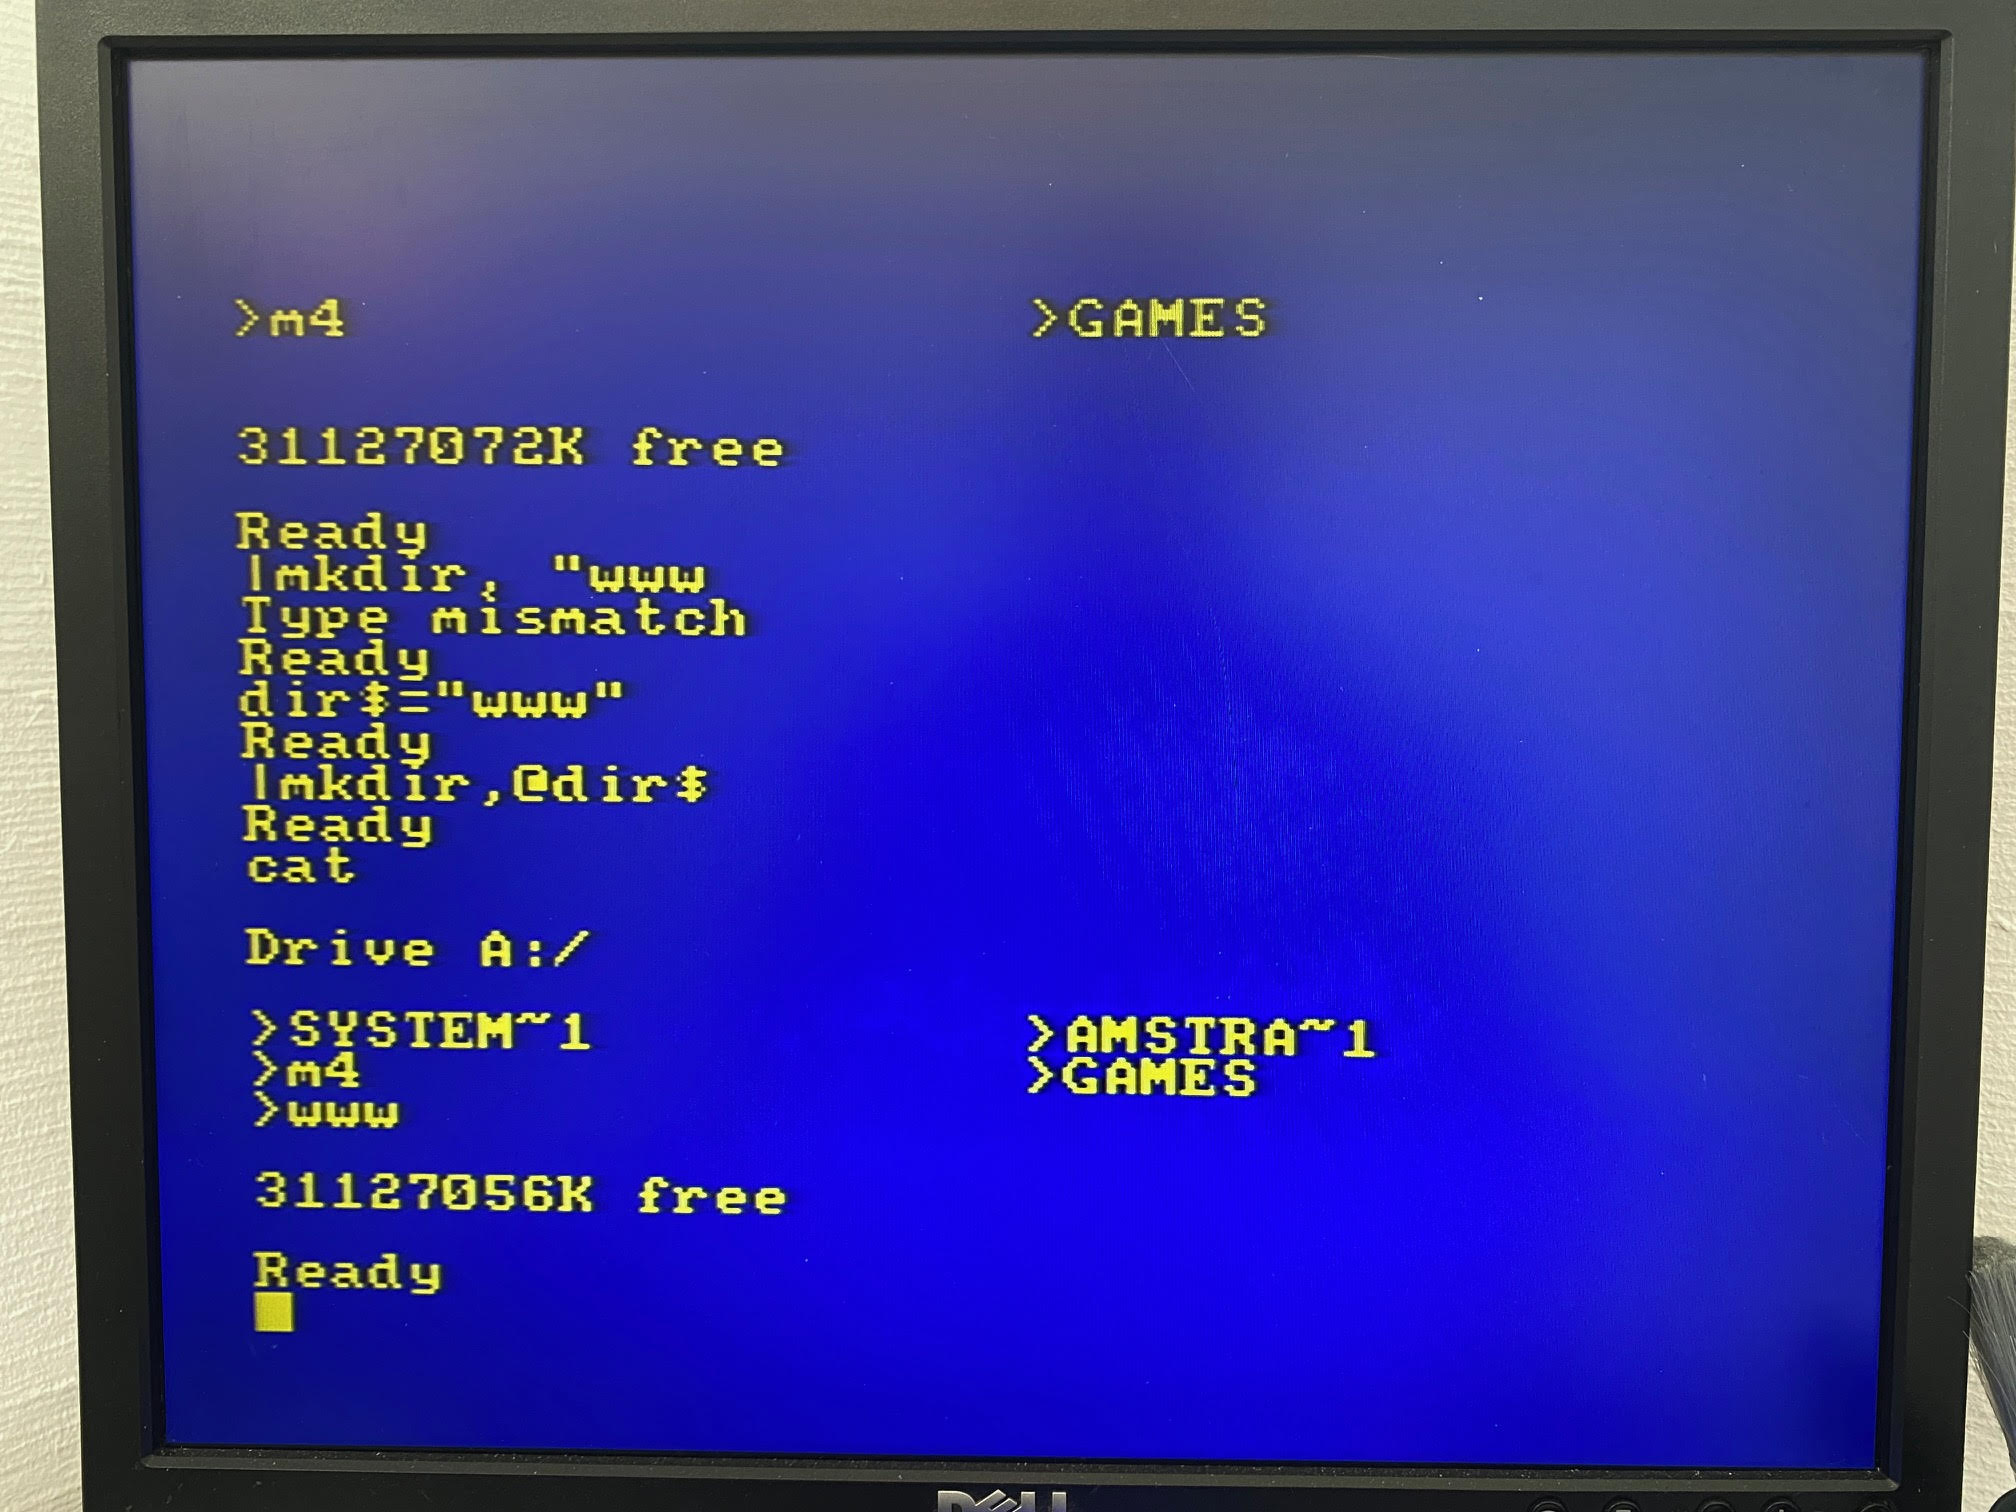 Now that the directory is created use |cd as described previously to navigate to that directory.
There’s currently nothing in the “www” directory. To download a game from the internet we are told to use the following command (on a CPC 6128).
|httpget,"spinpoint.org/battro.dsk"
But this is a CPC 464 so I have to do it this way.
file$="www.amstrad-noob.com/Games/arkanoid.dsk"
then issue the following
|httpget, @file$
This works fine but the downloaded file is 1k instead of 190k,see below screenshot.
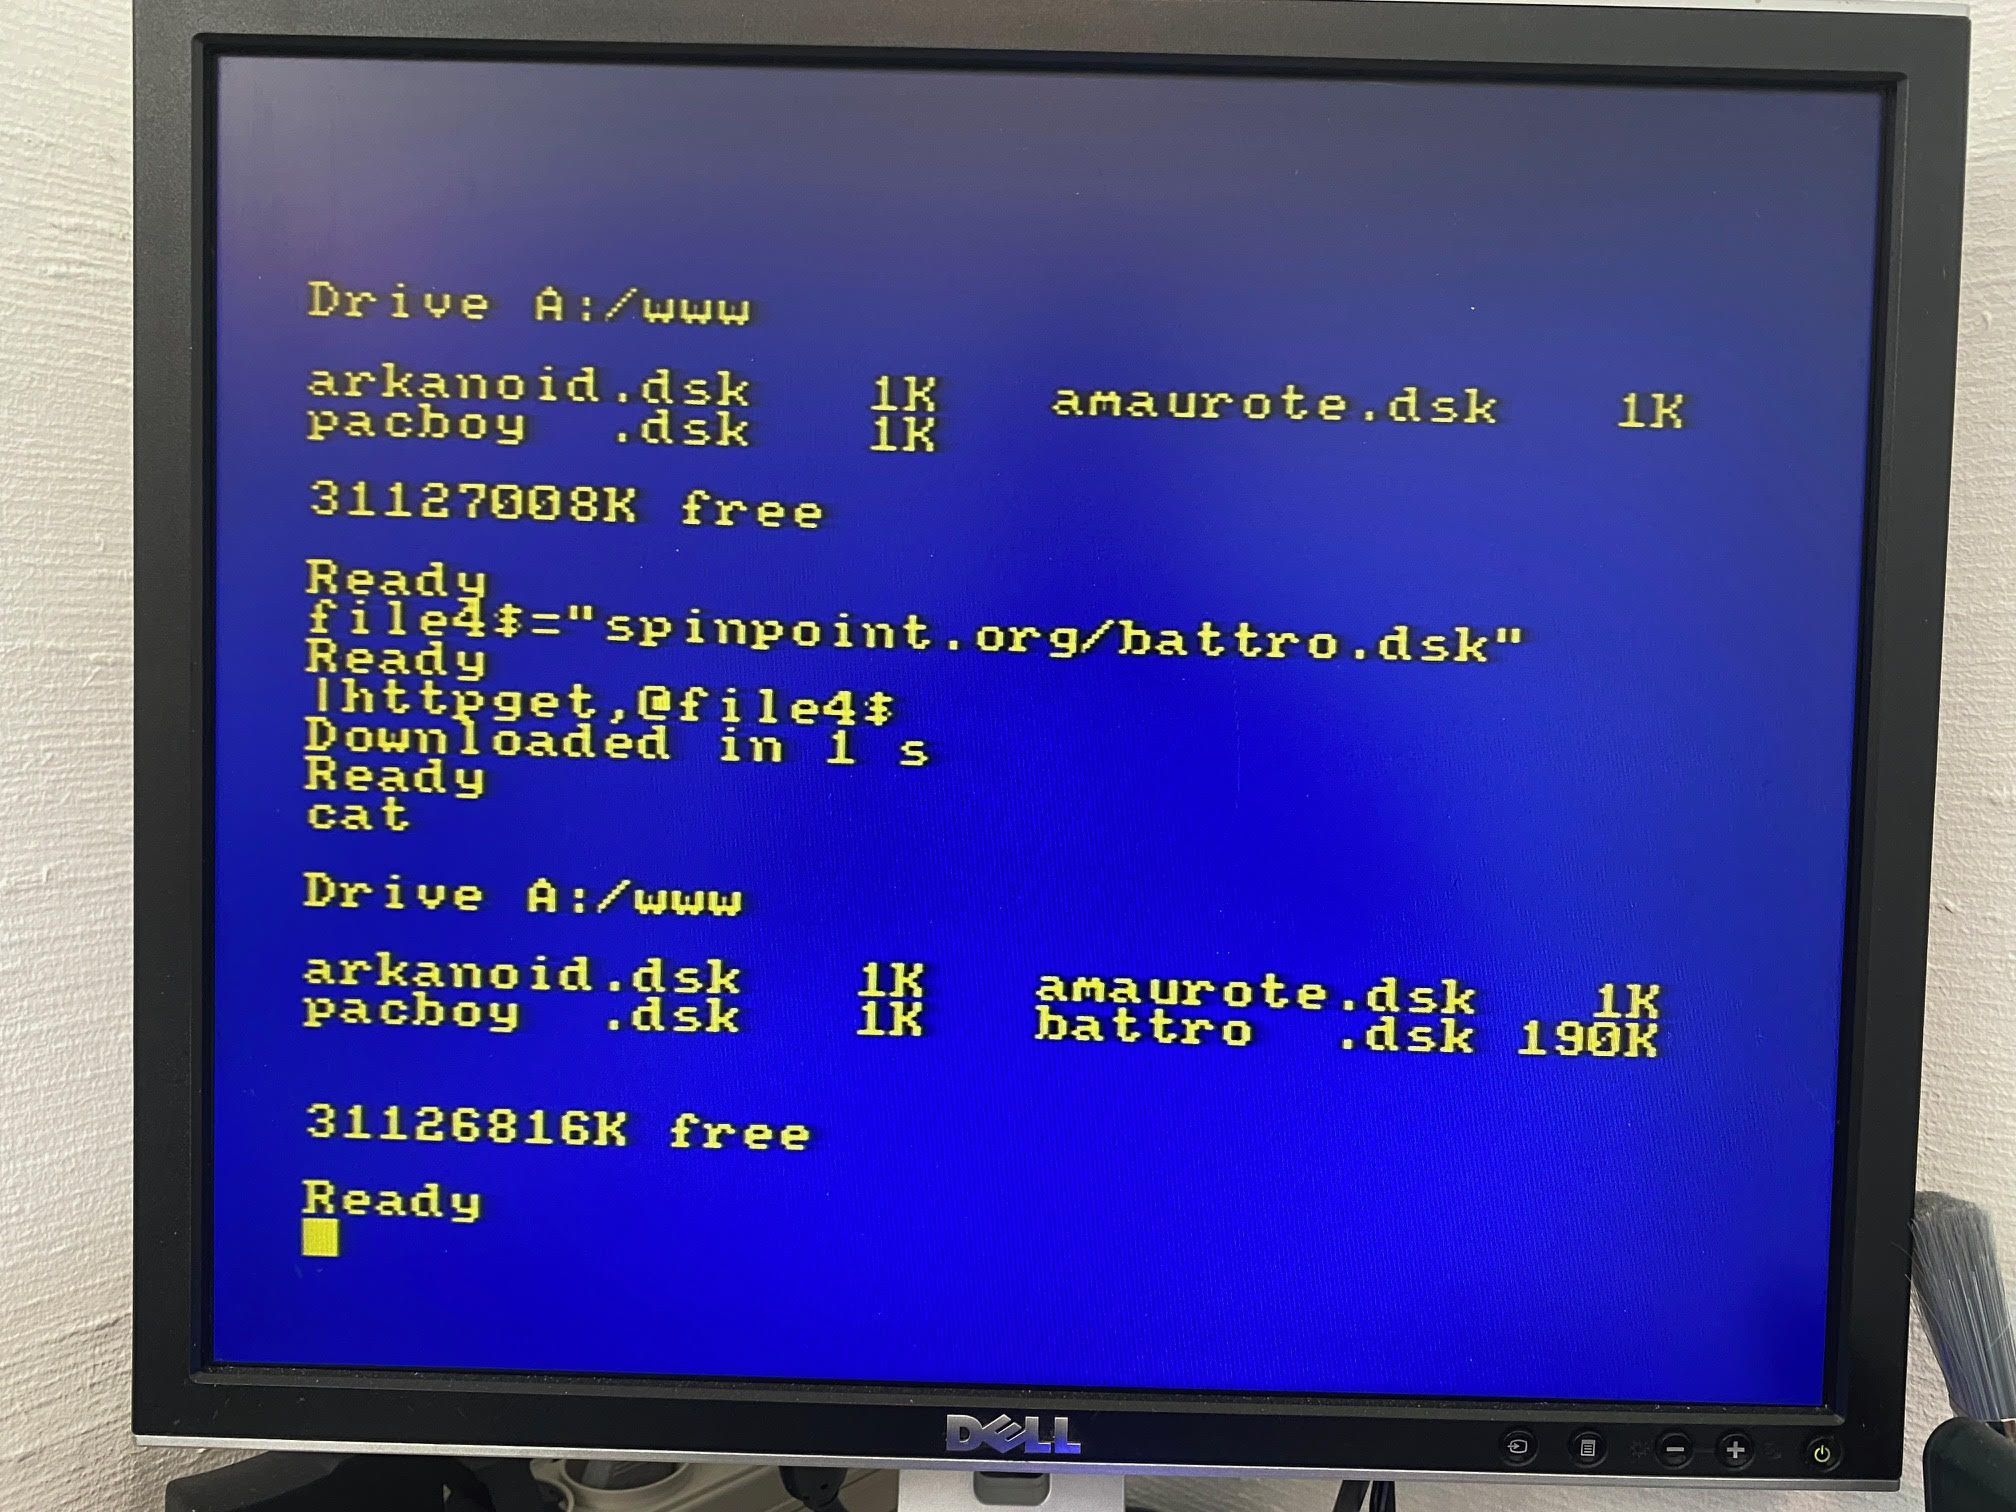
After some tests and emails to Duke it was confirmed that the M4 board doesn’t support HTTPS, only HTTP. So for now I’ll download the following file from Dukes HTTP site and I’ll work on getting a HTTP version of my amstrad-noob.com/games available.
file$="www.spinpoint.org/battro.dsk"
then issue the following
|httpget, @file$
after mounting the downloaded file using
|cd
then
battro.dsk
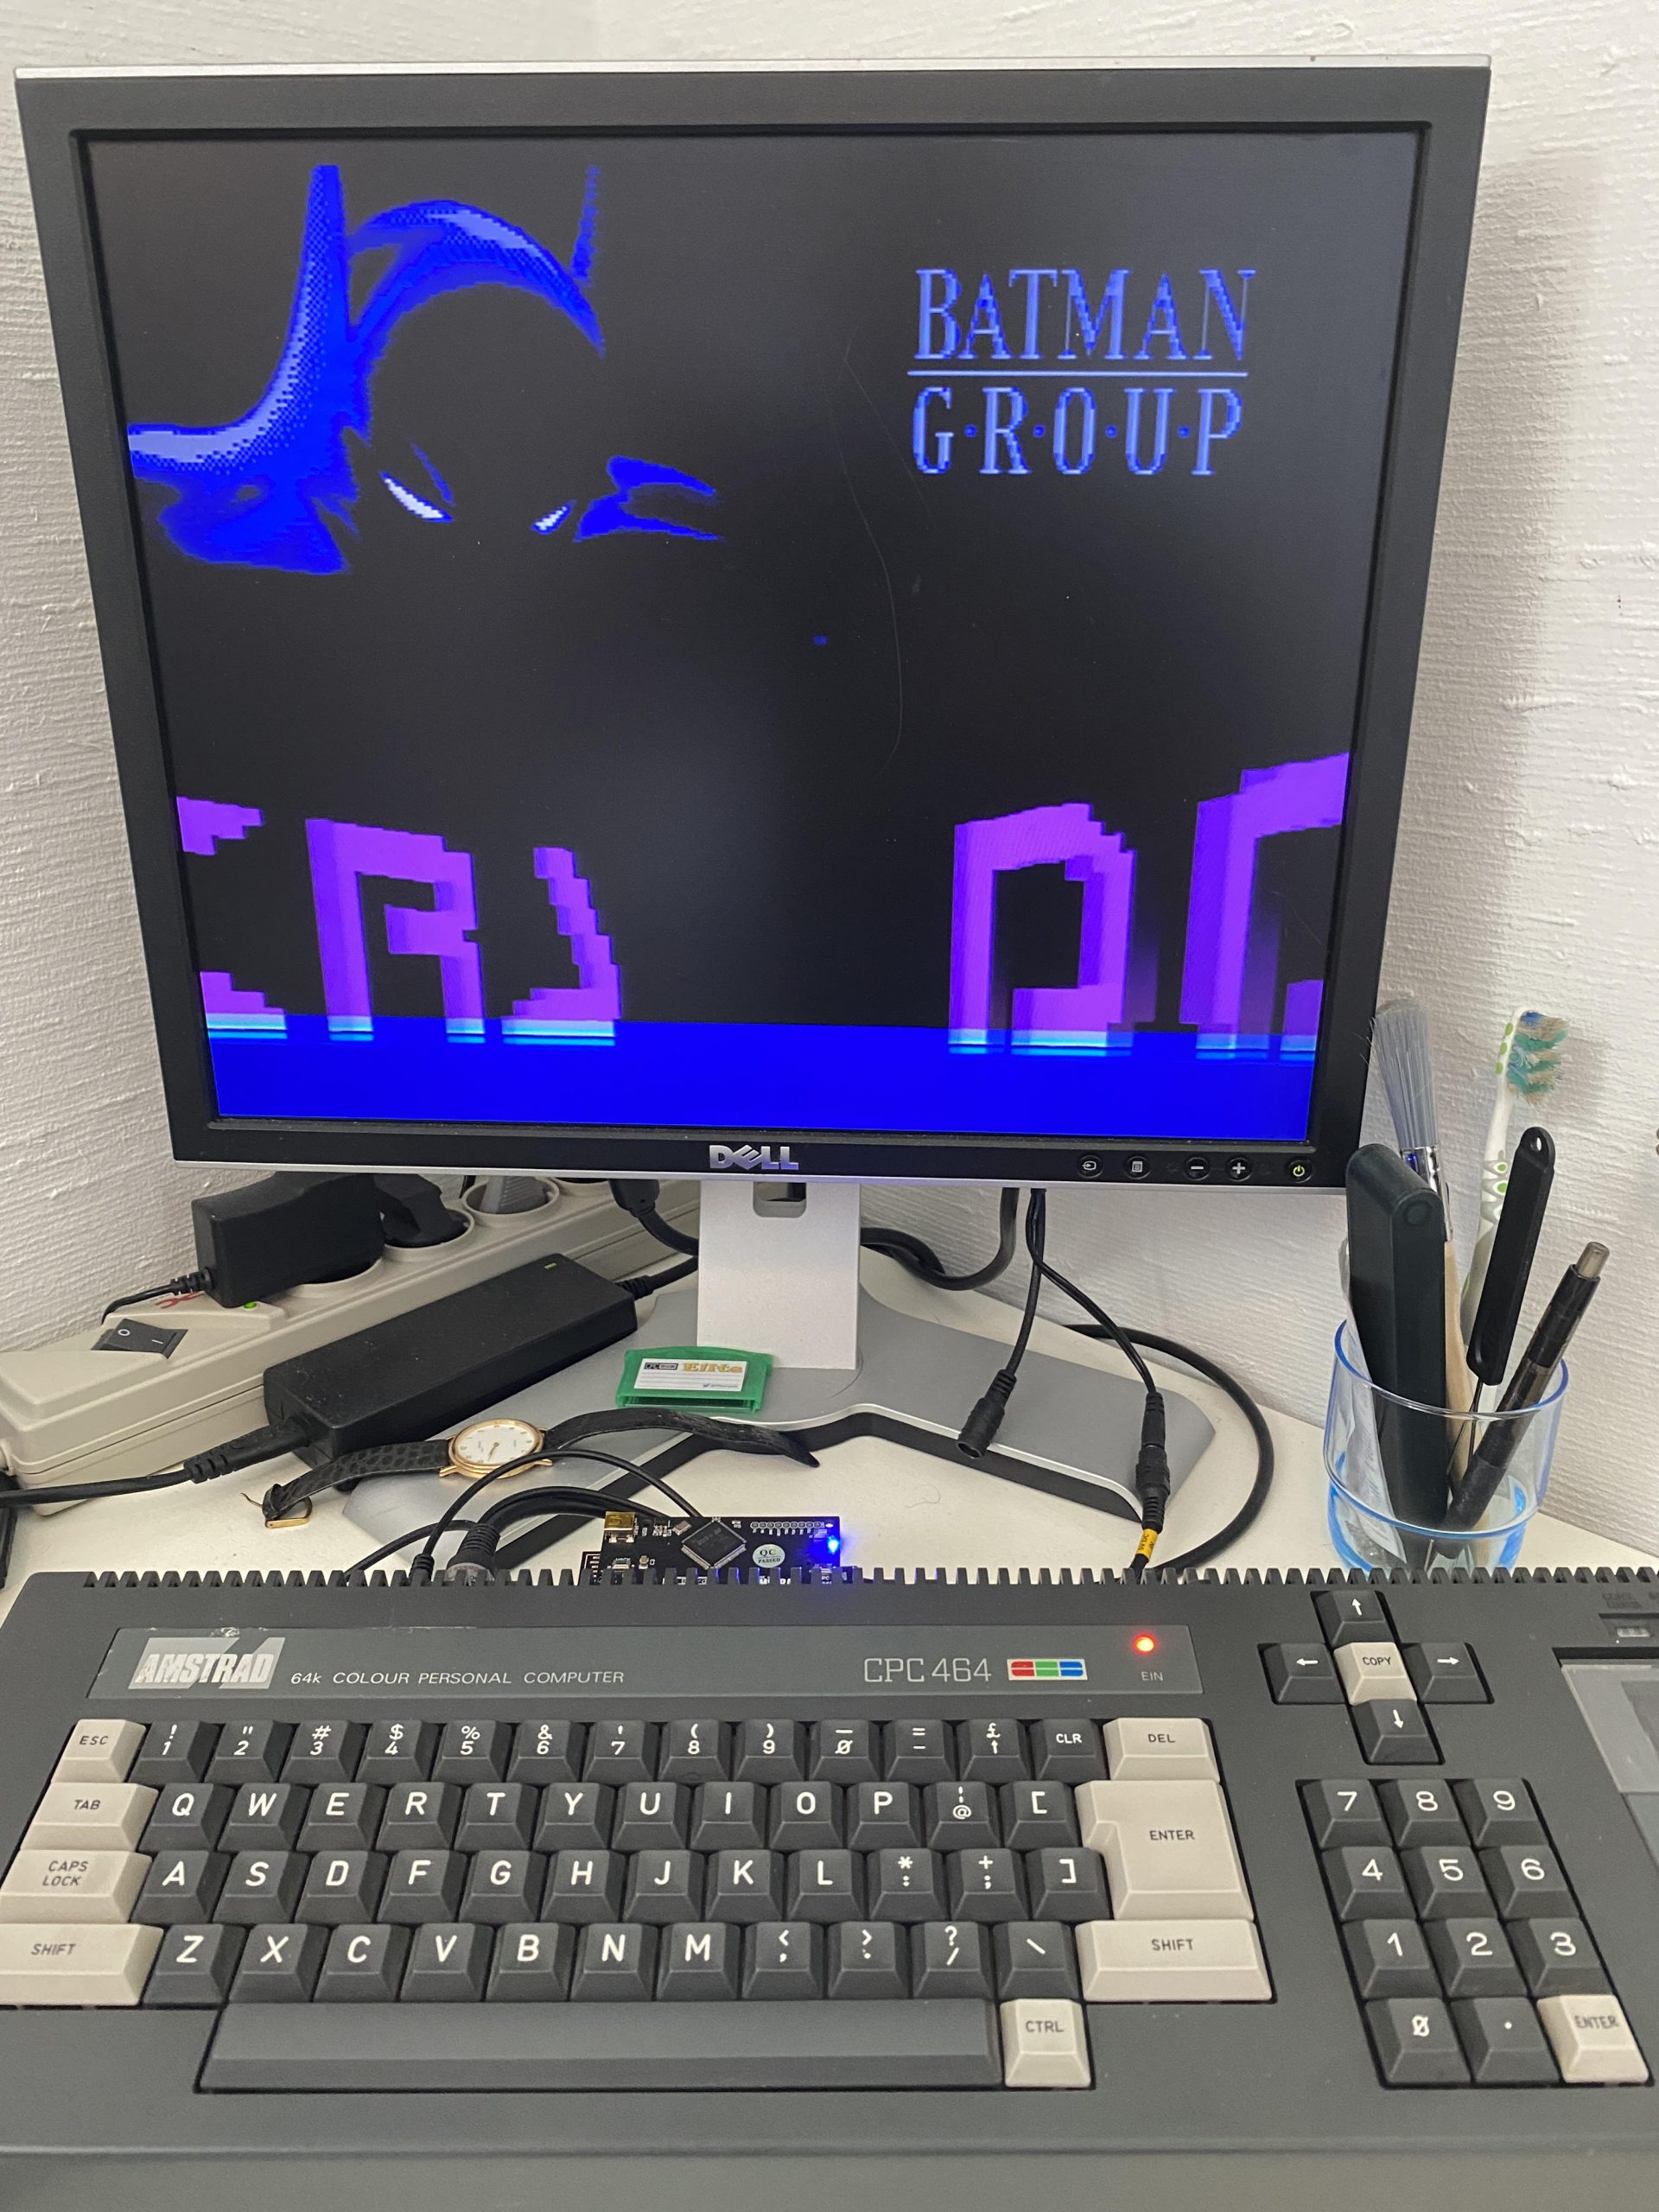
I was able to run the demo !
Awesome or what !
 Conclusion
After using the device I can say I’m definitely impressed, it gives internet and storage support (32gb max) to the Amstrad and that’s awesome. I wish it also supported HTTPS but it doesn’t. It’s a bit trickier to use on a CPC464 due to the way |RSX commands work on that platform, much easier with Basic 1.1.
In this video I show you how I fixed a loose power connector and dead LED on a CPC 464, I also explain a brief story about why this one is coloured the way it is.
If you’ve seen my previous blog post about loading games onto a Dandanator mini, then you are ready to also change the extra rom on the Dandanator and instead, load the new Amstrad Diagnostics from Noel’s retro lab.
I released a video on my new youtube channel here which explains the process from start to finish and goes over the features of the new Amstrad Diagnostics.
Here is the video, enjoy !
Anyone that has been reading my posts or who has seen my videos about the Dandanator Mini from HobbyRetro will know straight away how excited I was about the technology, for such a small device it delivers a whole lot of functionality. It’s a definite ‘must have’ for anyone who cares about Amstrad CPC’s.
Please see my earlier blog posts (and video) about the Dandanator Mini.
Based on my knowledge about the various Dandanator products available for the CPC there are actually at least 4 Dandanator models available to buy from various sources:
If you wonder where the Dandanator name comes from, it’s based on hardware designed by Dan Leon himself.
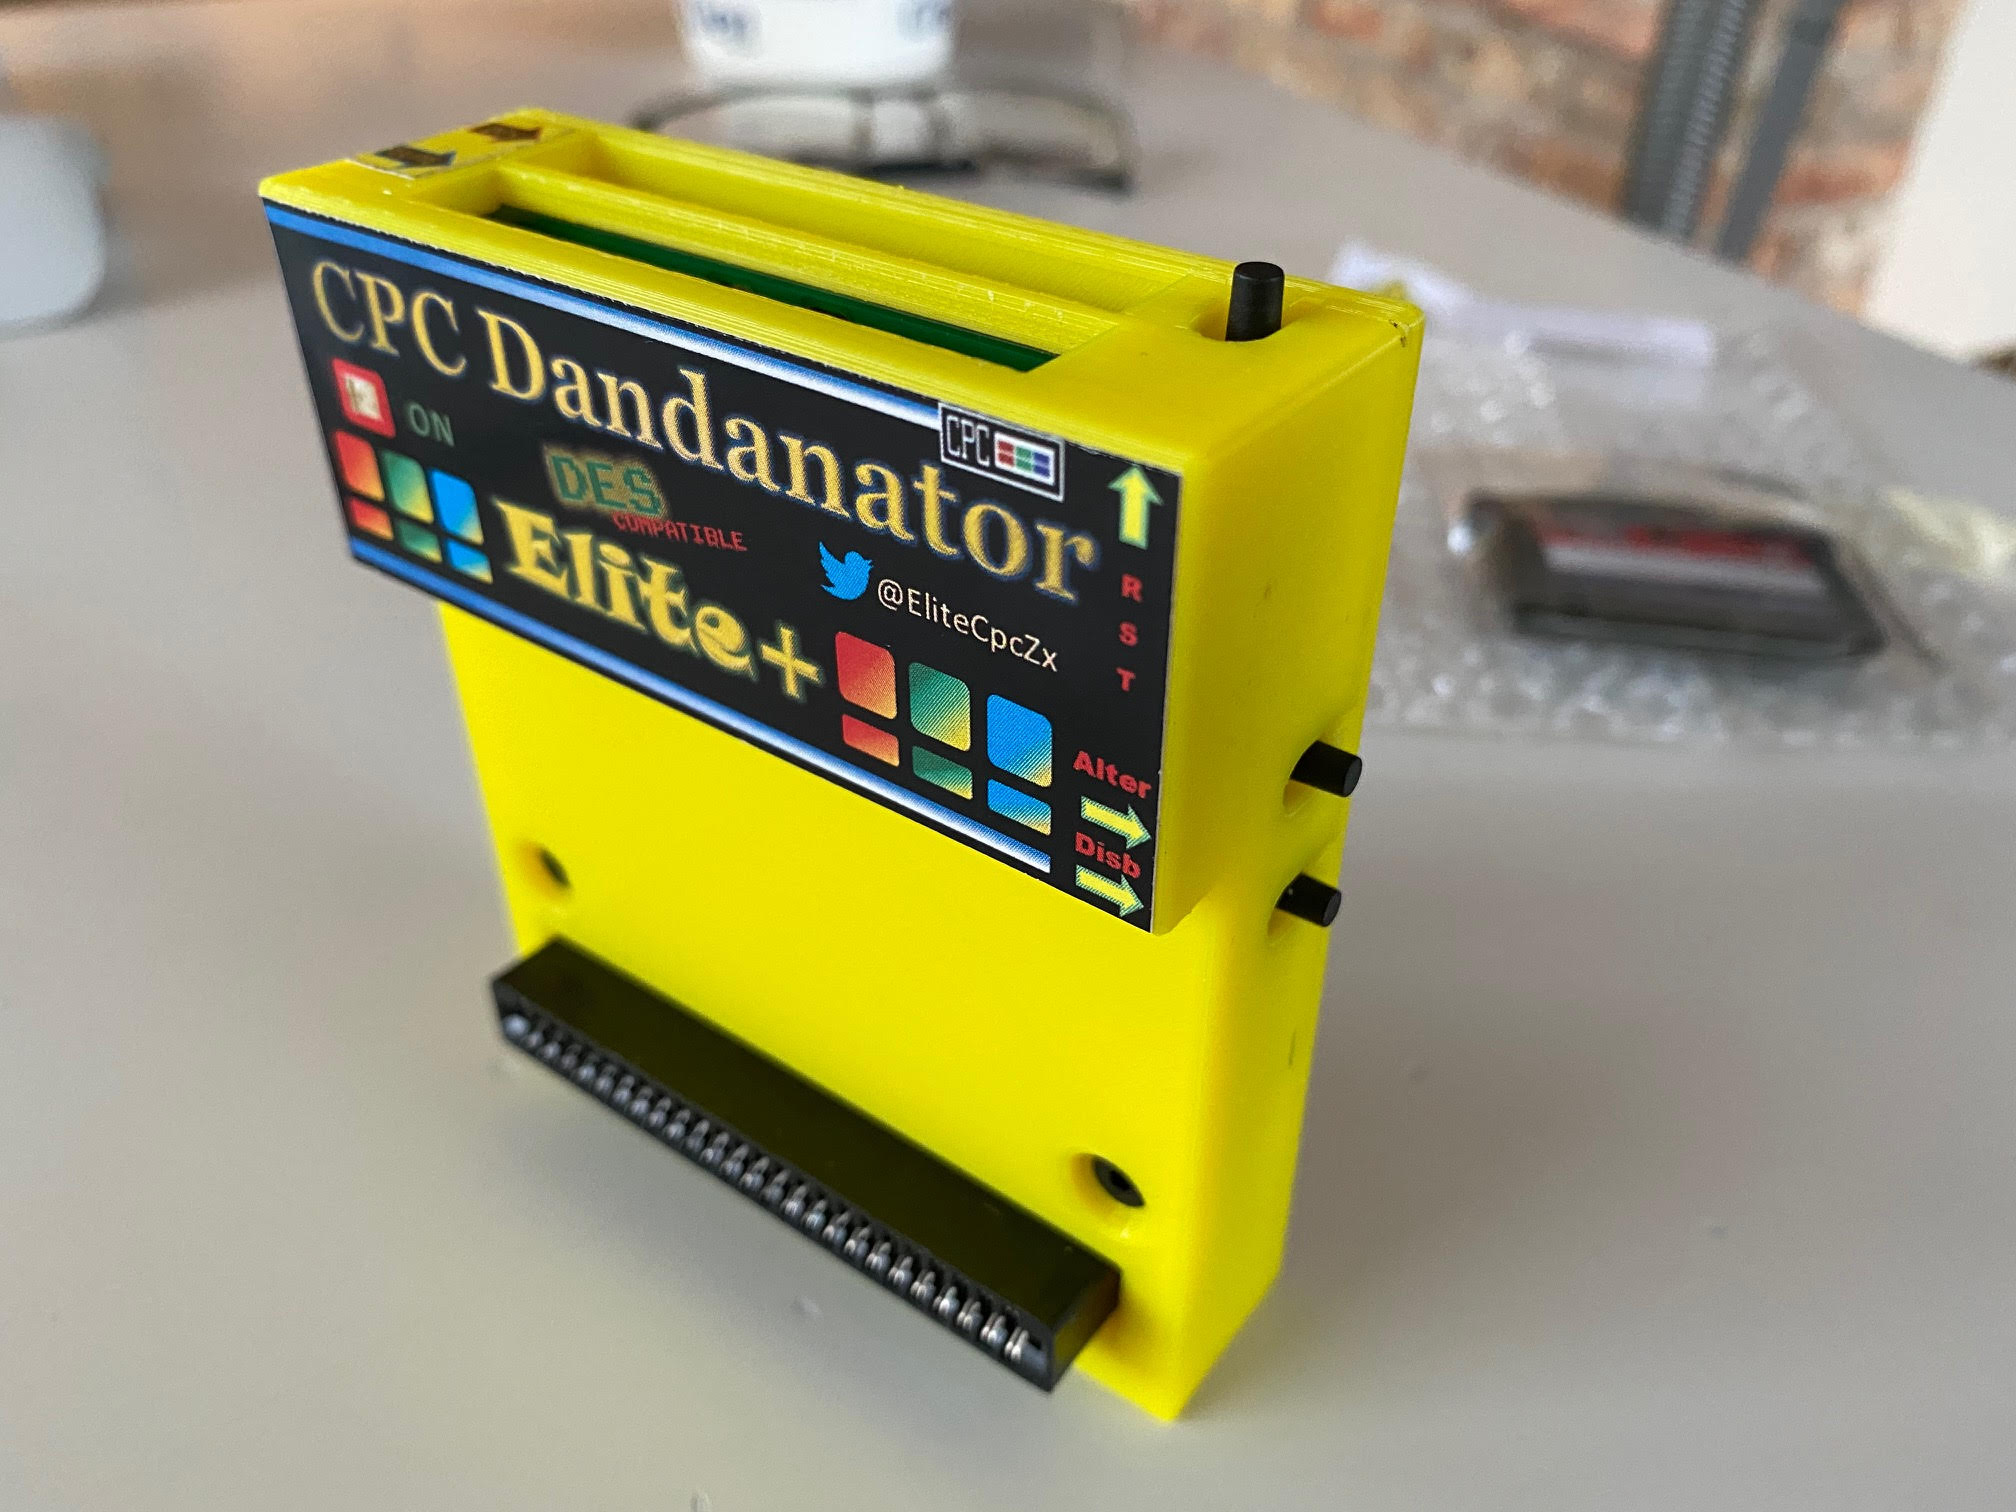
This blog post is about the Dandanator Elite + primarily so let’s get stuck in.
I was browsing a Spanish Facebook group and came across some screenshots of a new Dandanator device called the Dandanator Elite +, I was intrigued, so I asked where to buy them and ordered one. I ordered mine from a Spanish website called Neotienda. It wasn’t cheap, but there’s a lot included.
First of all here is how it arrived after I removed it from the packaging.
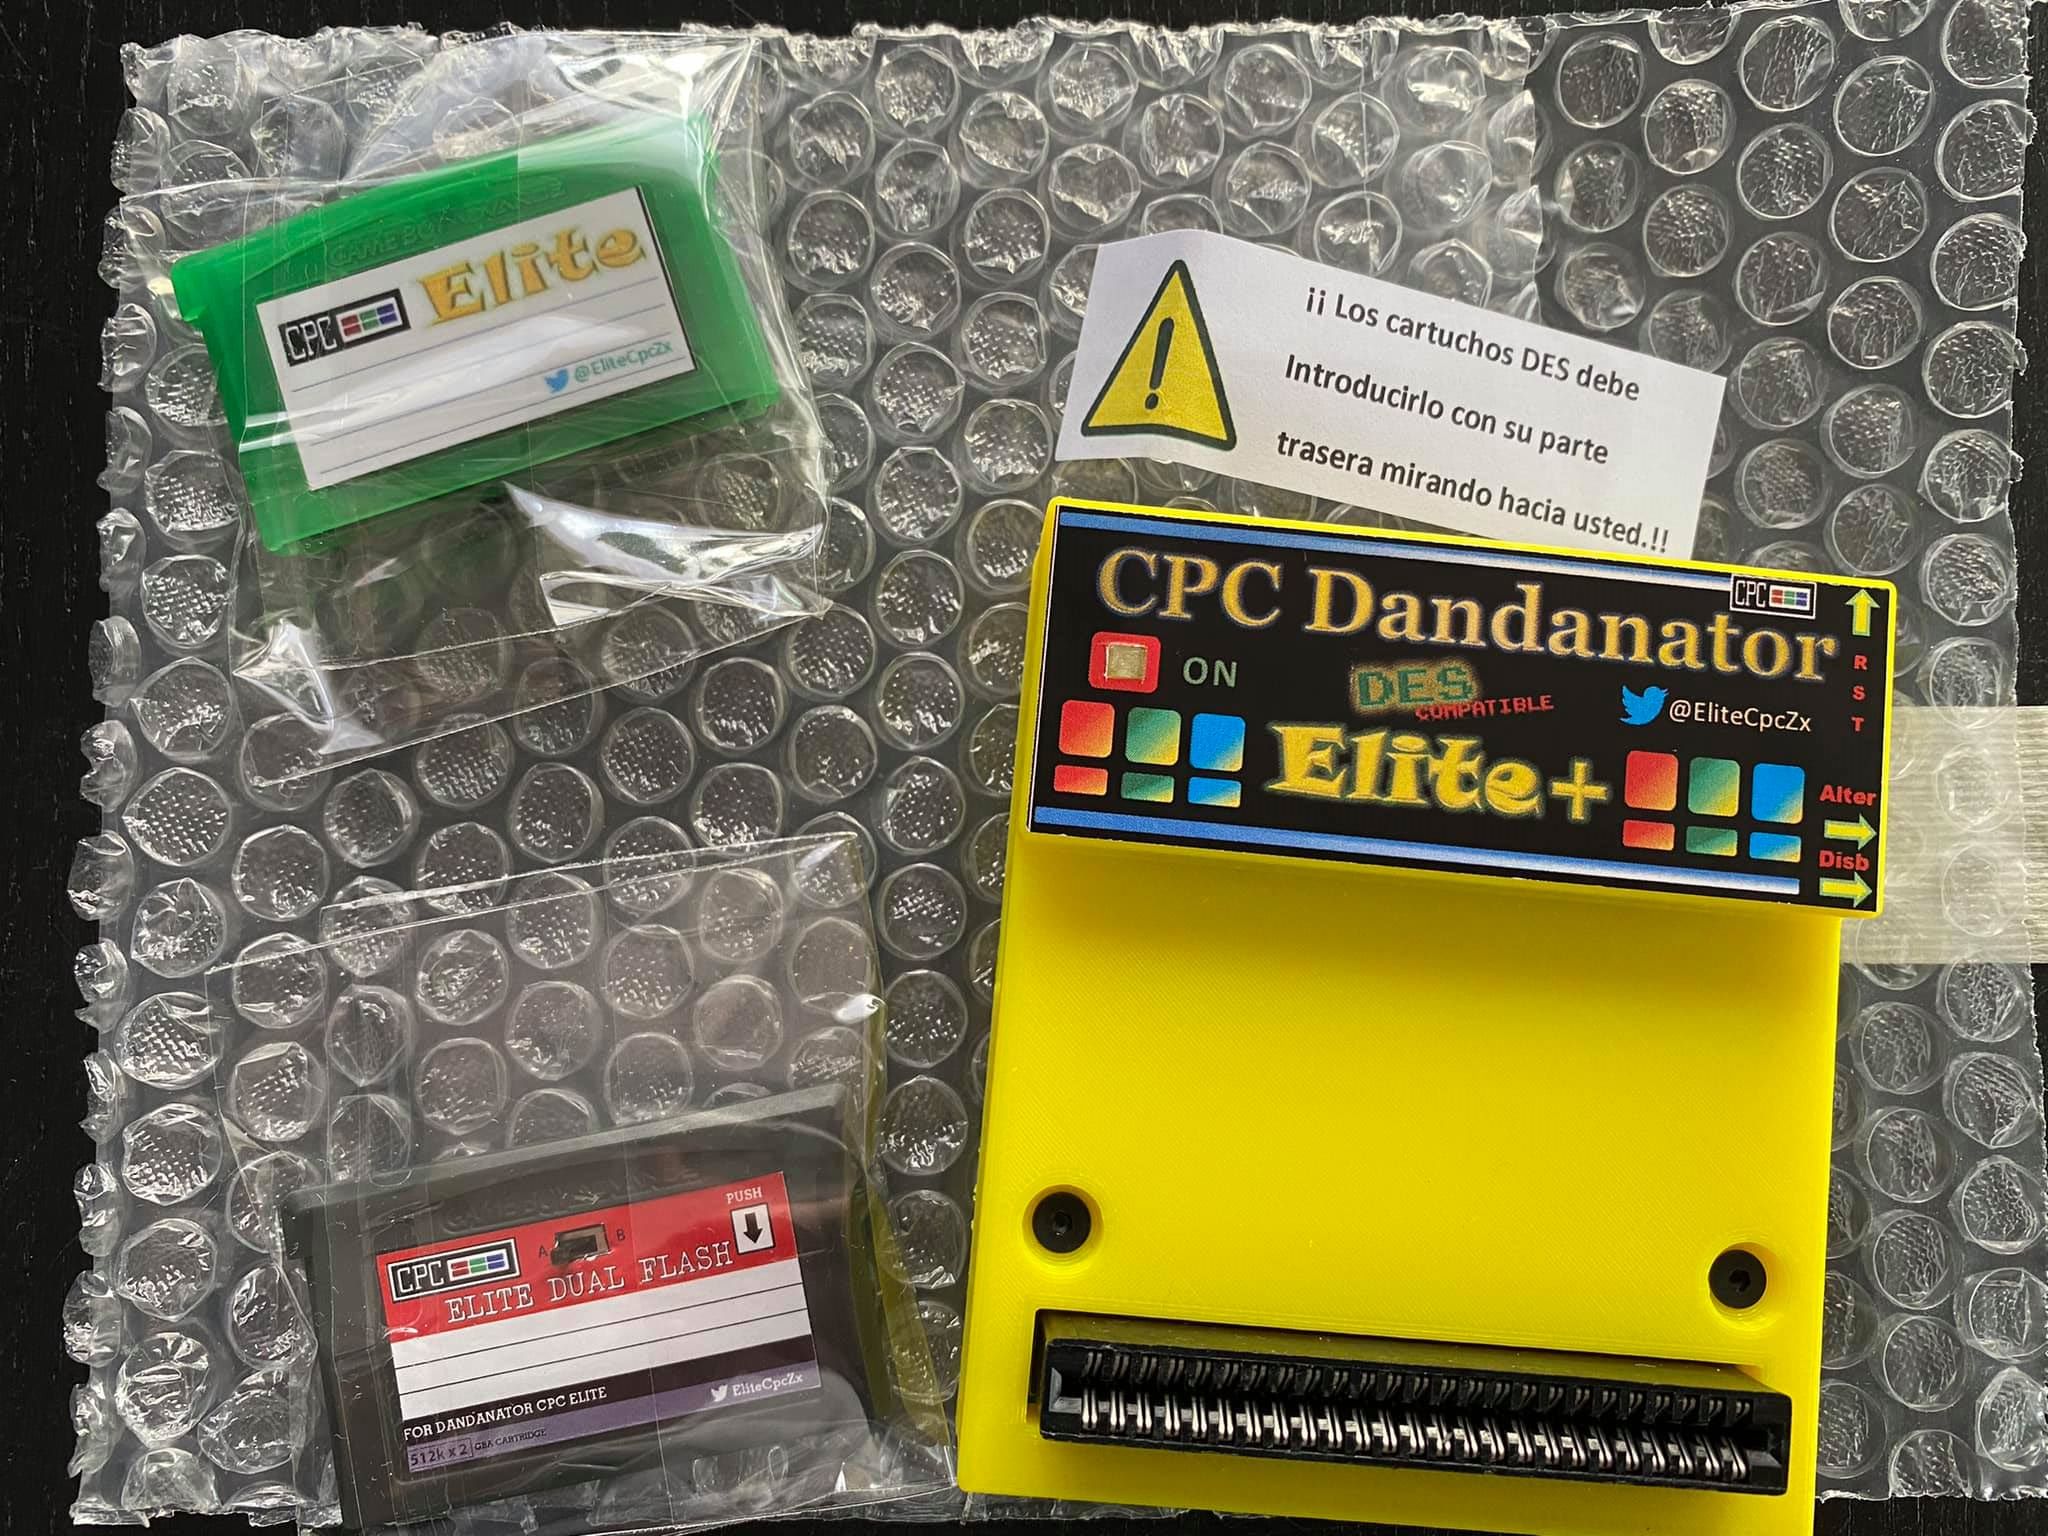 What you can see from the above photo is it was well packaged, and comes with 2 cartridges, one has a button on it (red cartridge) which allows you to flip between 2x512k roms.
The other cartridge (green) is just one 512k rom.
This Dandanator has 2 slots. The rear slot is marked for DES cartridges. DES cartridges are not compatible with Elite cartridges. The DES (Dandanator Entertainment System) cartridge goes in the rear slot with the Elite cartridge in the front.
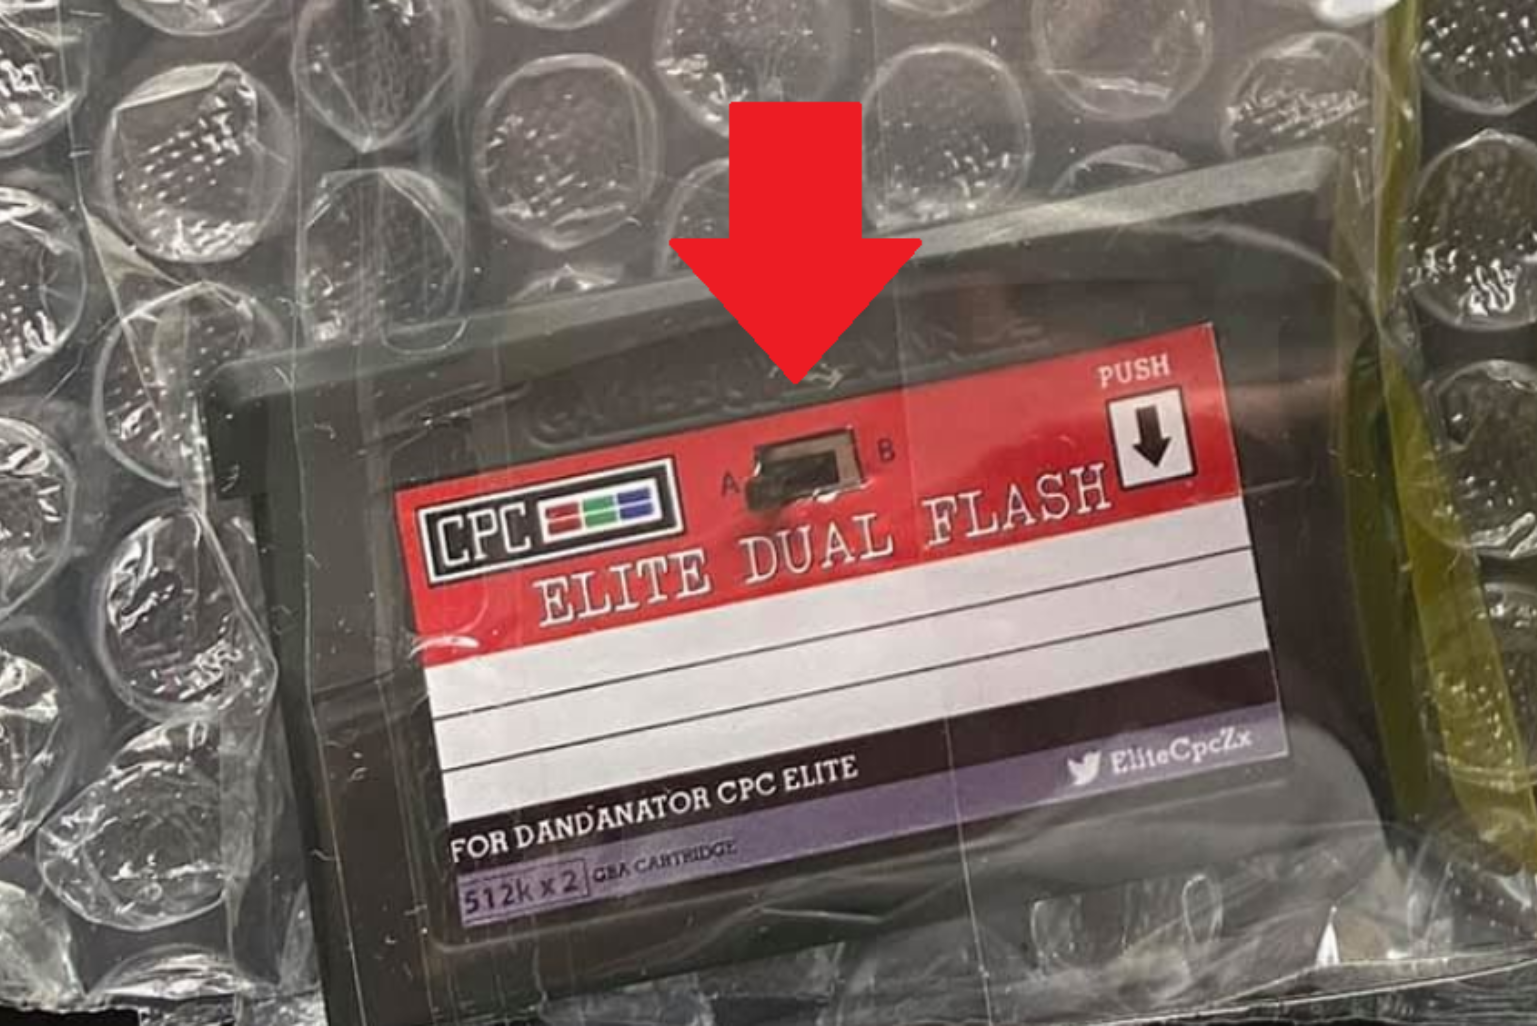
Note: To use the rear cartridge you’ll need to order a separate DES compatible cartridge from these guys > https://auamstrad.es/hardware/dandanator-entertainment-system/
The paper warning translates to the following:
The DES cartridges should be inserted with their rear facing towards you.
But what I think it should really say is:
Only insert Elite cartridges front facing in the FIRST slot (marked Elite). The rear slot is only for DES cartridges. DES cartridges should be inserted with their rear facing towards you.

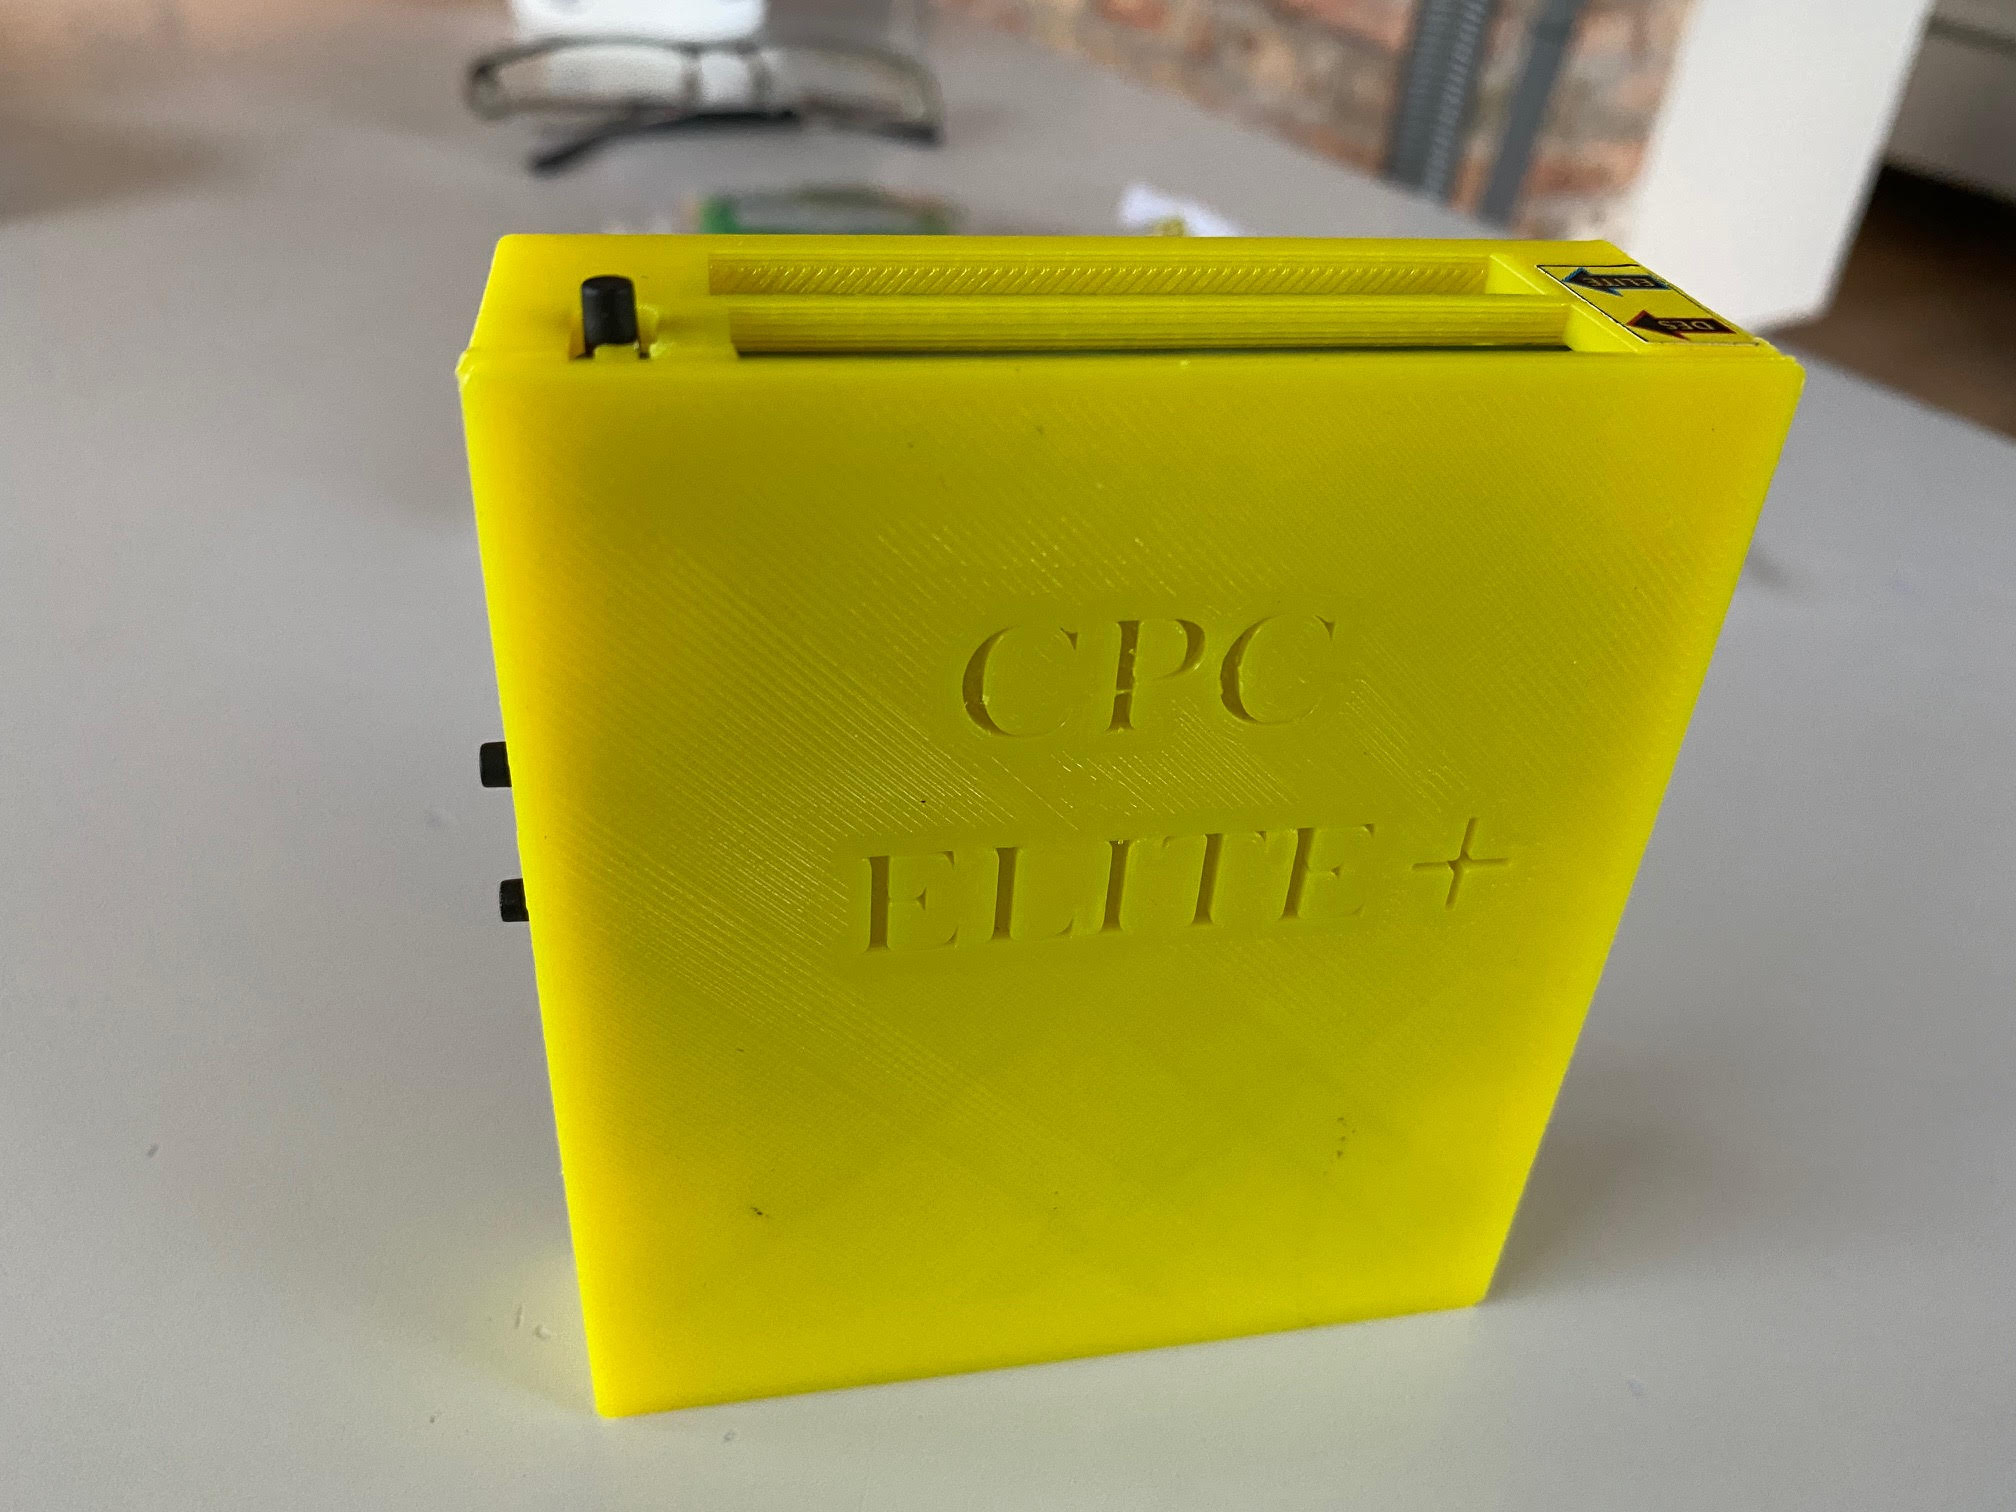
I can tell straight away that this device is stronger and heavier than the Dandanator mini, it feels very solid and well made with a really nicely 3d printed box. You can order your own chosen colour too. I picked the yellow one as I think it’s looks cool !
The front of the device has an edge connector to slide into the back of your CPC, it works with the CPC 464 and 6128 models although I’m not sure about + devices. To connect it to a CPC 664 you’ll need a pass-through cable (or rom box) as physically it’s NOT tall enough on it’s own (the 664 is too tall).
It didn’t come with any specs or info so I emailed the seller and he very kindly pointed me to the Rancanuo team who I guess designed the Dandanator Elite and Elite +.
Here’s what they say about their devices.
Like the other two models we currently market (Dandanator cpc Elite and Dandanator zx Elite) are the same with respect to the technical characteristics of its precursor Dandanator mini, in that it uses practically the same electronic components and has the same functions.
Rancanuo Team has evolved the design to use Gameboy advance sp cartridges instead of having the ROM built in. This make’s it quick to change cartridges and easy to change what you want to play. In principle we have two models, one with 512k on a single chip and one with two chips which are selectable by a jumper, allowing the device to work with twice as much memory.
First we developed the “Dandanator CPC Elite” with a design based on the Dandantor mini but with some improvements, especially regarding the manufacture, because even if the operation is the same, now, having interchangeable and collectible cartridges the user can purchase these cartridges so that they do not have to be continuously rewriting their romsets in the same memories.
This allows you to create your own collections of games in a more showy and professional way.
Technical characteristics common to the three models we have (CPC Elite, CPC Elite + and ZX Elite):
Cpc Elite+ model.
As you can see, with regard to technical characteristics in its (functional) design there are not much differences, but in its assembly and its “vision of the future”.
Here’s an article about the team (in Spanish) Rancanuo Team – Retro Parla
If you want you can follow them @EliteCpcZx
And finally here you have the project released on github Rancanuo/Dandanator-CPCElite- (github.com)
I’ll follow up with a video soon show casing this device in action on one of my CPC’s, stay tuned !
I don’t have any affiliation with any of the sites below, if you do buy from them, do me a favor and tell them ‘Niall from Amstrad-noob’ sent you :-).
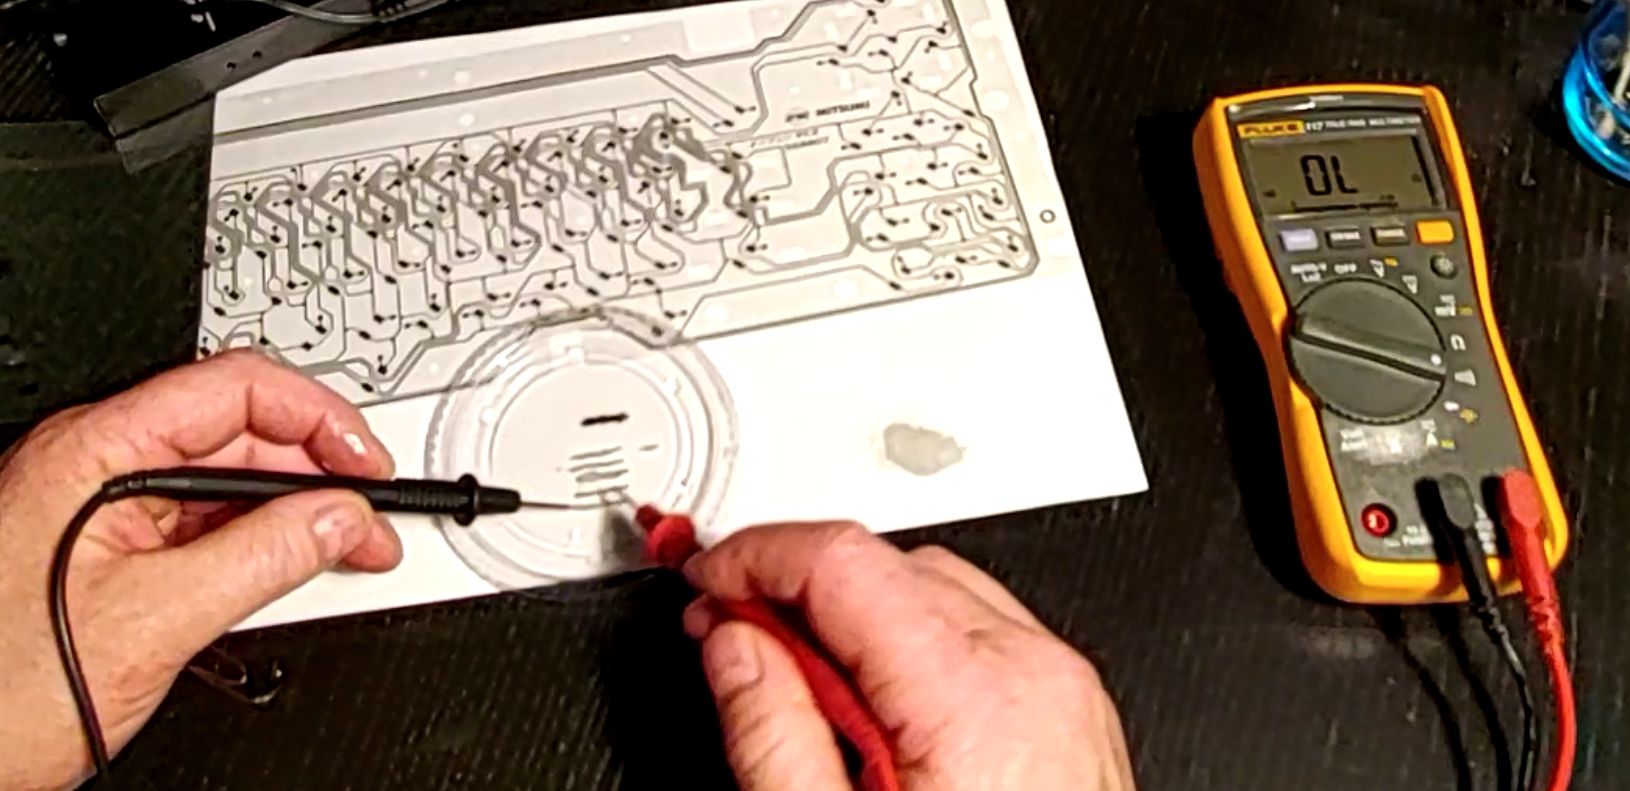
I put together a video on youtube showing the different ways you can troubleshoot a failing/failed keyboard membrane and how it’s possible to test and maybe even fix it.
It’s a tricky business that’s for sure but if you want to give it a go then you’ll need some conductive pain, there are two main types, black or silver.
Below are some of the resources I used.
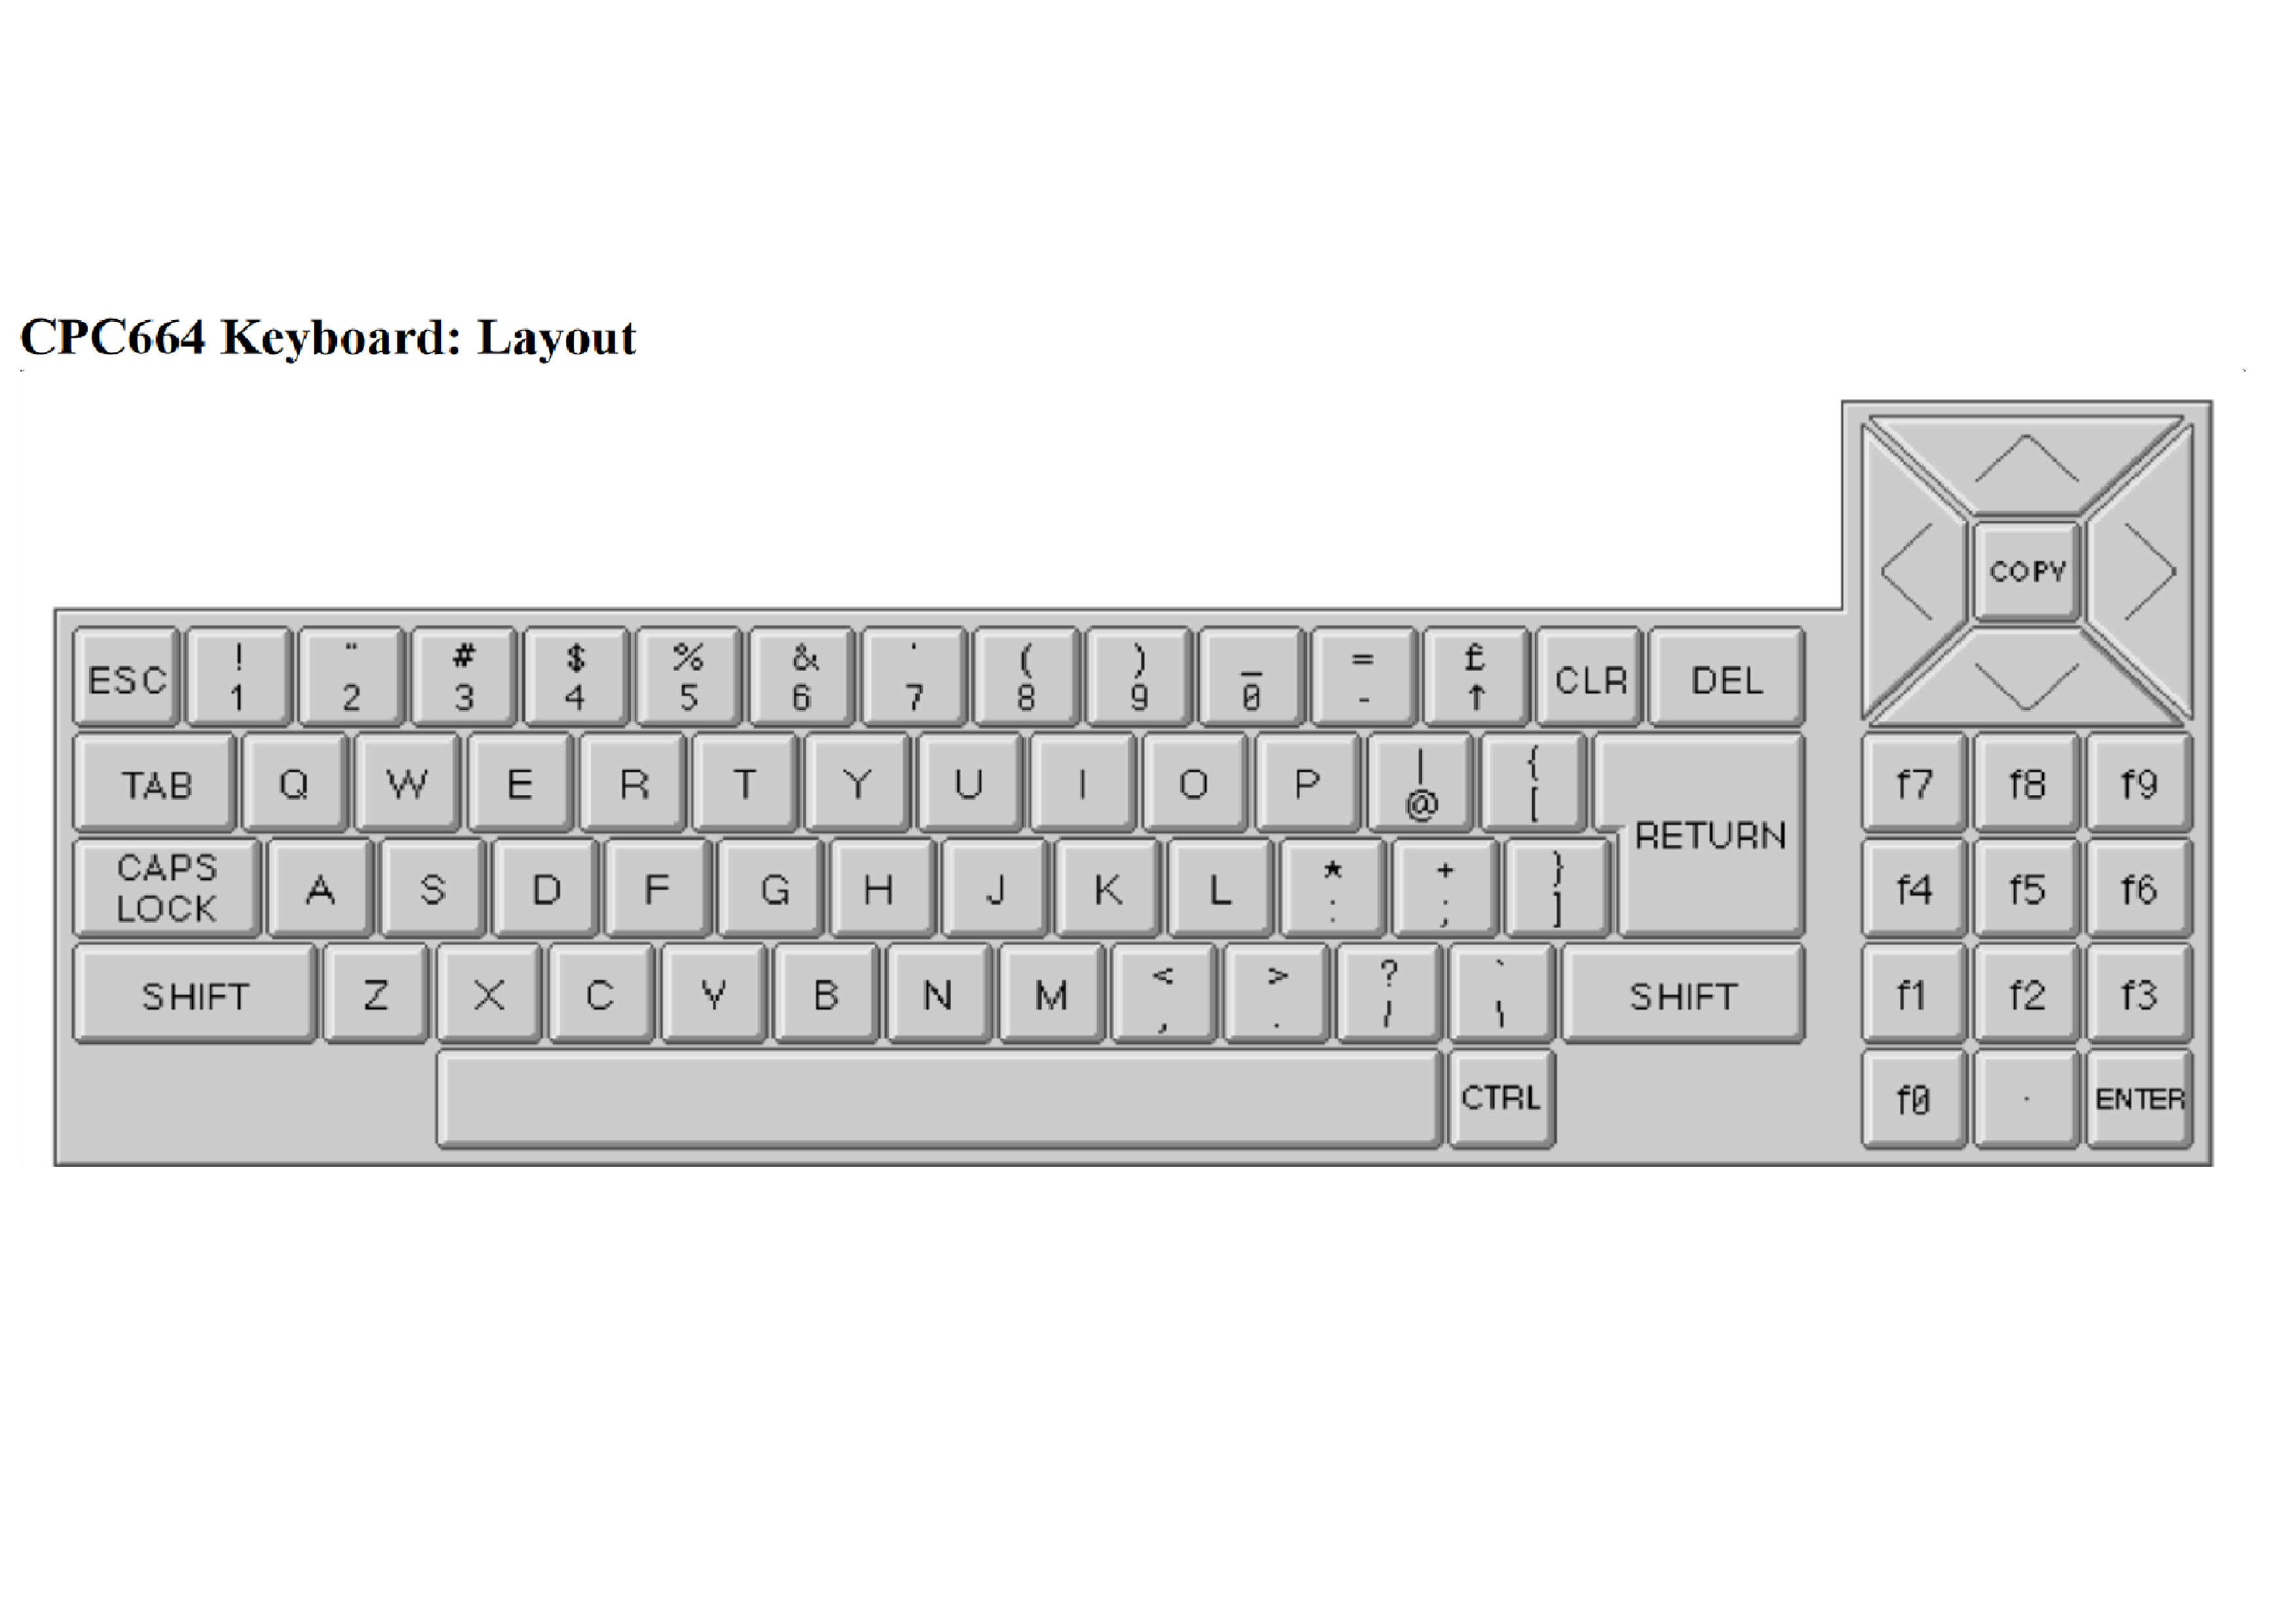
Here is an A4 sized graphical representation of the CPC 664 keyboard, simply save it and print if off to help with marking which of your keys are faulty. Via link.
Below I am testing the conductive paints, links to them below.
I bought my new membranes from SellMyRetro here
and here’s the video link
cheers
niall
I got my Dandanator mini a few weeks ago and already it’s helped me diagnose faulty RAM on one of my CPC 664’s. It came pre-loaded with some games but I’d like to understand how to re-program it with some different games. So that is hopefully what this blog post will be about. If you’d prefer to watch a video of this then click here.
Note: Before you get started make sure you have a decent USB cable, I tried 3 before I found one that worked with the Dandanator.
Before continuing you might want to prepare some downloads.
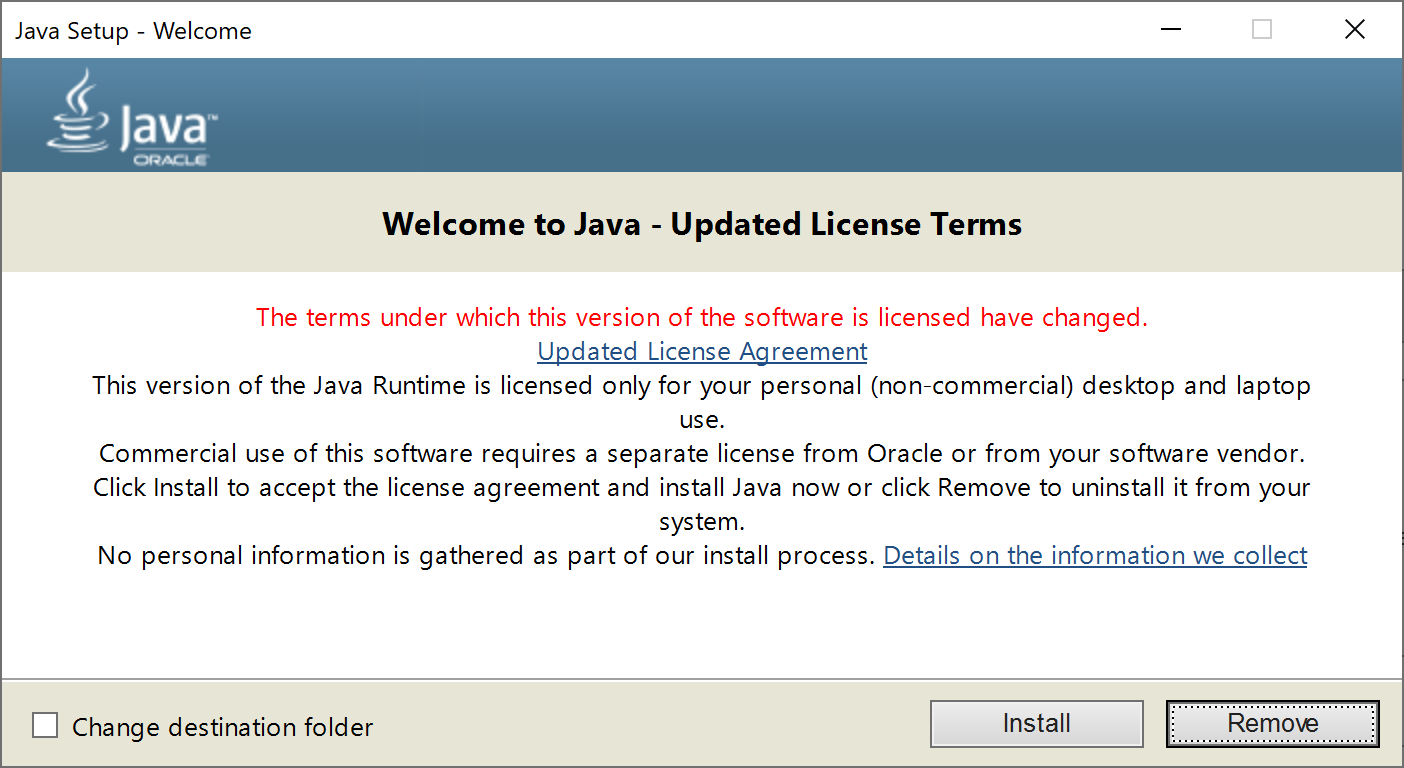
Note: For the Dandanator software itself, please use version 2.4 or later to avoid it crashing Java with an “EXCEPTION_ACCESS_VIOLATION (0xc0000005)” error. See here for more details.
You might need to do this, it’s worth a try if nothing else works. The driver for the Dandanator device needs a special driver which just won’t install (even if the setup says it does) without disabling driver enforcement first. There is a potential security risk with this so it’s up to you to consider the consequences of that, for example, maybe have a spare old laptop just for doing this activity. If your laptop is reasonably new then you’ll need to disable Secure Boot in the bios before issuing the command below.
(via this site)
bcdedit /set testsigning off
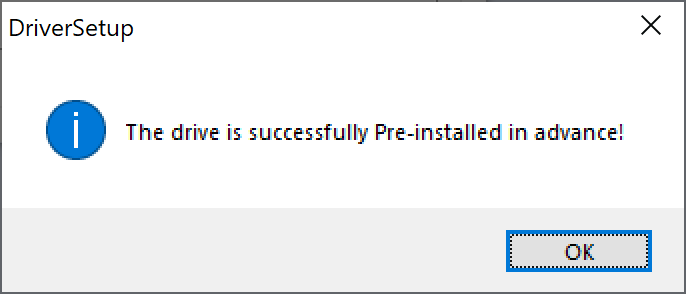
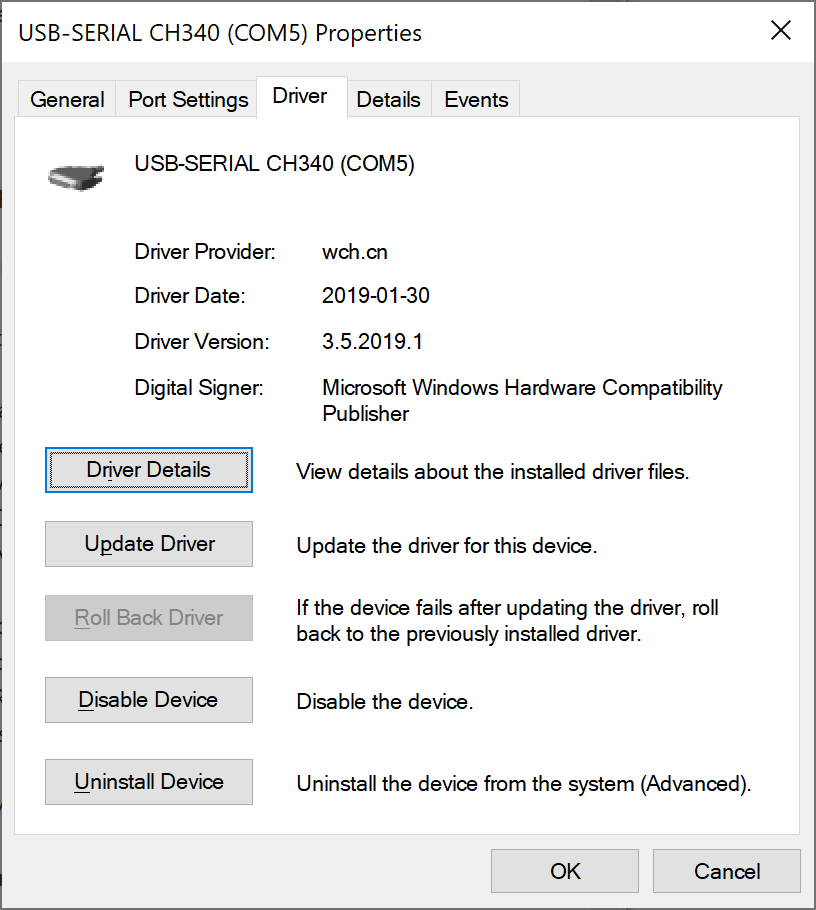
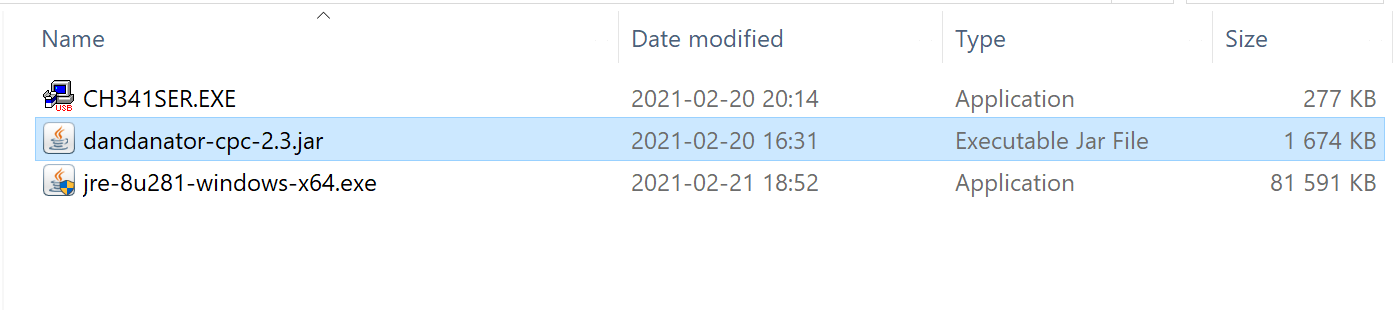
We need to install the CH341SER.EXE driver, you can download it from here. Once downloaded, go ahead and install it on a Windows 10 computer.
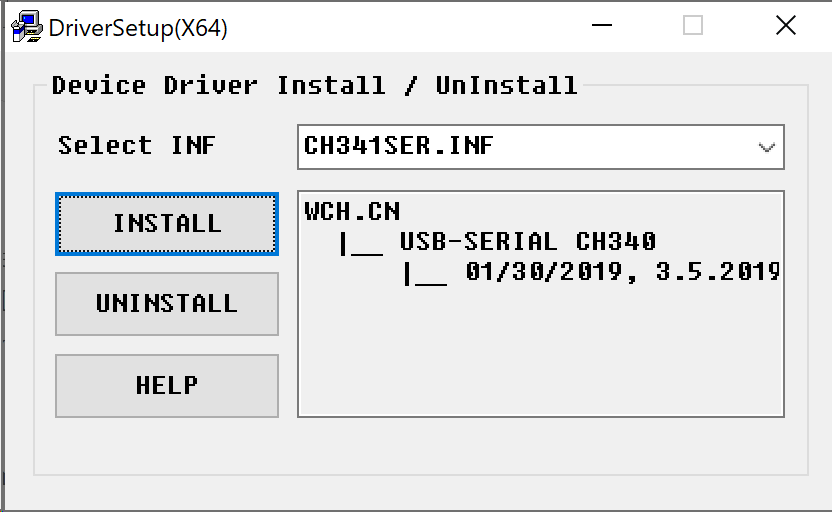 Click Install and you should see this.
Download the ROM set software – http://www.dandare.es/Descargas_CPC/dandanator-cpc-2.3.jar
Head over to here and download (and install) Java 8 SE runtime
Connect the usb cable to your Dandanator and connect the Dandanator to the back of your CPC. Next, plug the usb cable into your Windows 10 computer. Power on the Amstrad CPC.
You should see something like the following show up in the device manager.
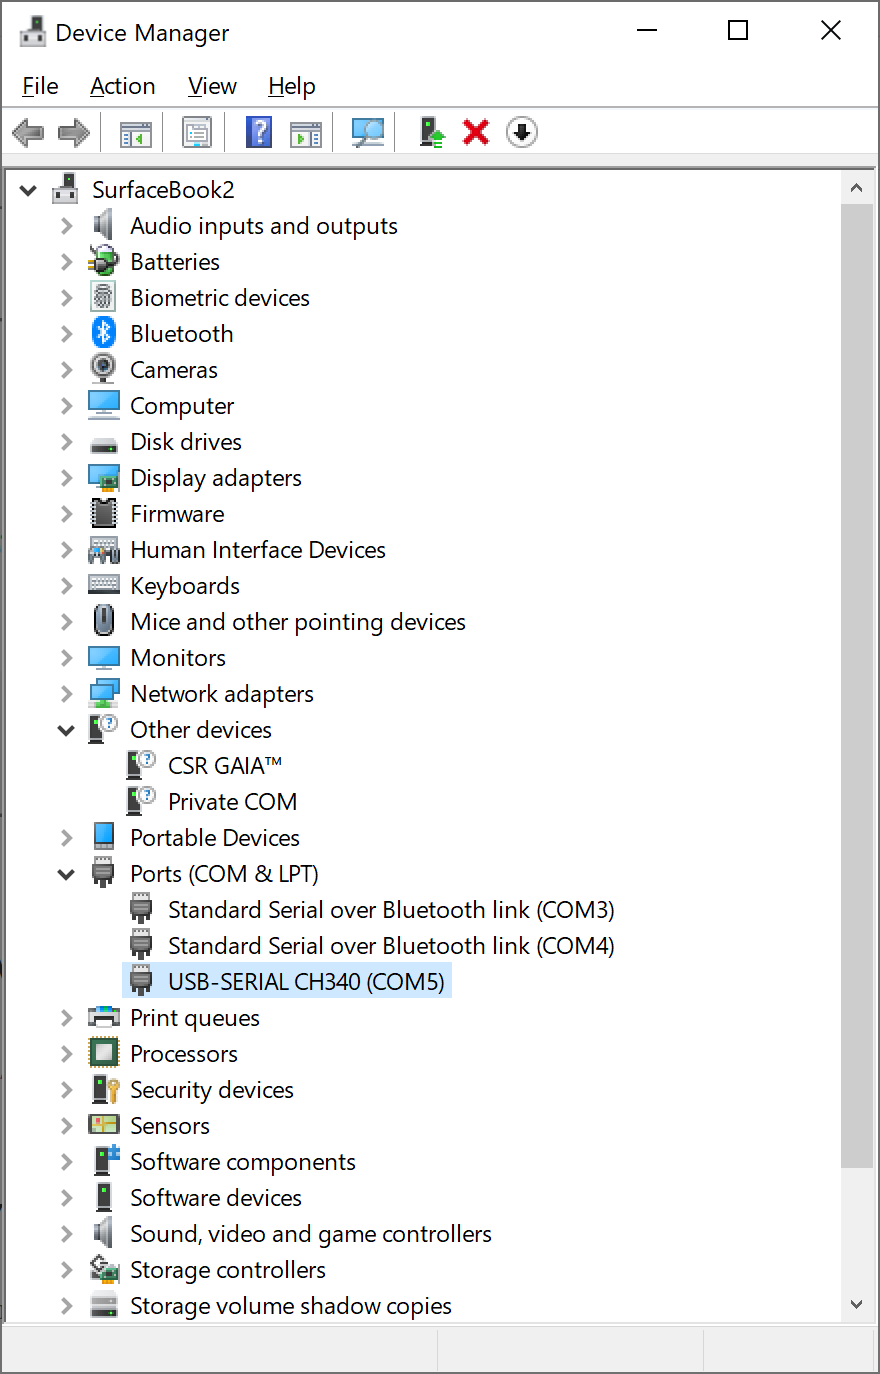
And it should be using the correct driver.
 If this doesn’t show up then try another USB port or another computer, or even another operating system.
Double click on the Dandanator jar file, it should launch the software.
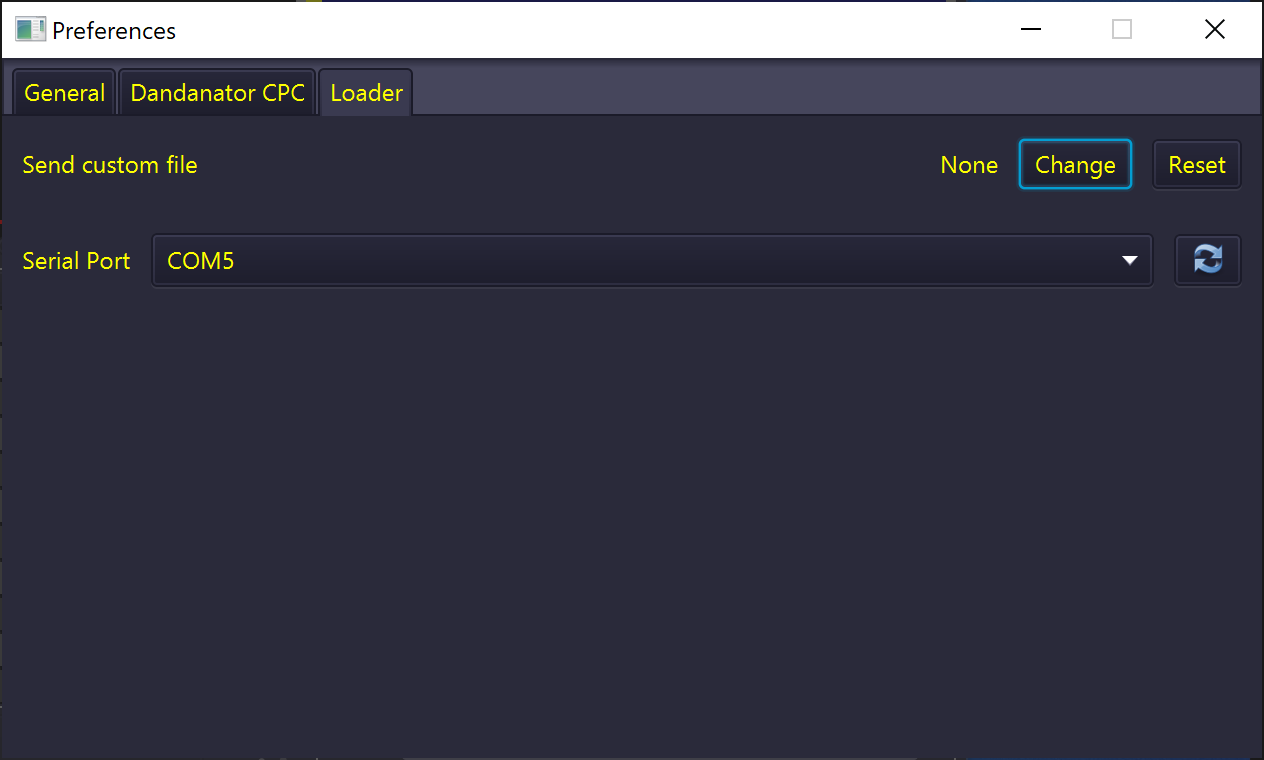
In the Rom programmer, click on File, select preferences and select the new USB com port that shows up in your device manager. If your port doesn’t show up in the drop down menu click the refresh button to the right. Once you’ve selected the correct port, close the preferences. There is no Apply button.
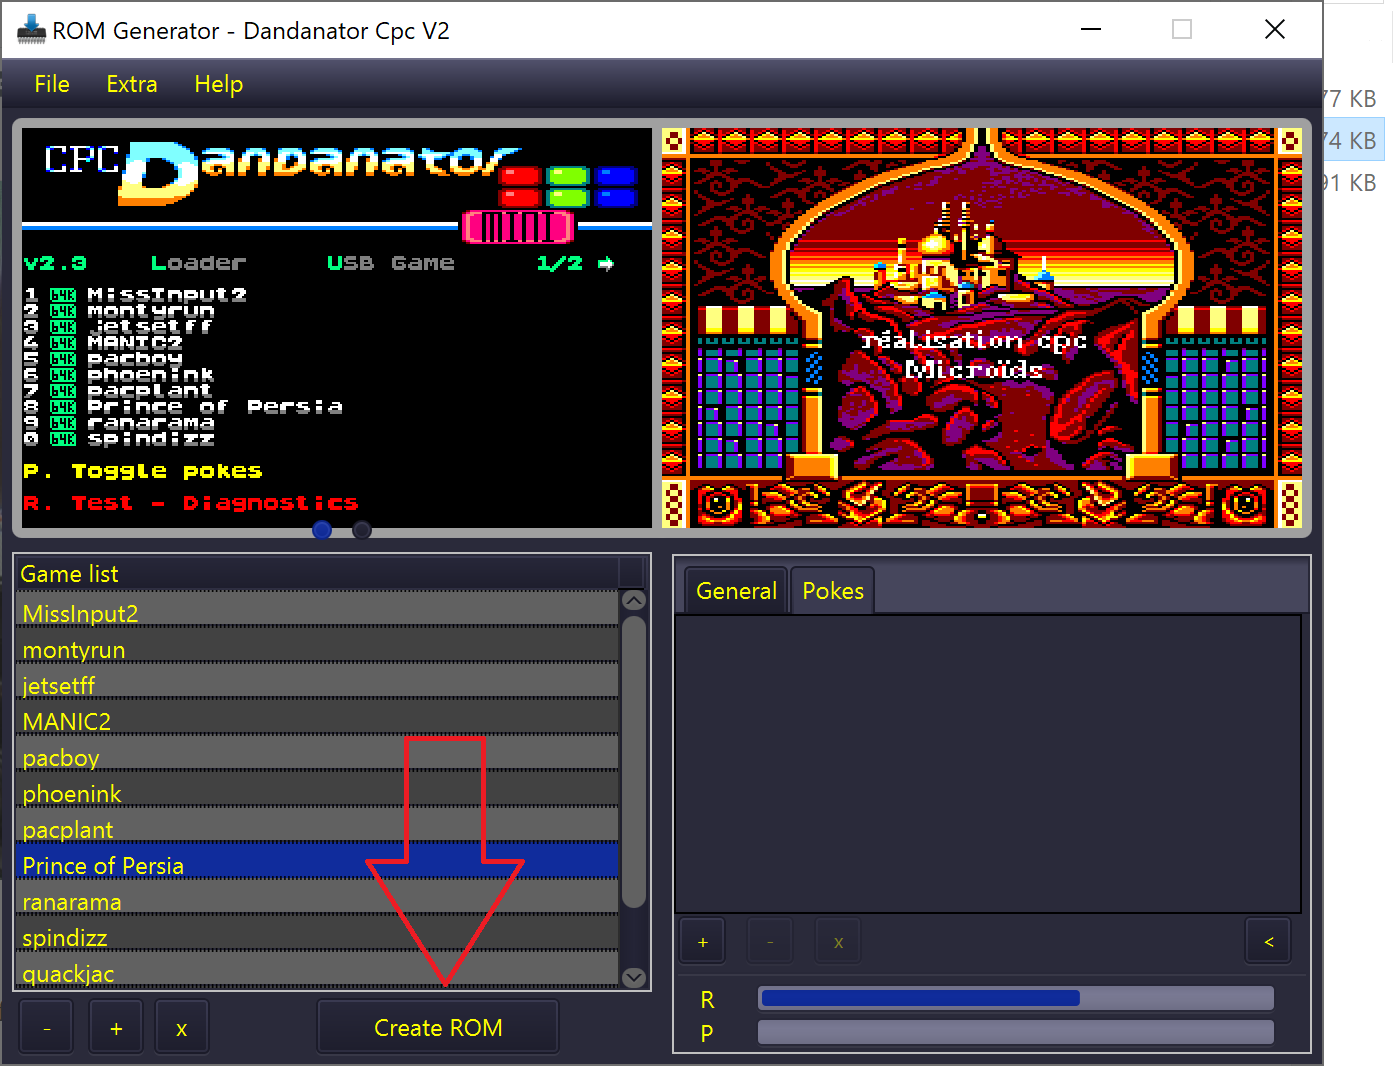
Next, select some cool games and drag and drop them into the empty space.
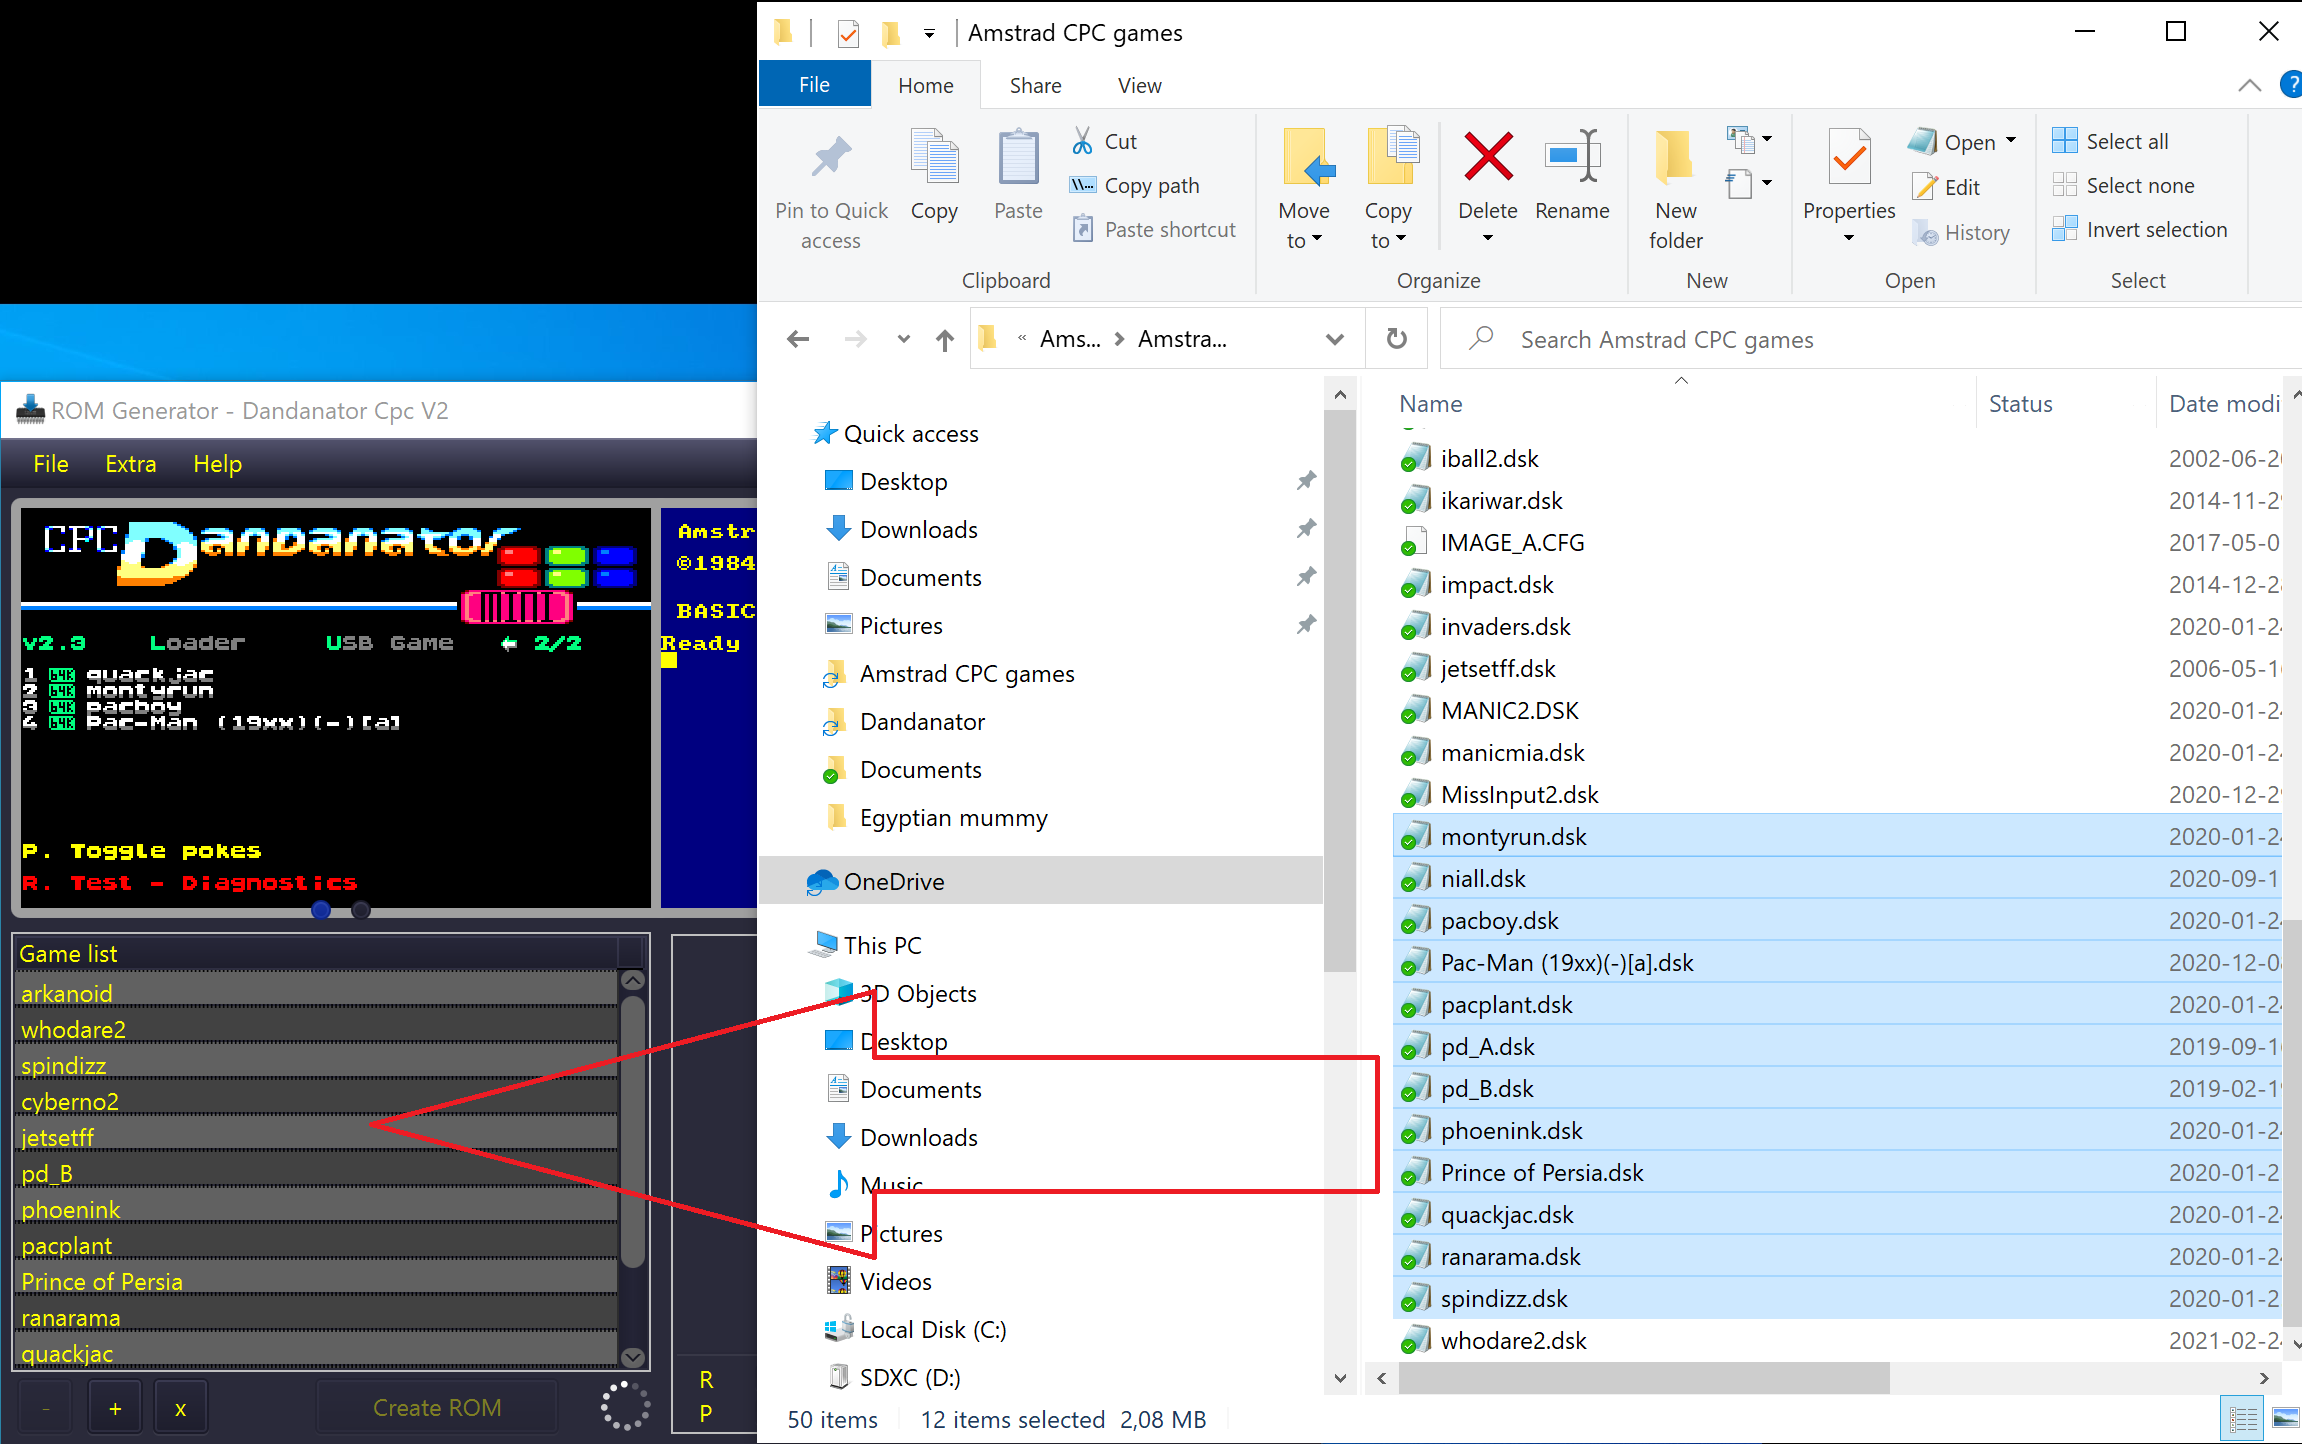 Clicking on any of the games you have copied over shows a screenshot of the game, and you can see how much of the 512k Rom is used up via the R indicator on the bottom right, the P indicator shows how much Pokes space you’ve filled (I assume).
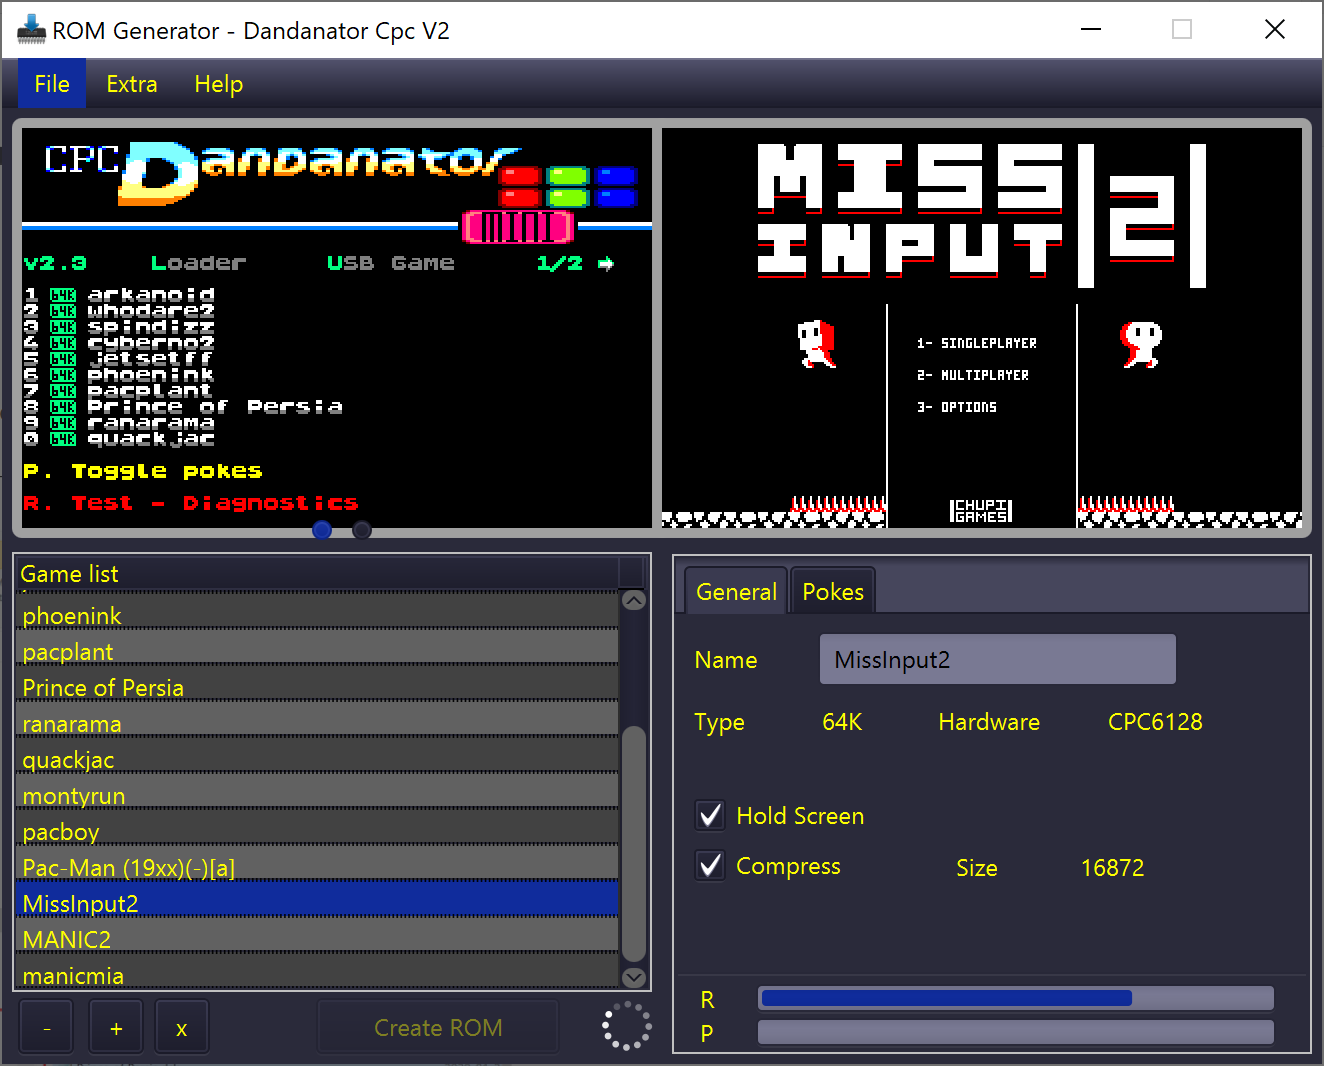 When you’ve nearly filled up the available space you’ll see the R bar turn red. At this point I decided to attempt to re-program the Dandanator.
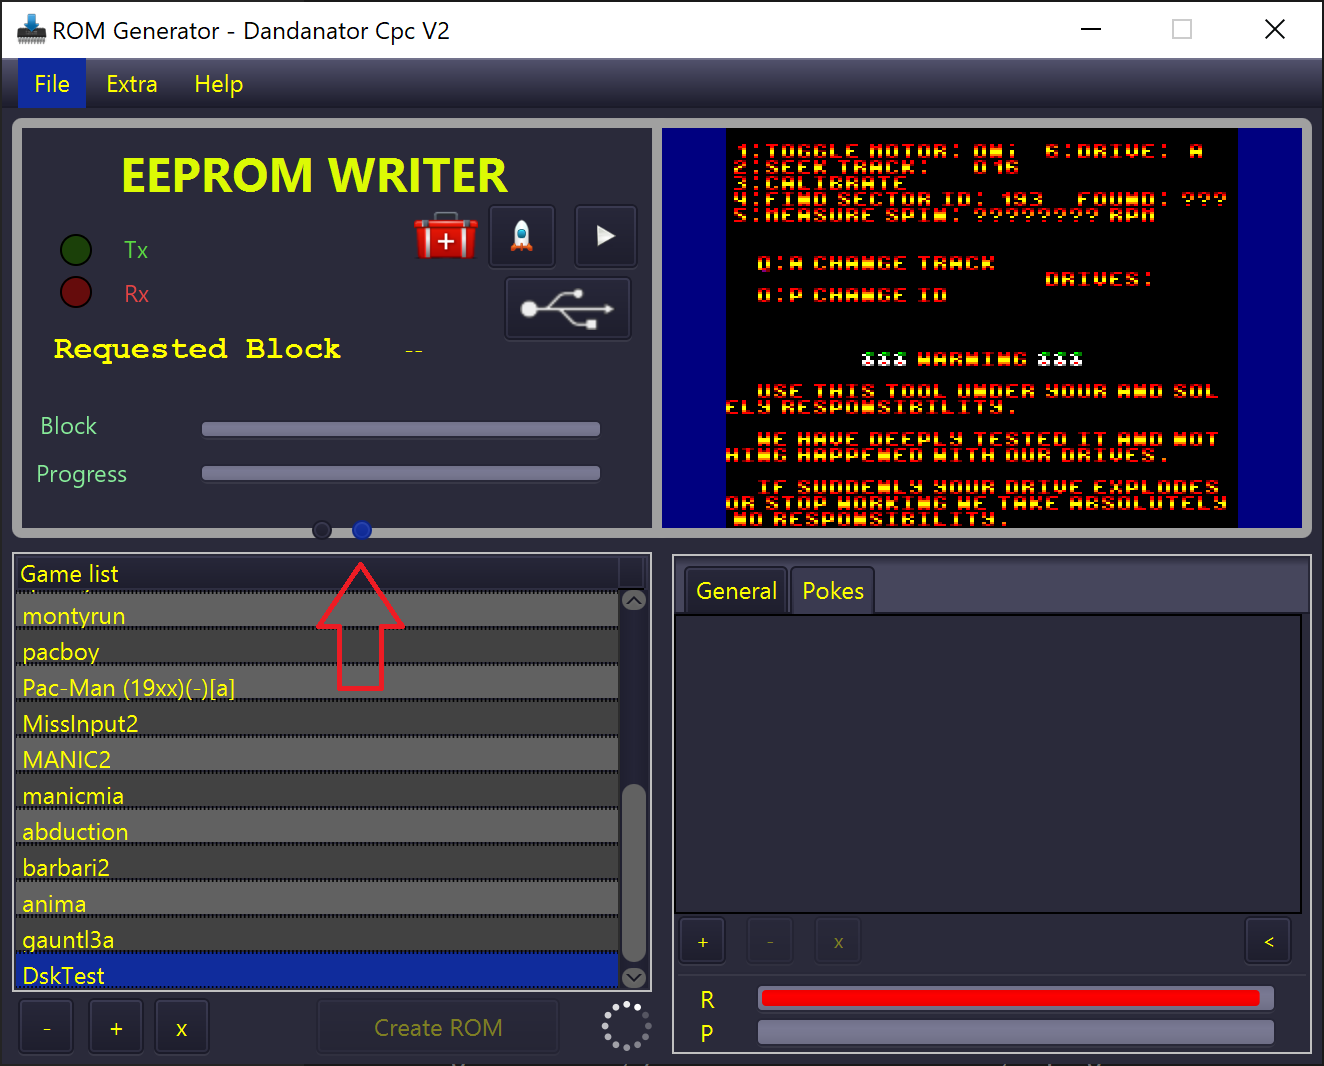
Press the right most circle under the top left screen, it should flip from the CPC Dandanator mini screen to an EEPROM Writer.
 Next, on the CPC itself, press the L key to get to the Loader.
 Back on the computer, click on the play icon in the EEPROM Writer, if all goes well you’ll hear the familiar sounds of a CPC tape…. funny and some moving progress bars.
 When I tried with all the games above it wouldn’t copy, it would just start at block 1 of 32 and stop, so I started again with less games.
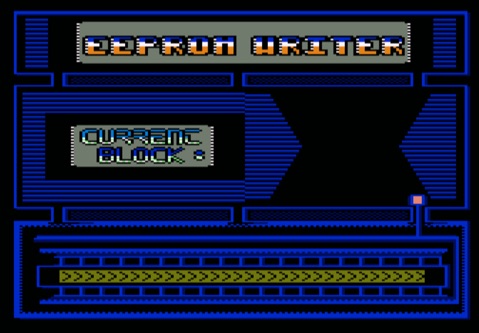
This time it started copying and it was reflected both in the EEPROM Writer on the computer as well as on the CPC.
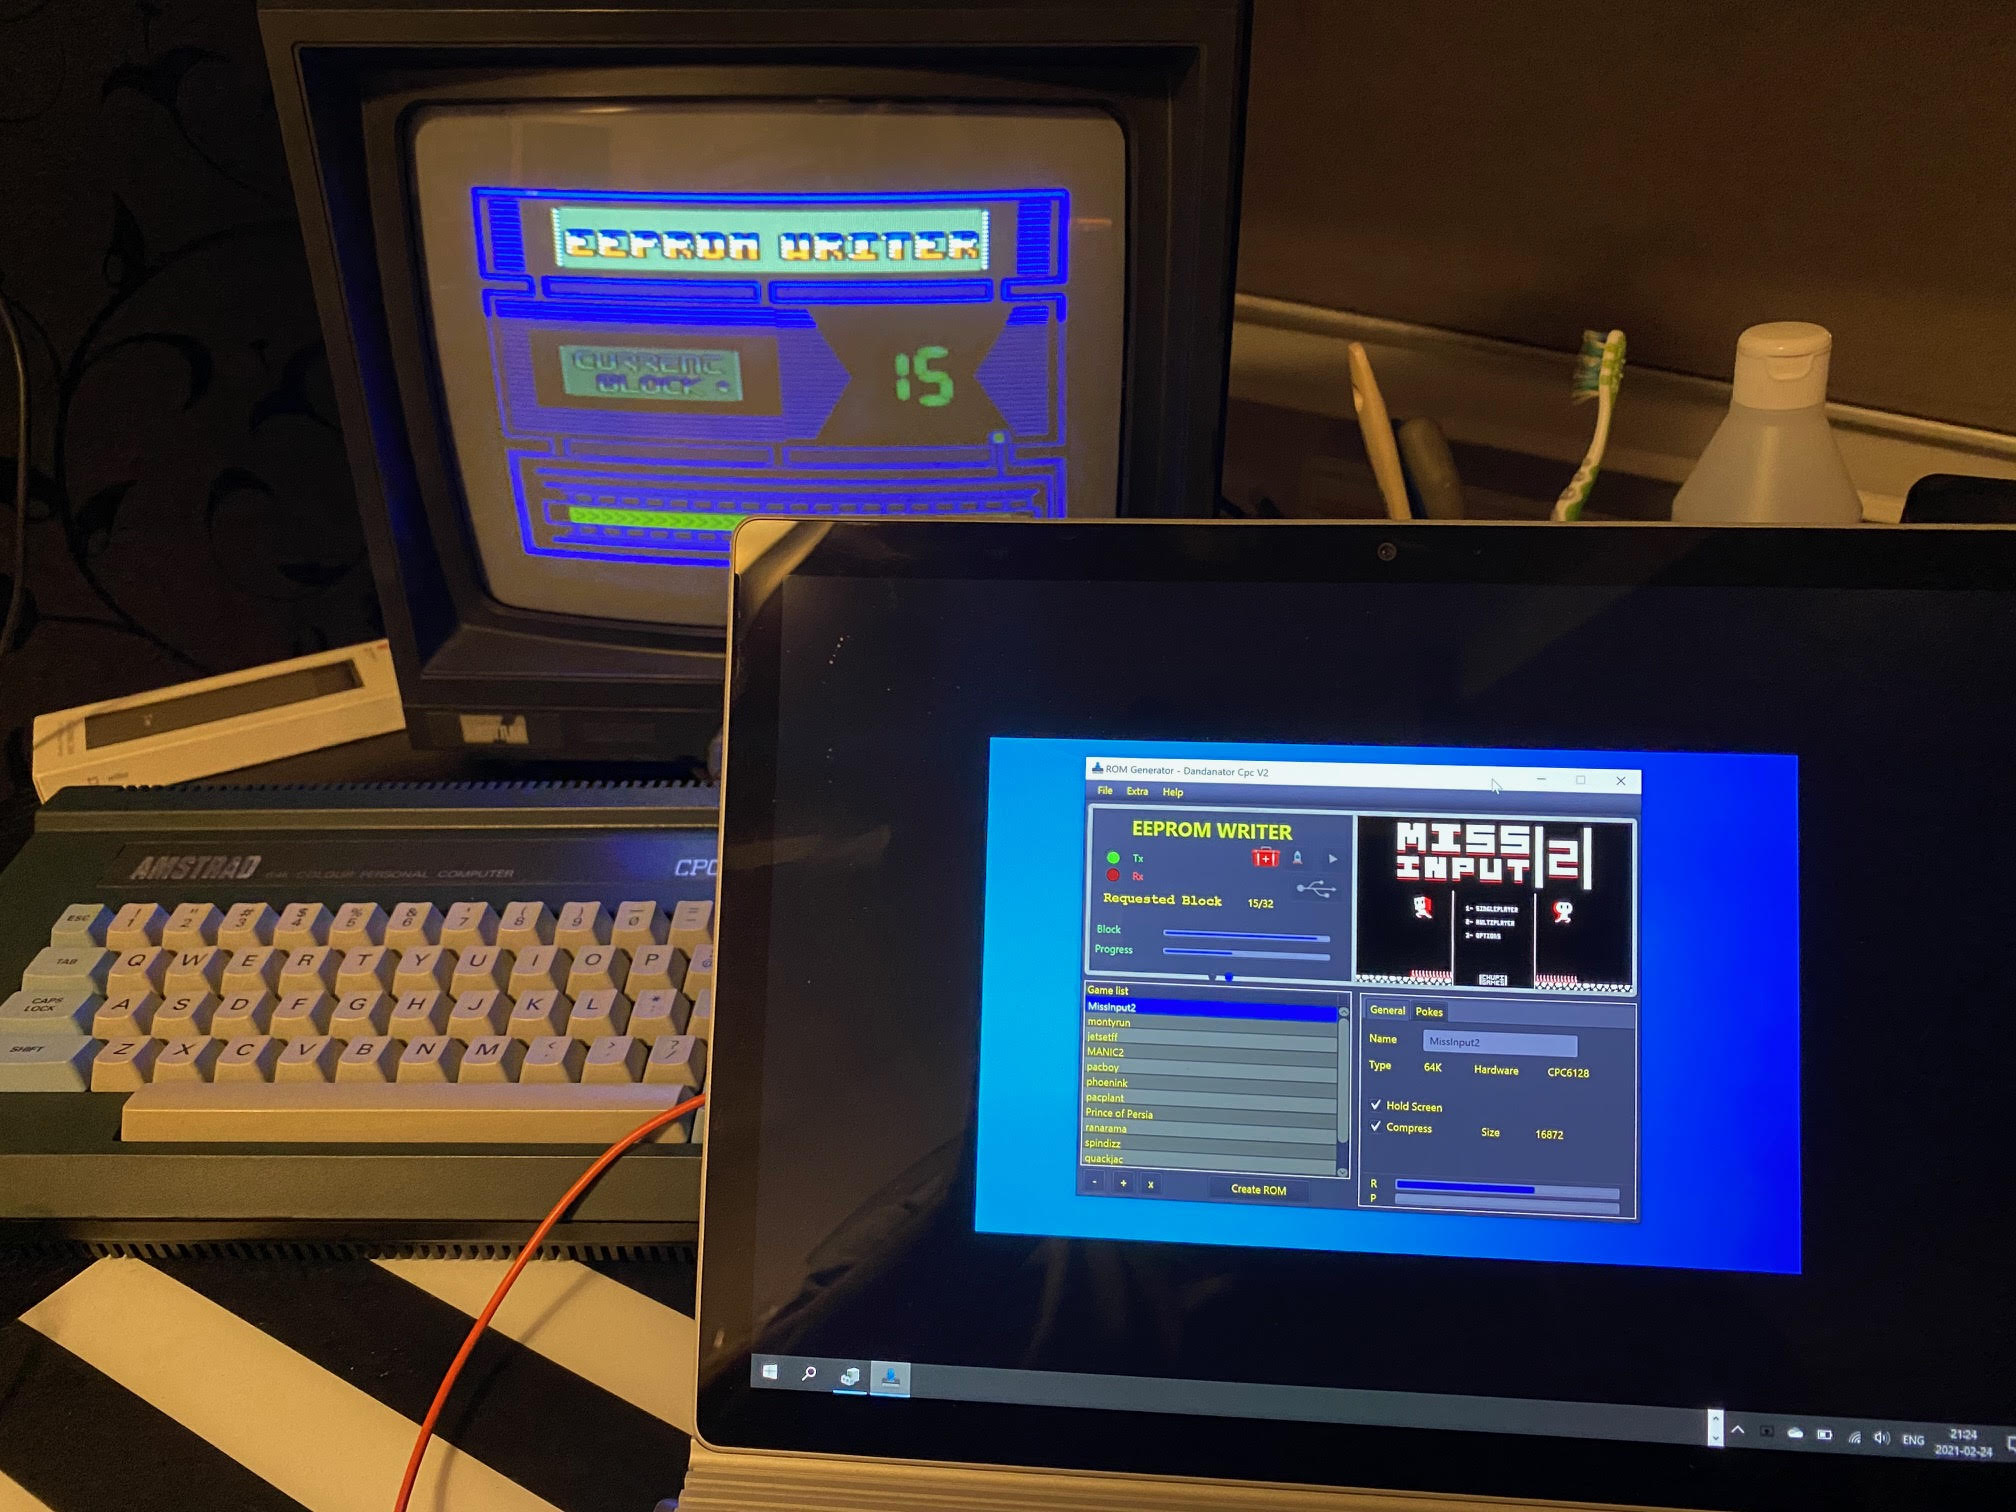 and here’s the proof !
 Trying the first game !
Wow! I got it to work, finally !!!
After all your effort you might want to create a ROM file of your new Dandanator, to do that simply click on Create ROM.
if you want to customize or add a special rom (diagnostic rom) , click on Dandanator CPC tab in preferences and select the Extra Rom option, point it to your downloaded ROM.
Here are some from Noel.
https://github.com/llopis/amstrad-diagnostics/
Here’s a video I made showing you hot to load the diagnostics onto the Dandanator
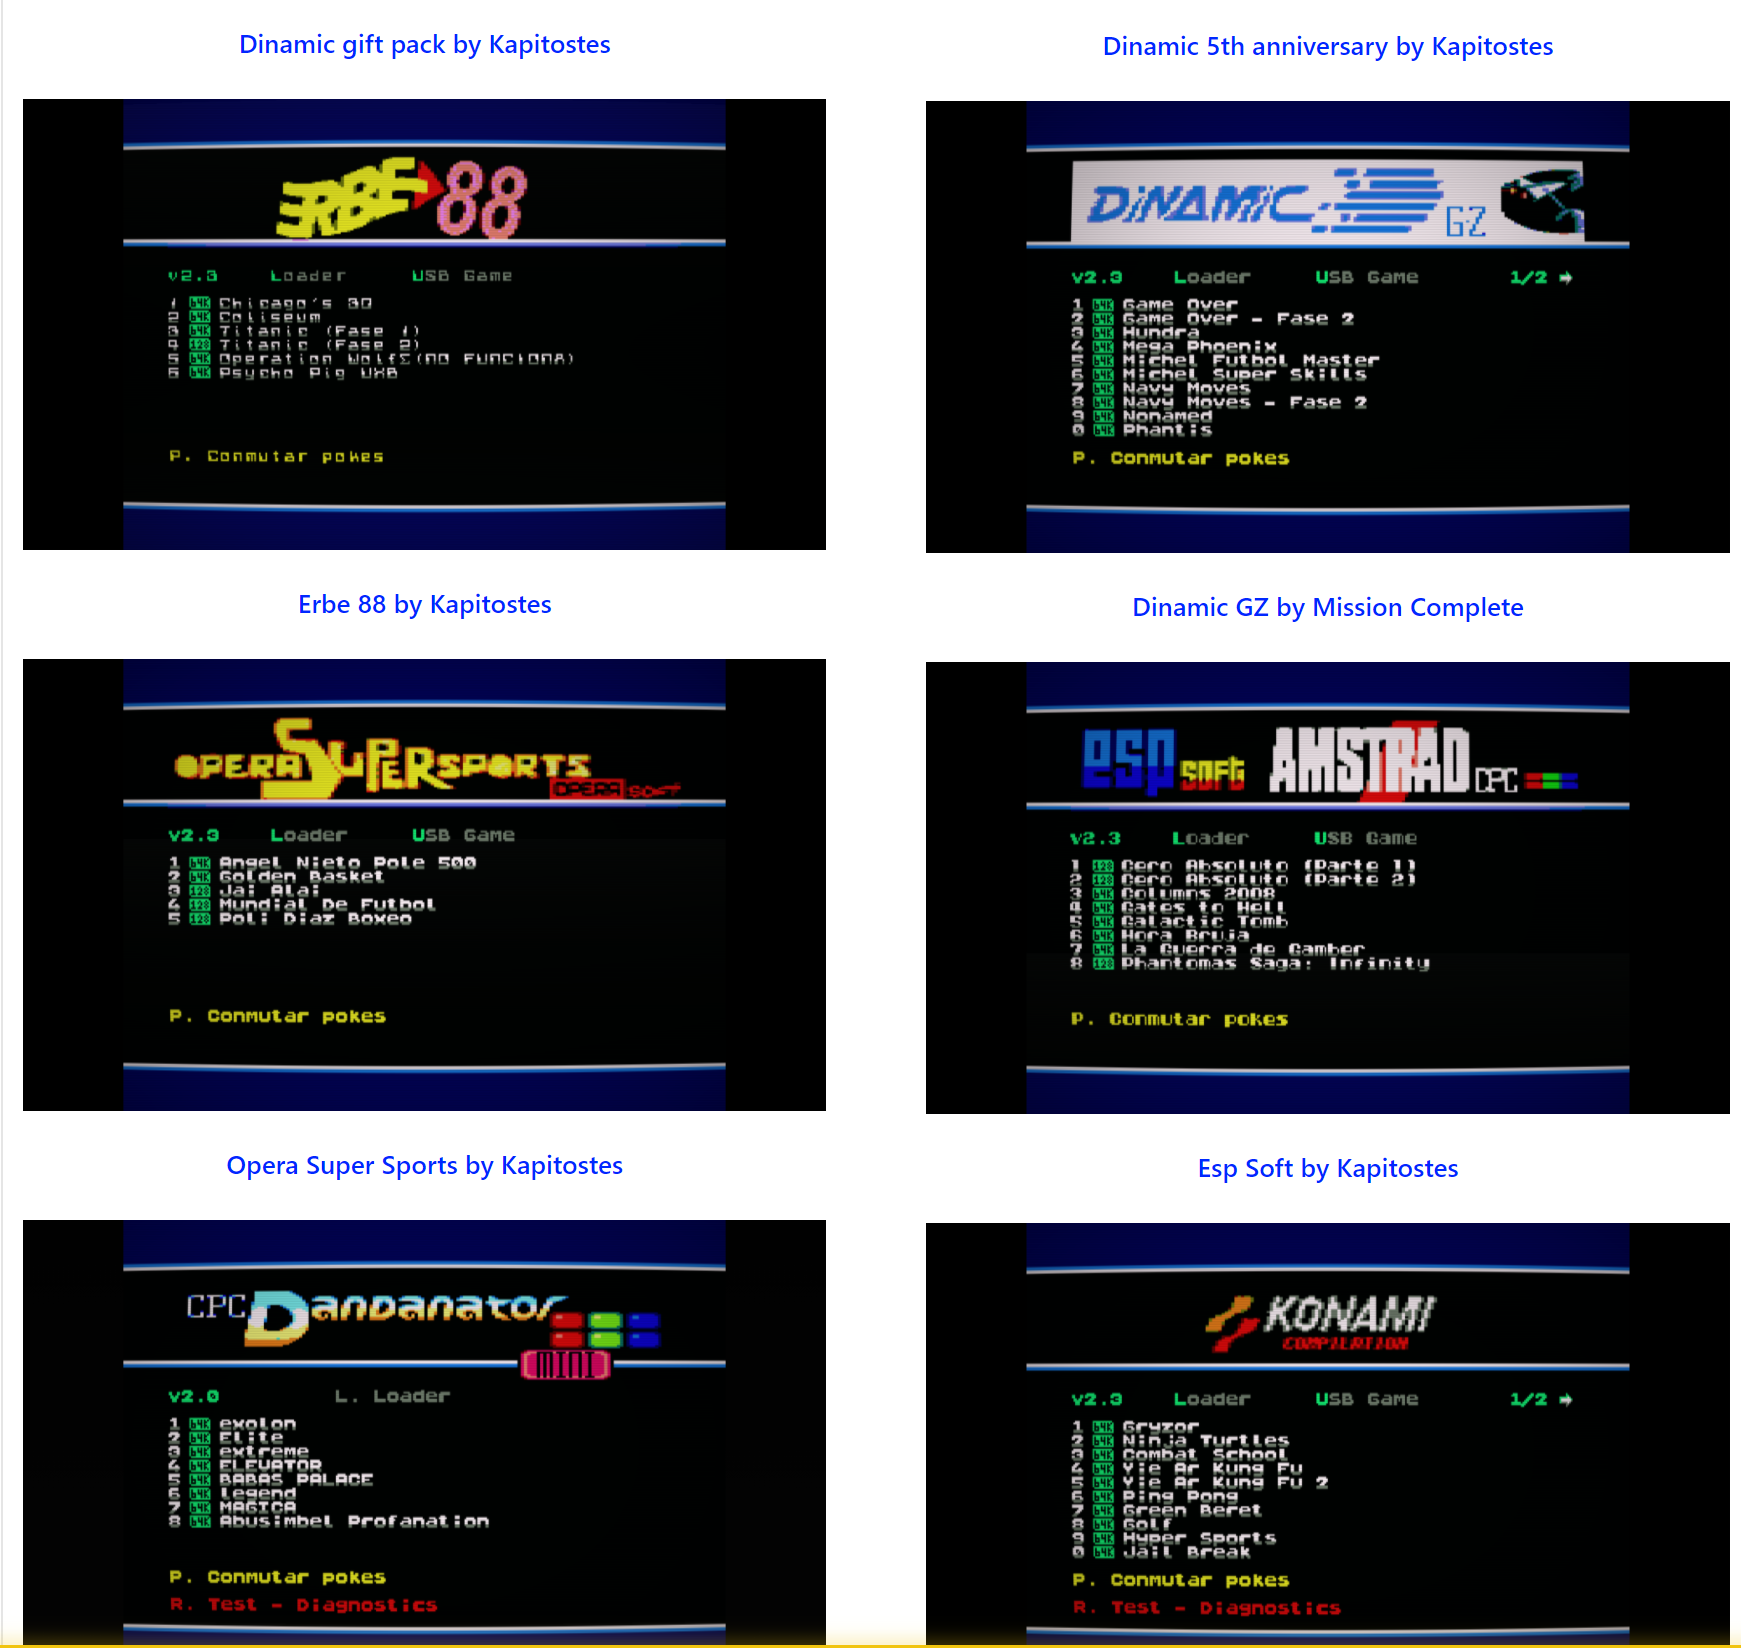
If you’d like to try pre-made ROM’s they check out this page, scroll down to the bottom, it’s got loads of ROMs to try.
Thanks go to Dan for creating such an amazing product and for answering my emails looking for help !
Dandanator mini manual (Spanish) – http://www.dandare.es/Proyectos_Dandare/Manual_CPCDDTRMini.html
Download the developers manual – CPC Dandanator mini – DevDoc
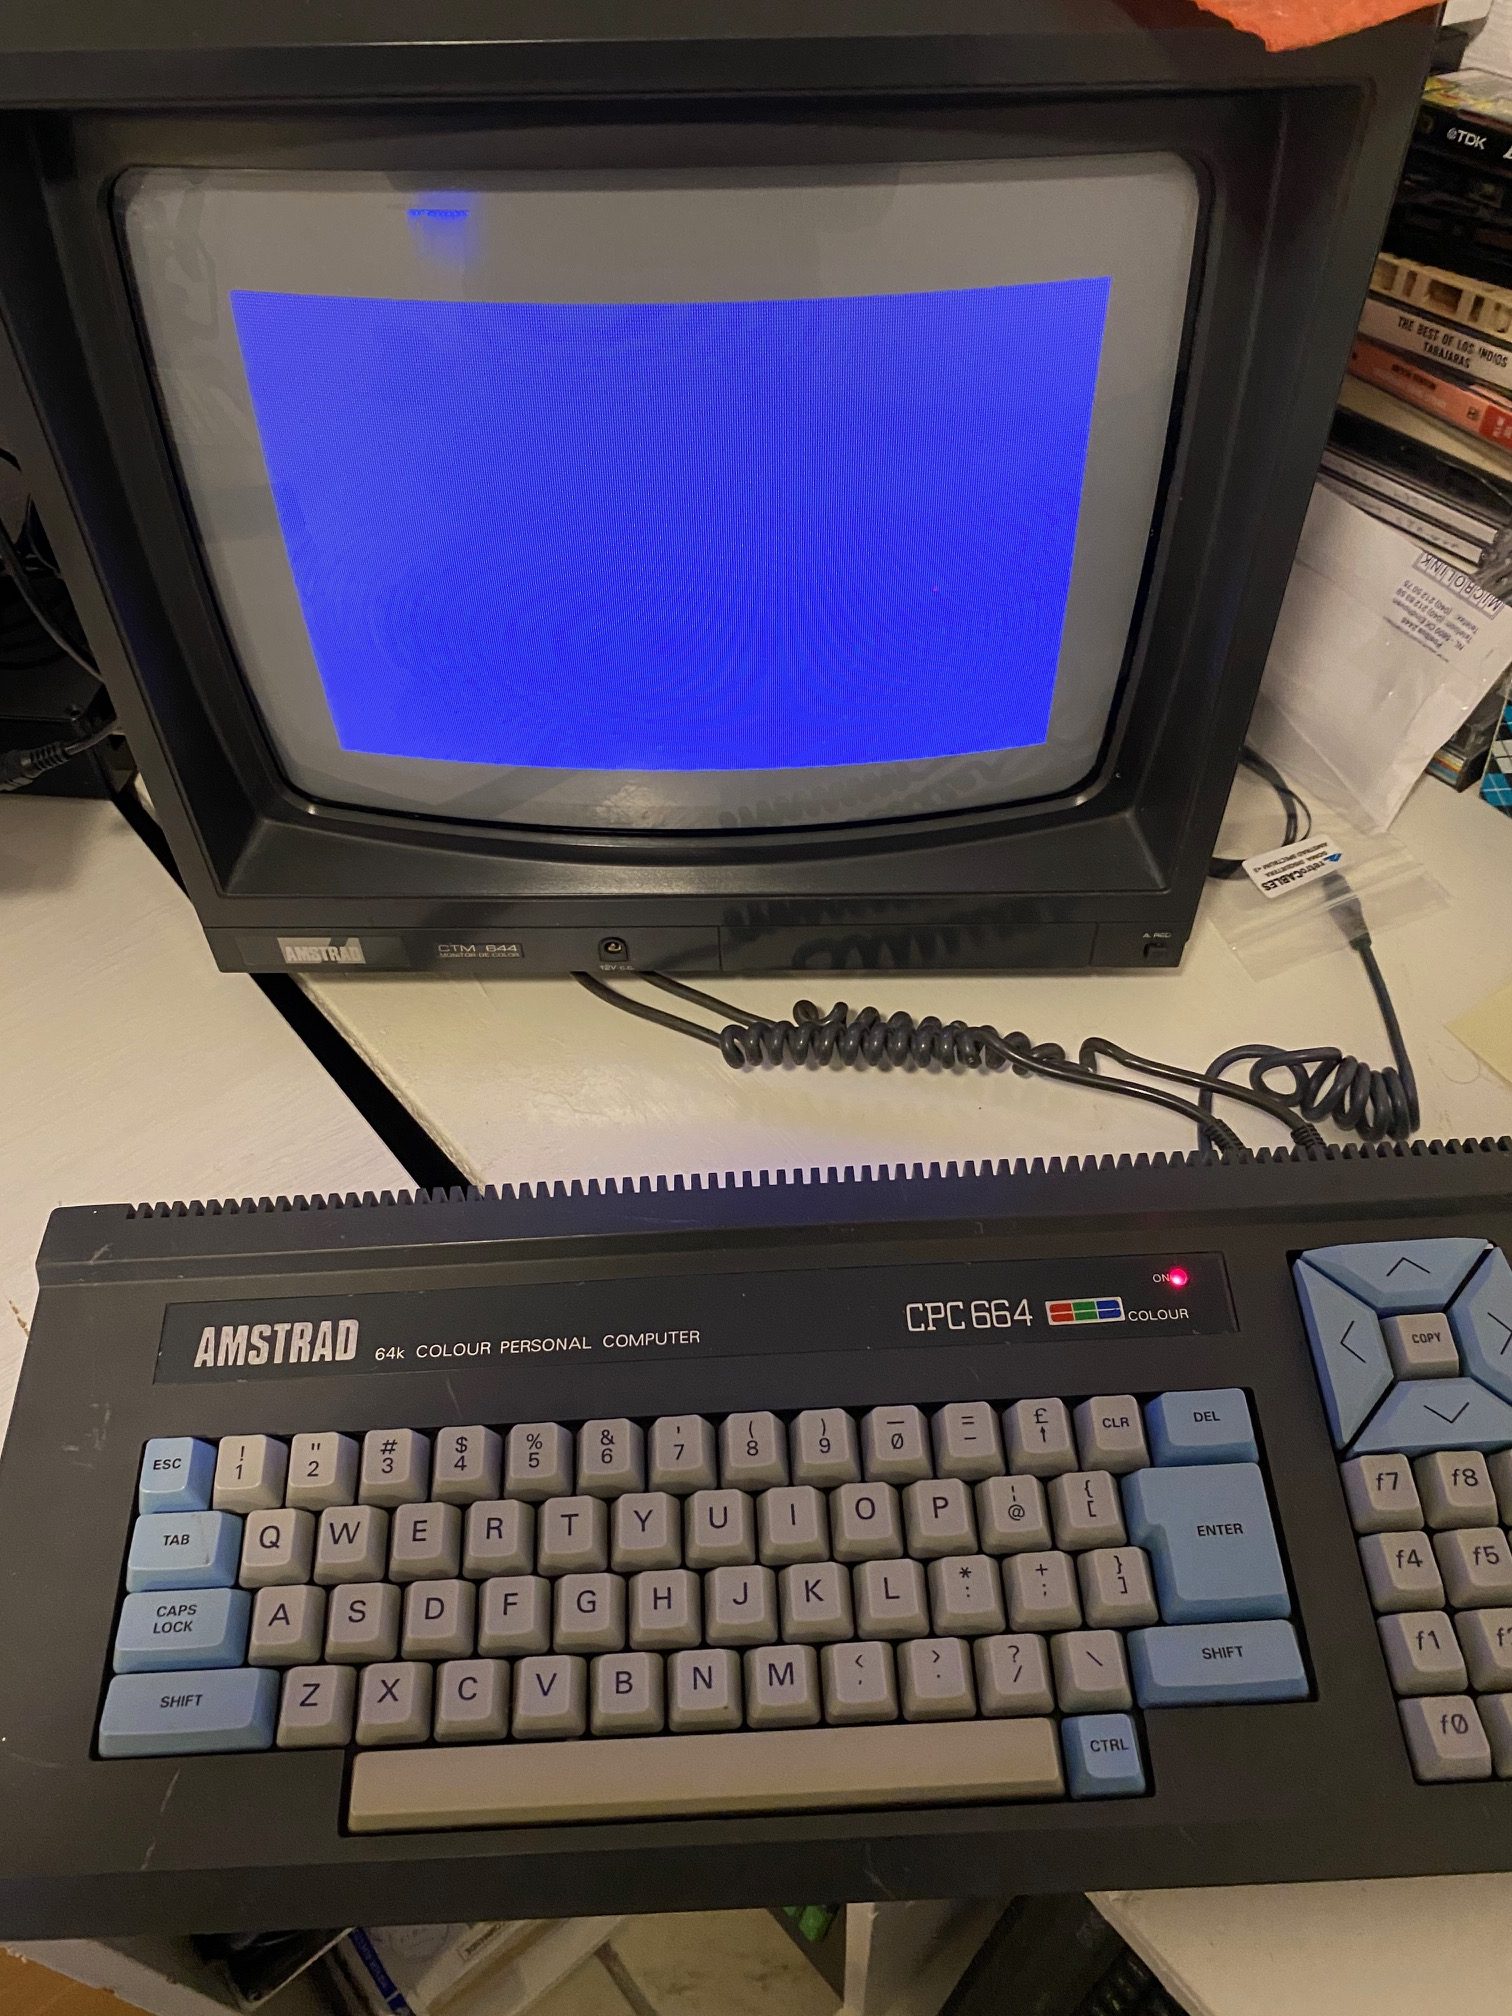
I bought this CPC 664 from ebay, it looked nice but it was advertised as “for parts or not working”. It came from Cairo in Egypt as was evident from the dust all over the motherboard and inside…
As it was dead on arrival I decided to name it the Egyptian mummy.
I actually received the 664 in January but spent a few weeks researching the problem on Amstrad Wiki forums. The advice I got there was excellent (from Bryce, Noel & others), so I went and ordered some parts from ebay and watched countless videos about replacing RAM on Amstrads’ (hint, start with Noels excellent videos @ noels retro lab).
Note that no matter how many videos you watch about repairing old retro computers, the best way to learn what works for you is to try it yourself, and to learn from your own mistakes. I should know, I learned a few tricks in the hours it took de-soldering the ram on this CPC.
Here are the new parts I ordered in no particular order. All of the parts listed below are by random sellers that have nothing to do with me, I’m just posting the links so you can find something similar yourself.
I already had some other tools, so in case you are interested here they are.
I’ve heard a lot about the Dandanator from various websites so decided to get myself one. This device is designed by a very clever guy called Daniel Leon and is available as an open source project for anyone to make.
After filling in a contact us form at the bottom of a webpage I got an email response from MrByte at hobbyretro.com telling me they had one available, so I bought it. And I’m pleasantly surprised ! It was cheap too, approx 30 Euros not including European shipping (another 6 euros). One of the reasons I was interested was because of the built in RAM test ability.
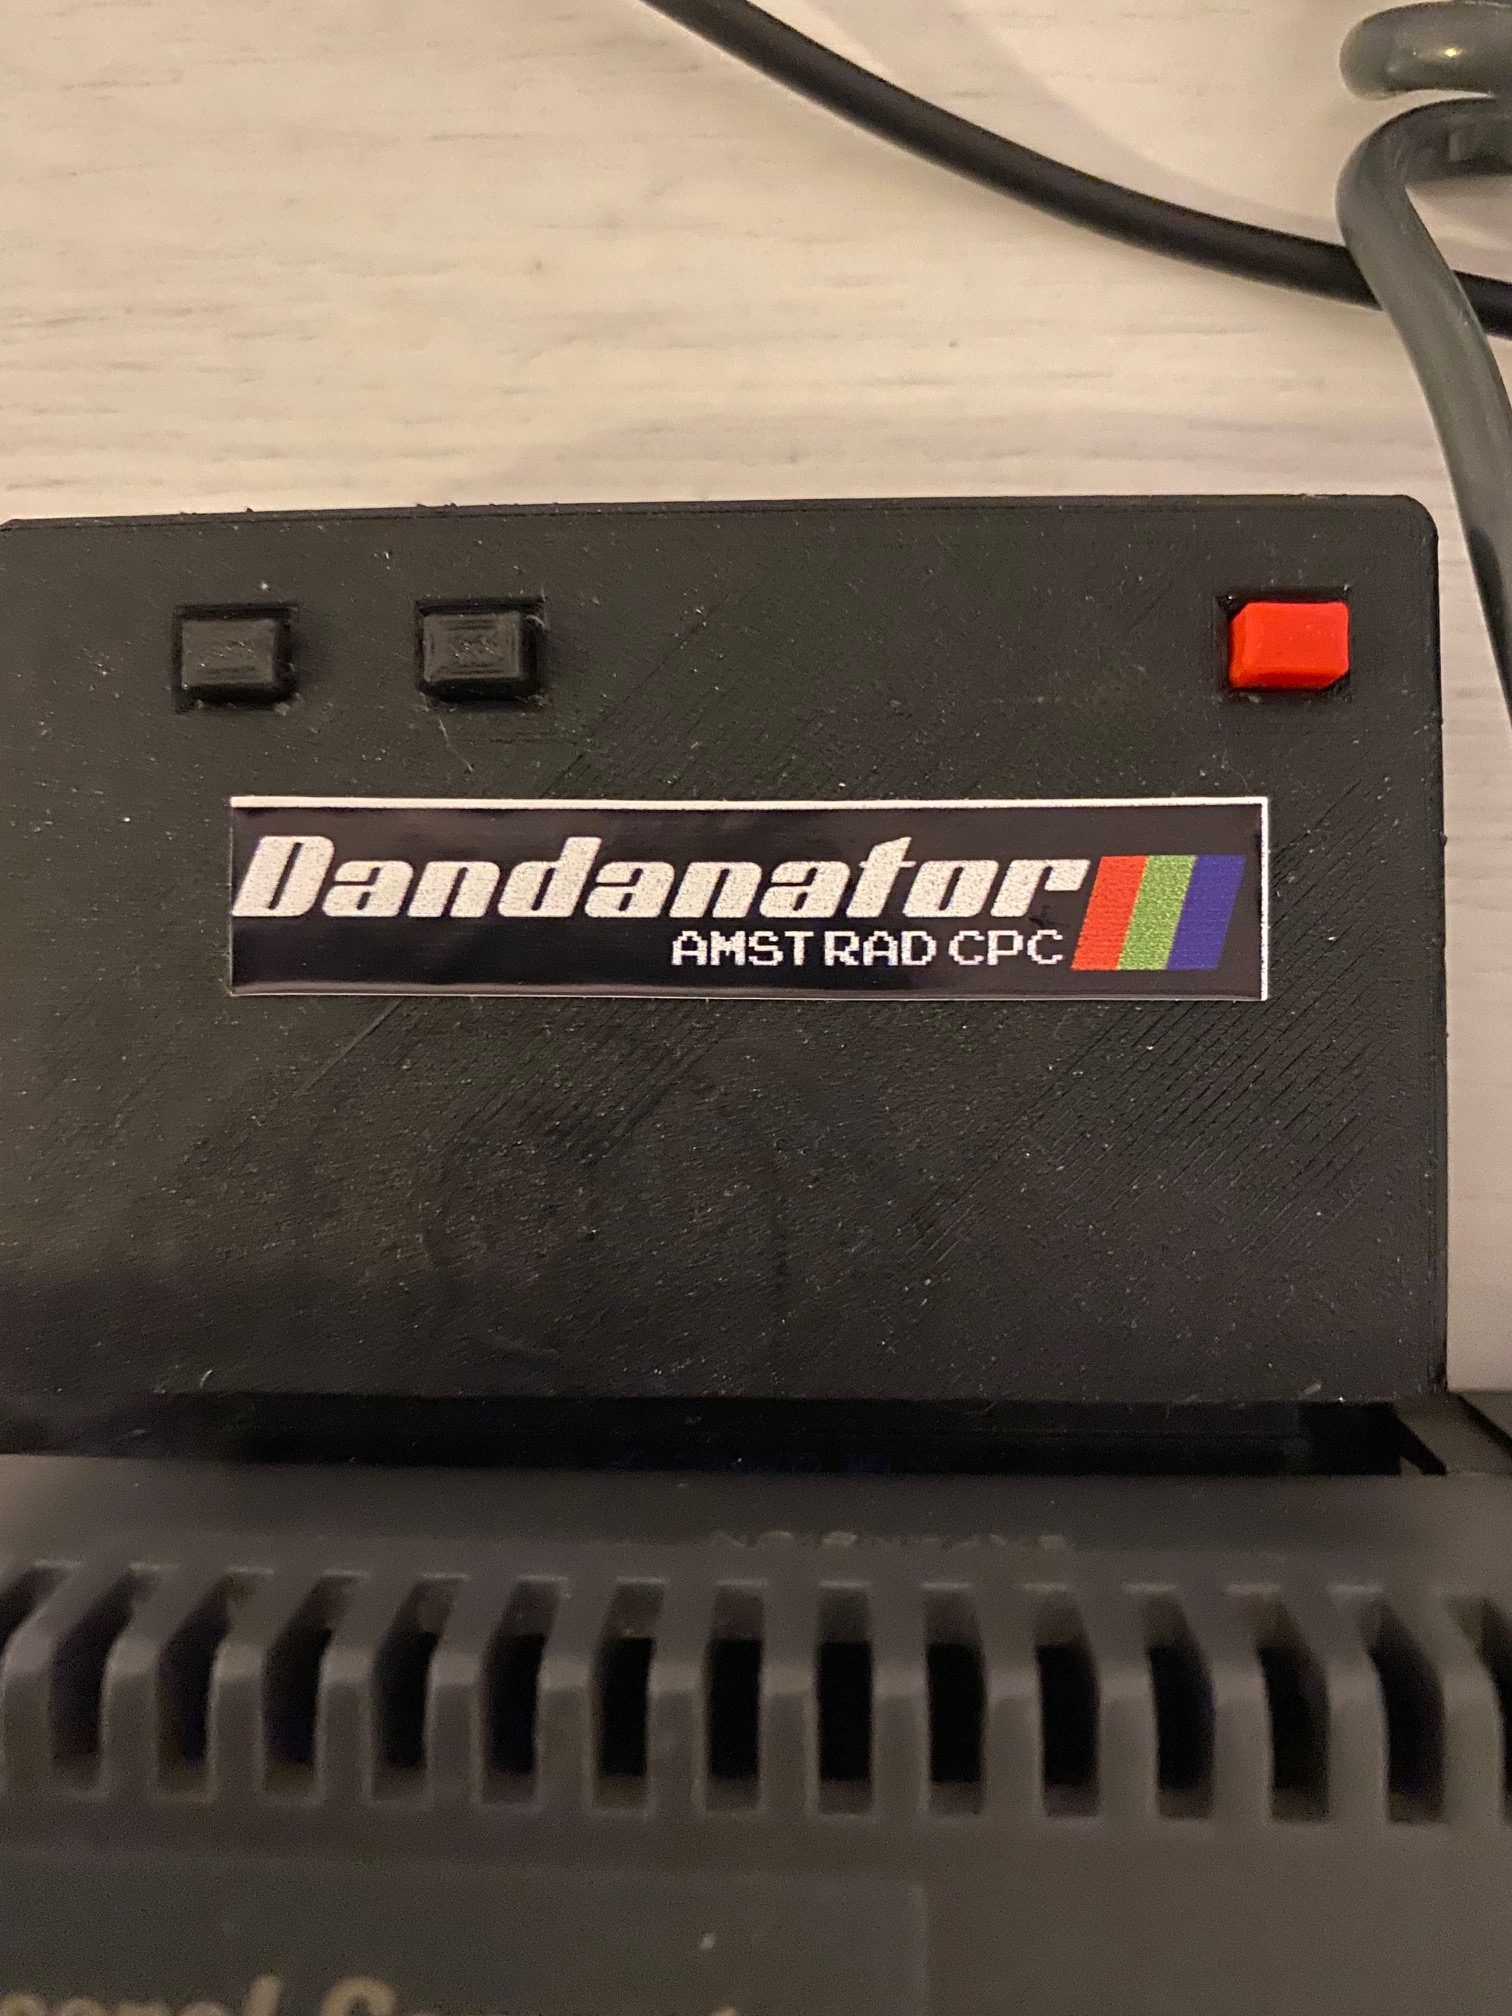
The device is nicely made (3D printed case) with three buttons. It’s got a 512KB flash access memory on the inside which you can flash with games. The red button resets the CPC.
The device plugs into the back of your CPC lying down, so doesn’t shake about. Once you connect power on the CPC, it’s instantly available.
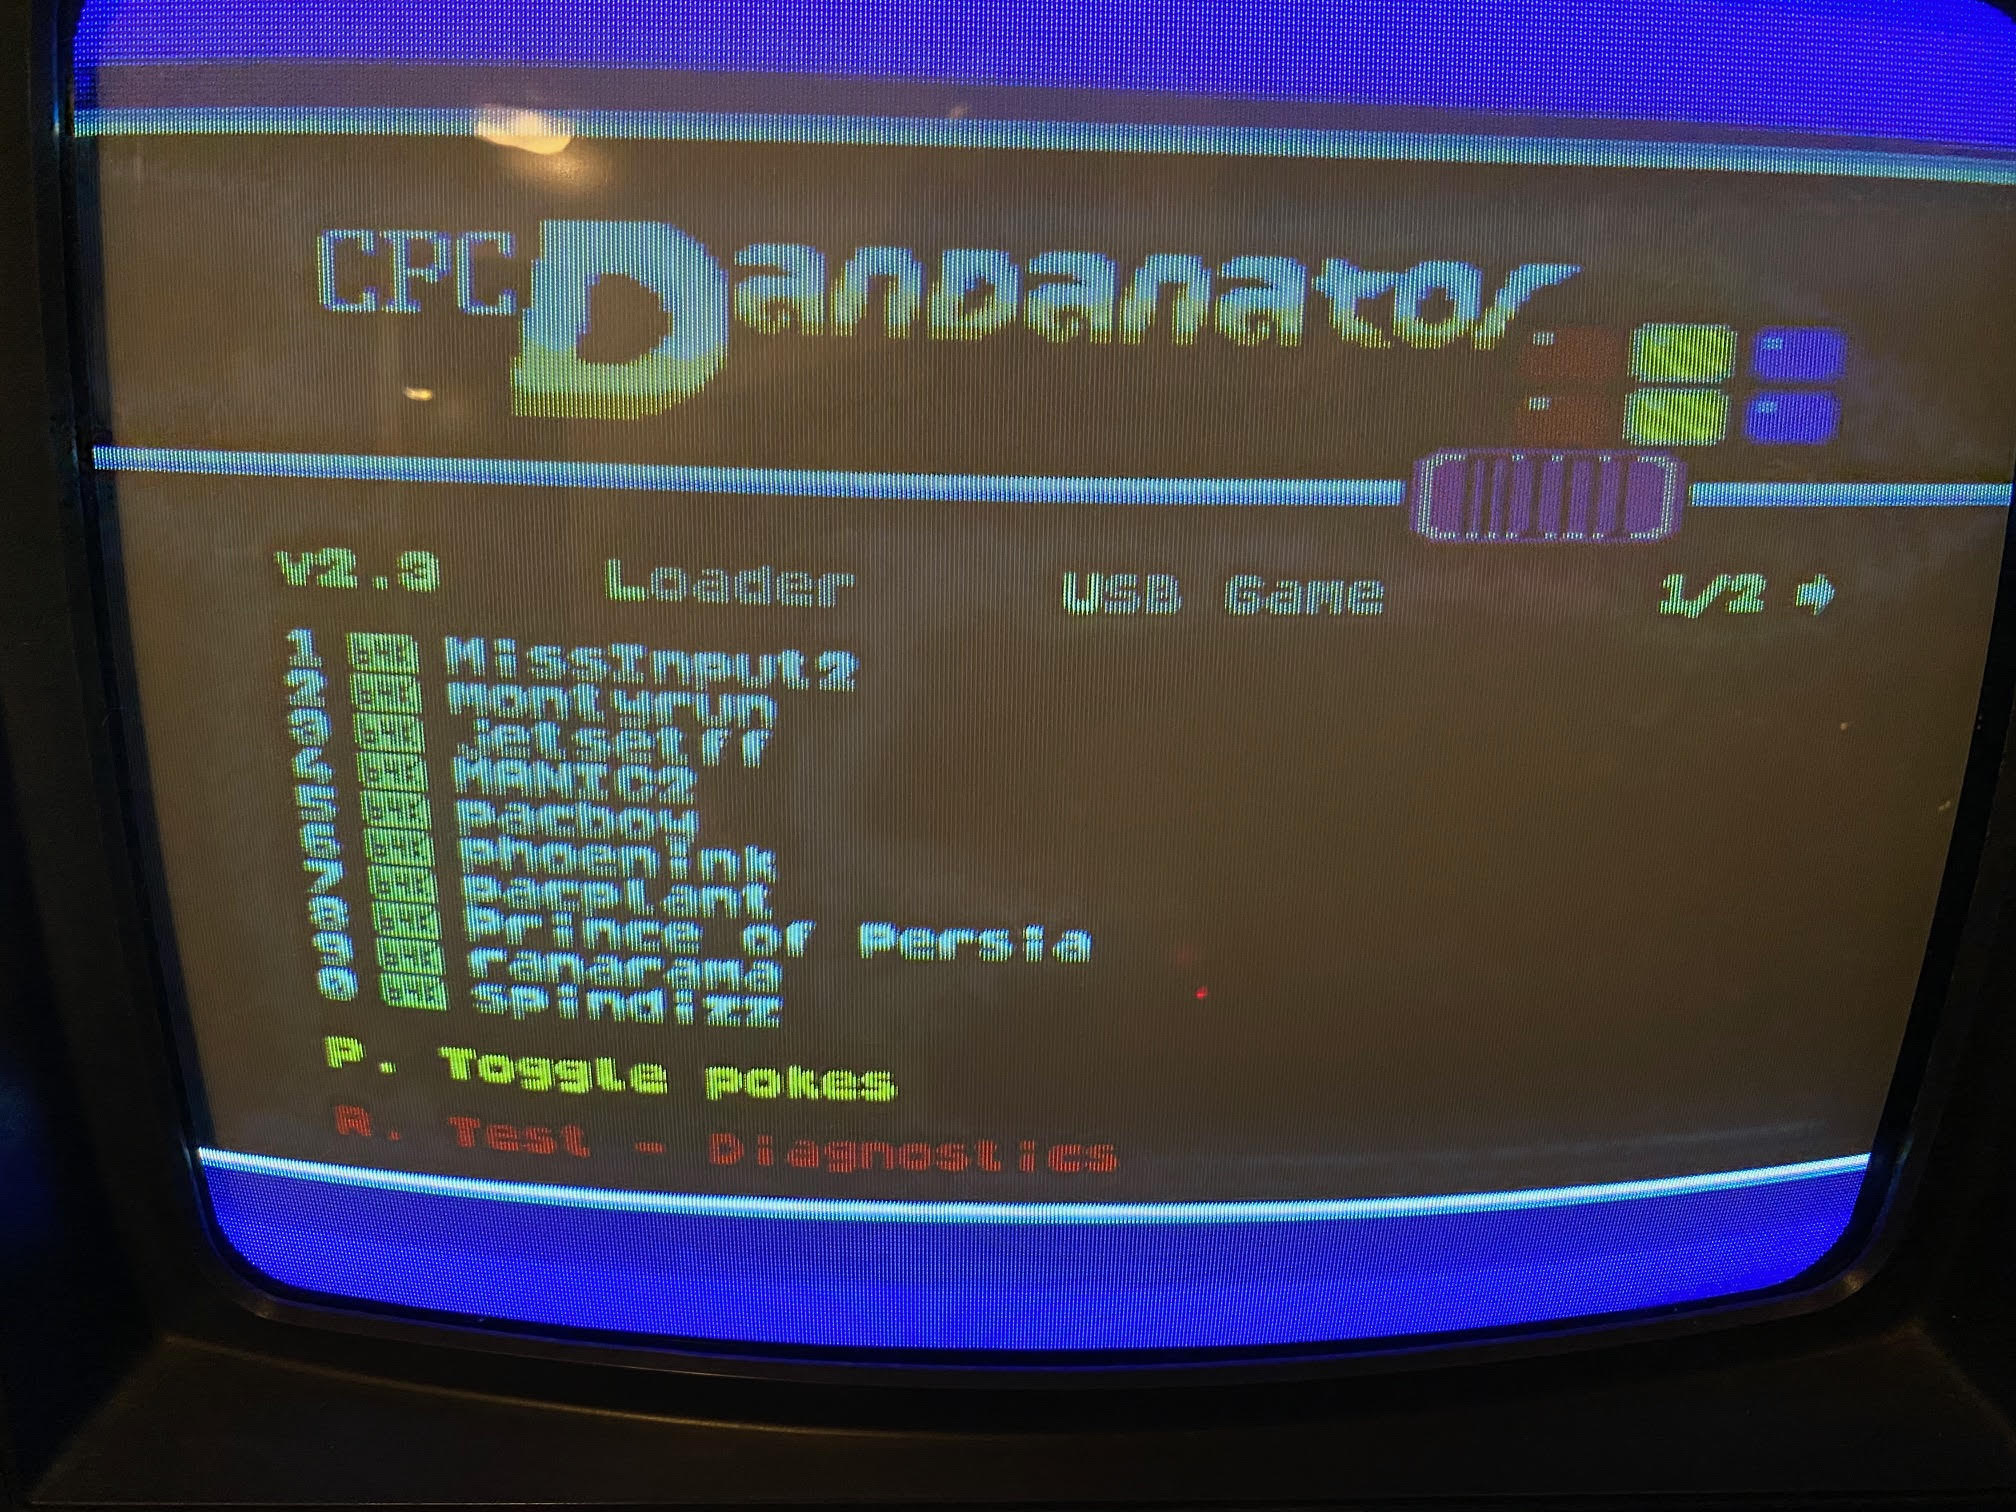
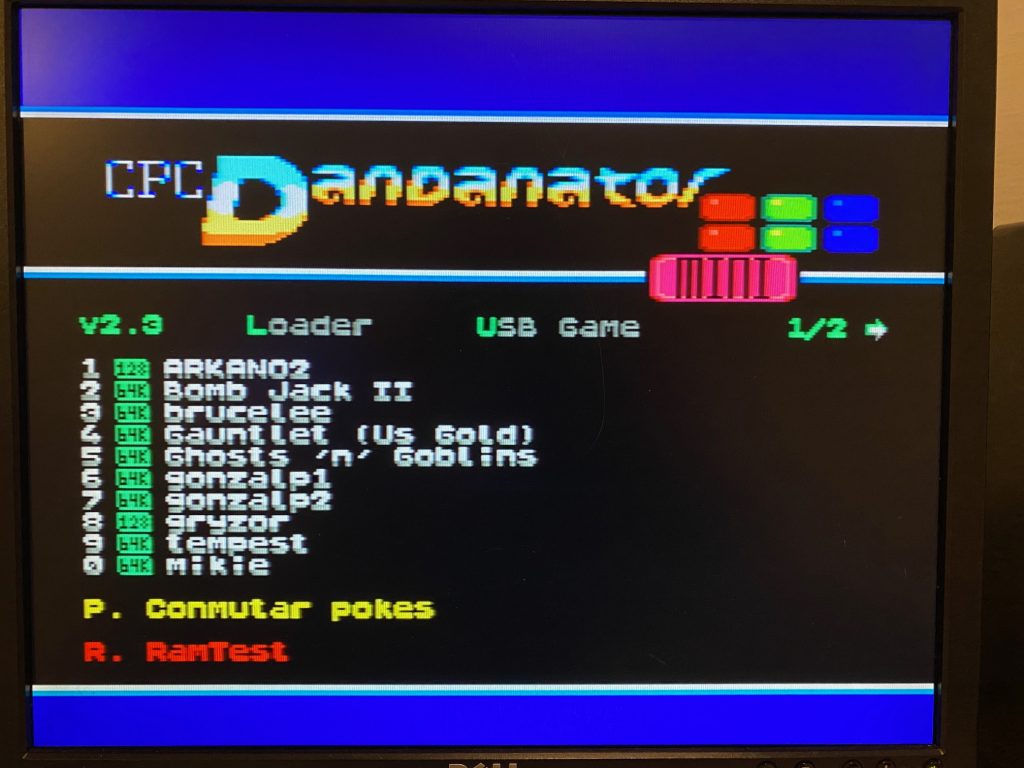 You have 2 pages of games/stuff to scroll through and you can do that using the cursor keys on the Amstrad keyboard, awesome ! You can see the memory requirements of each game beside it (128 or 64k). I assume the P. is for Computer pokes.
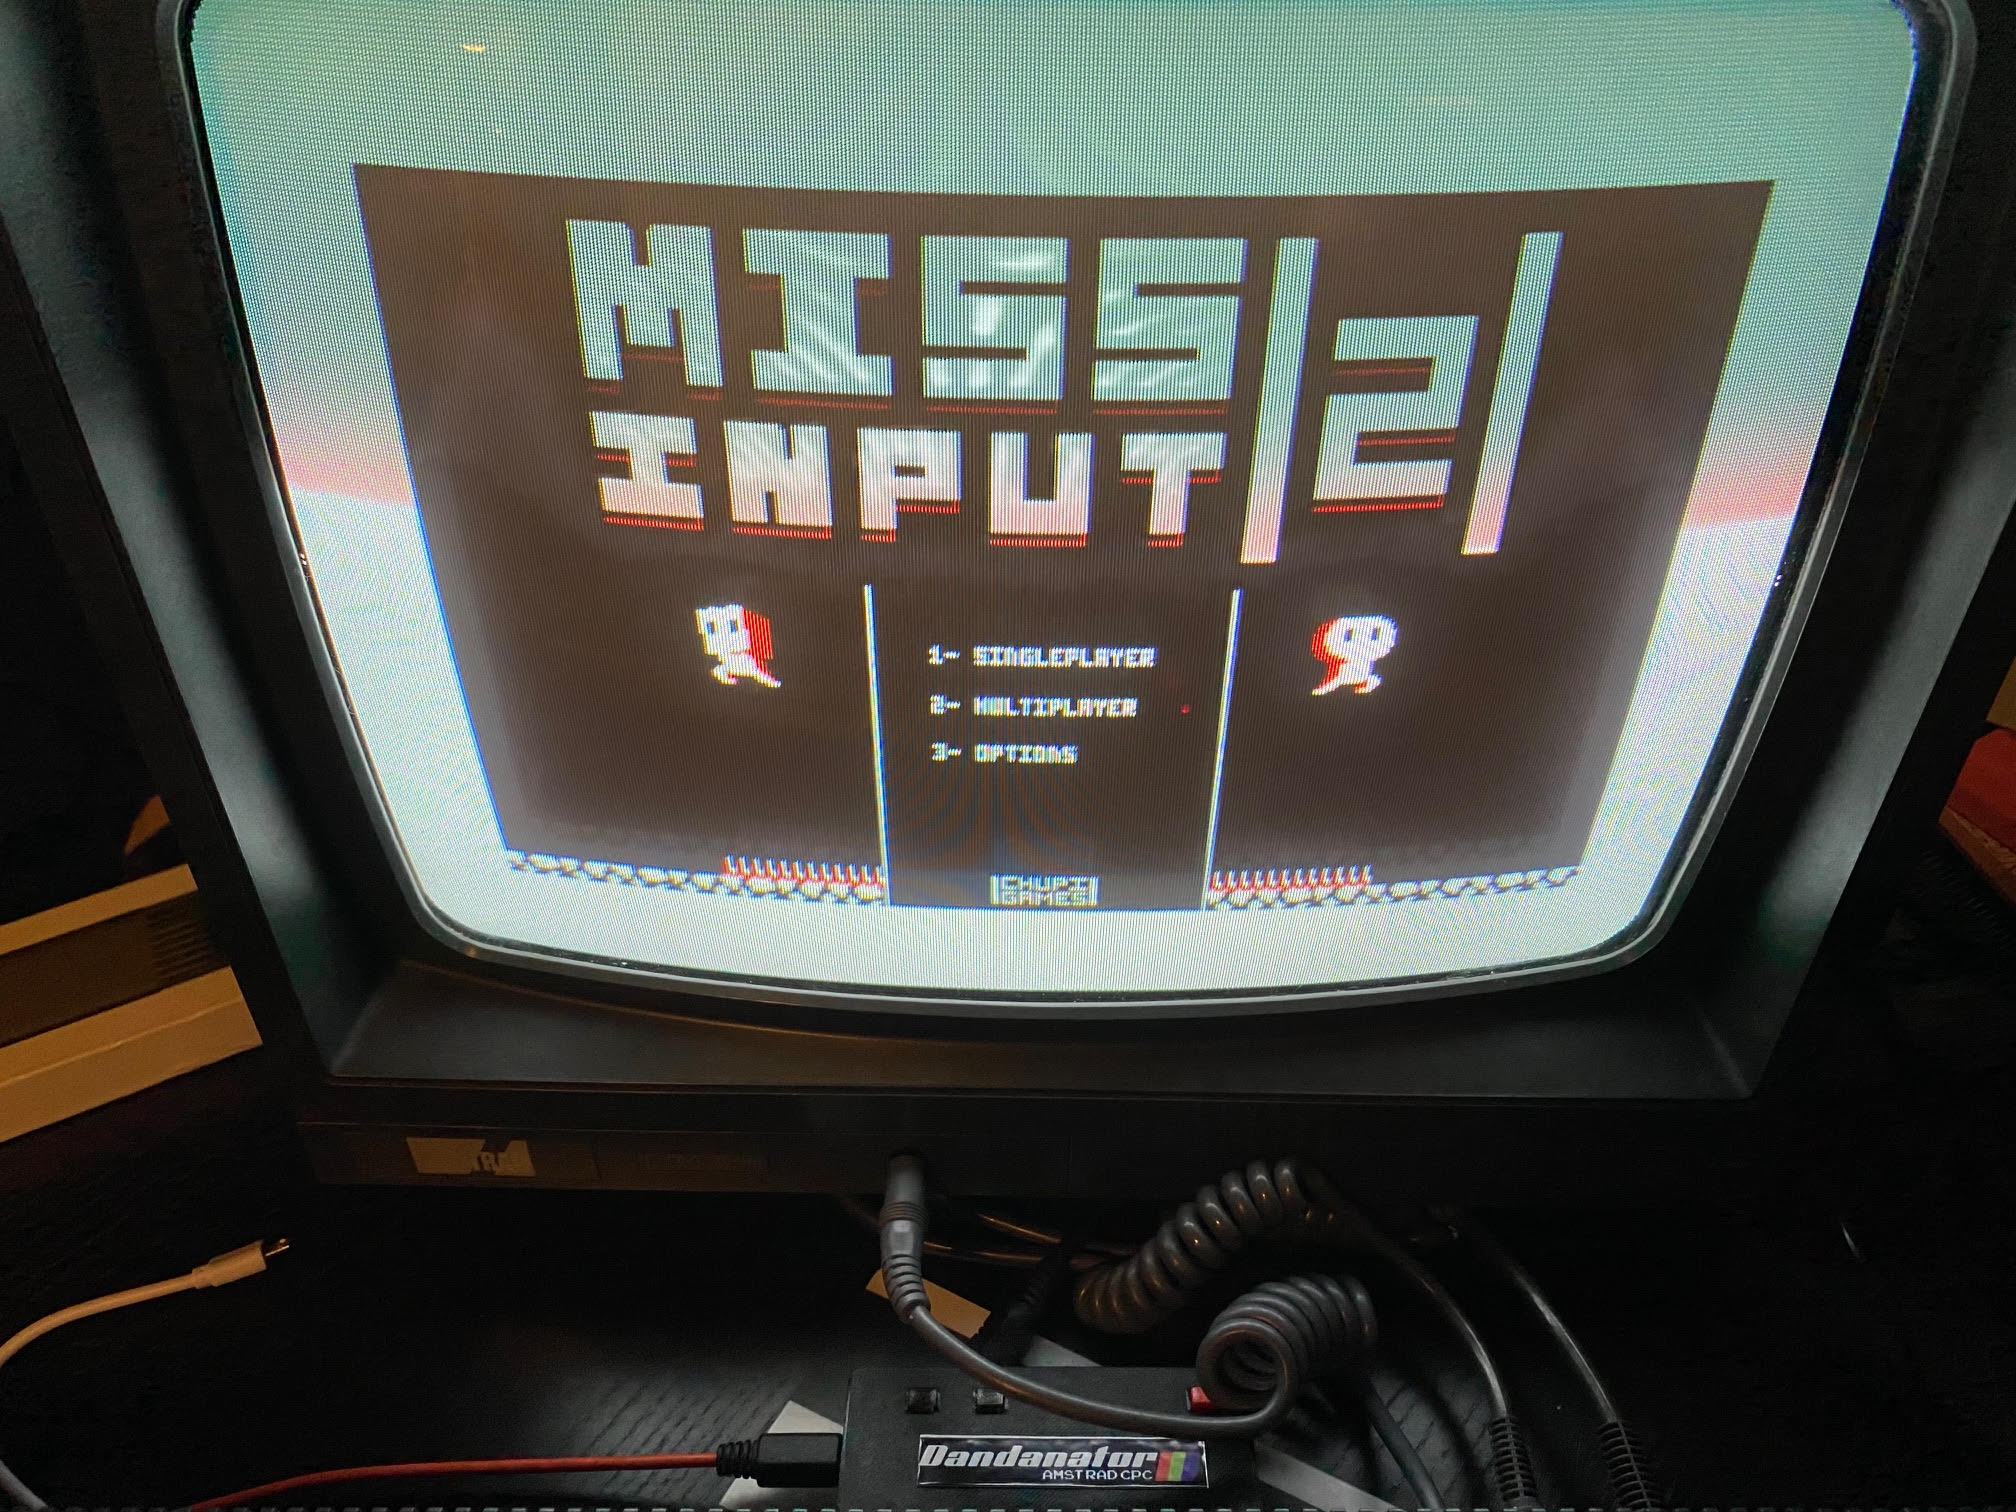
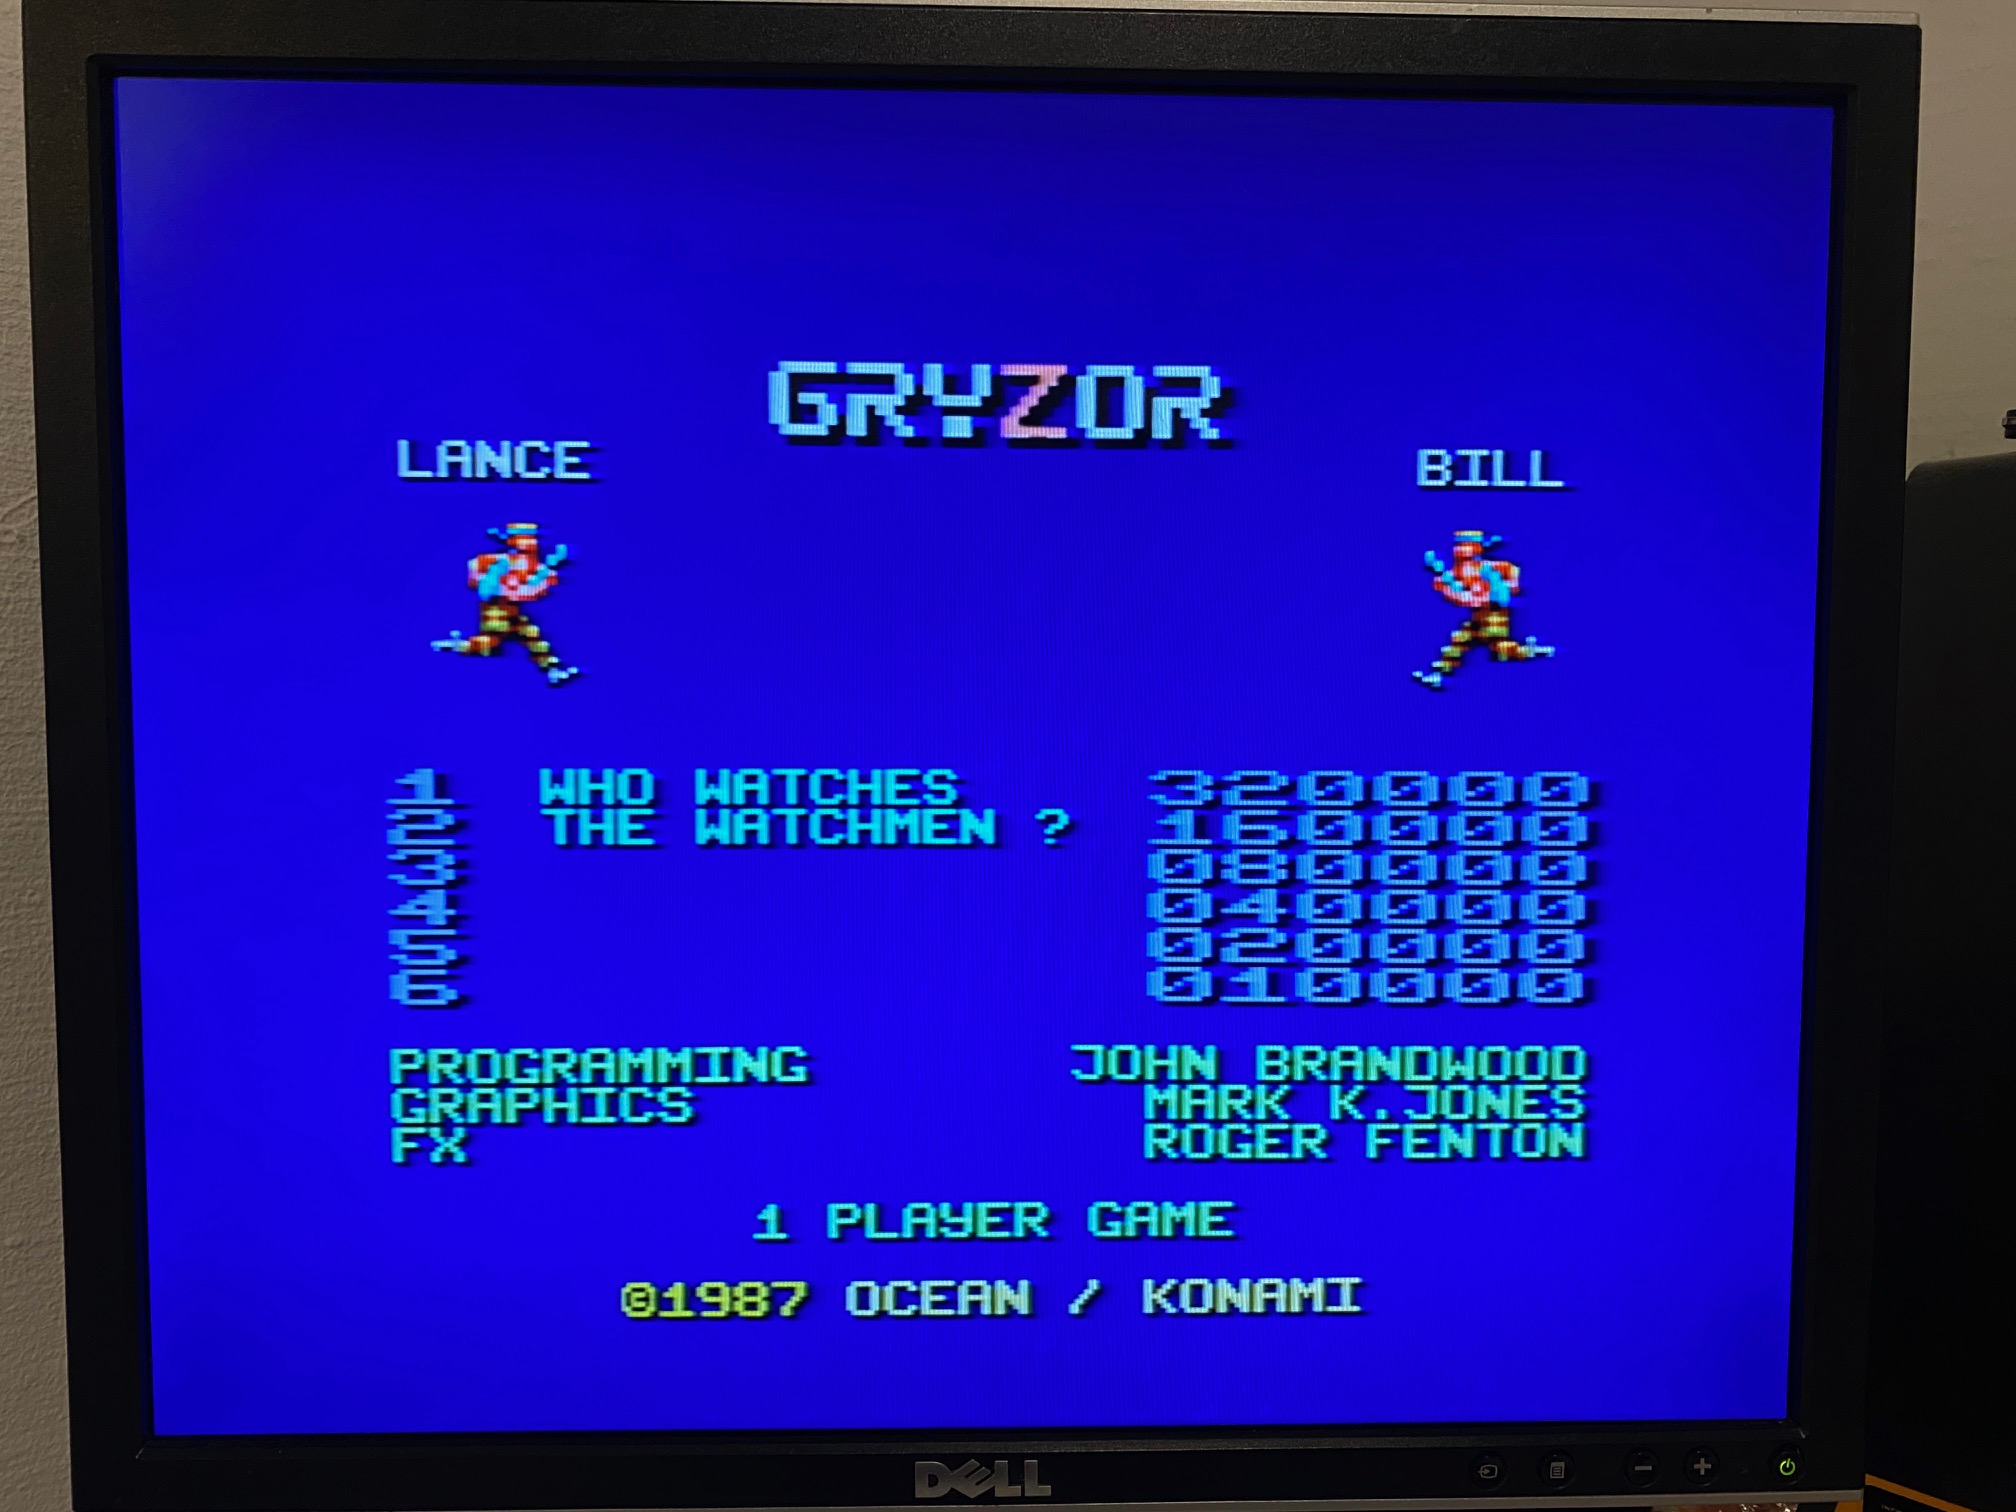
When you find a game you want to run, press the corresponding number on the keyboard and it loads instantaneously. It’s a really cool concept. Fast, cool, awesome, and I really love the fact that it comes preloaded with a selection of very cool games.
 There is a USB connector on the side (mini-a) for loading games/data onto the ROM, but that’s for another blog post.
I tried the RAM test by pressing R. It was that simple.
 I also wanted to test RAM on my CPC 664, which has suspect dead ram, that computer was dead on arrival as you see here.
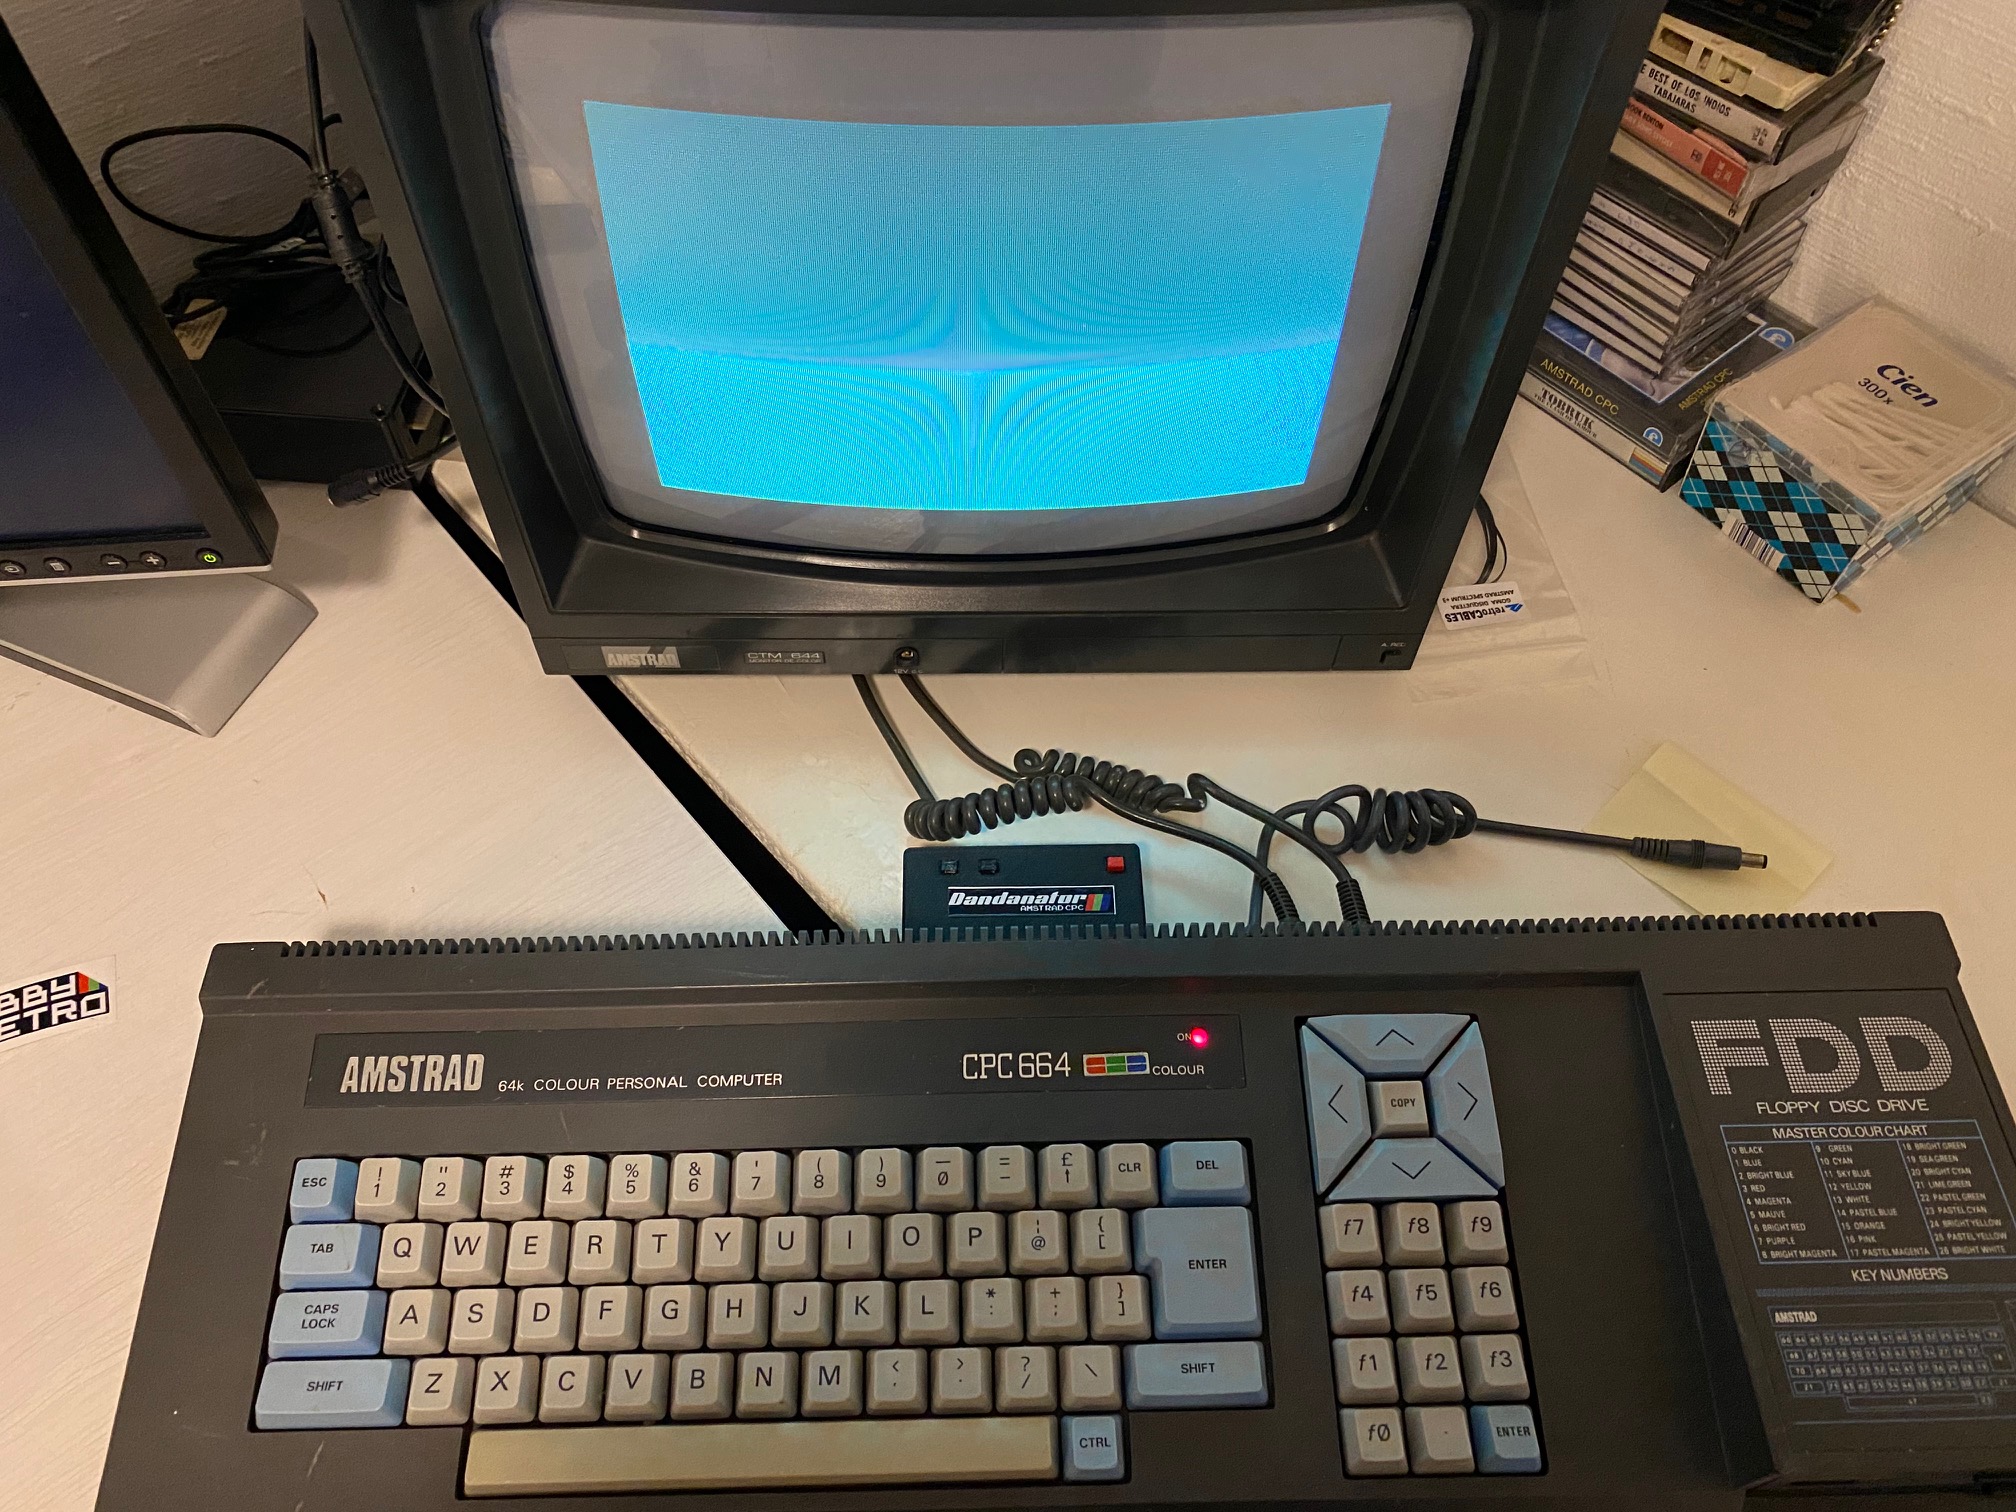
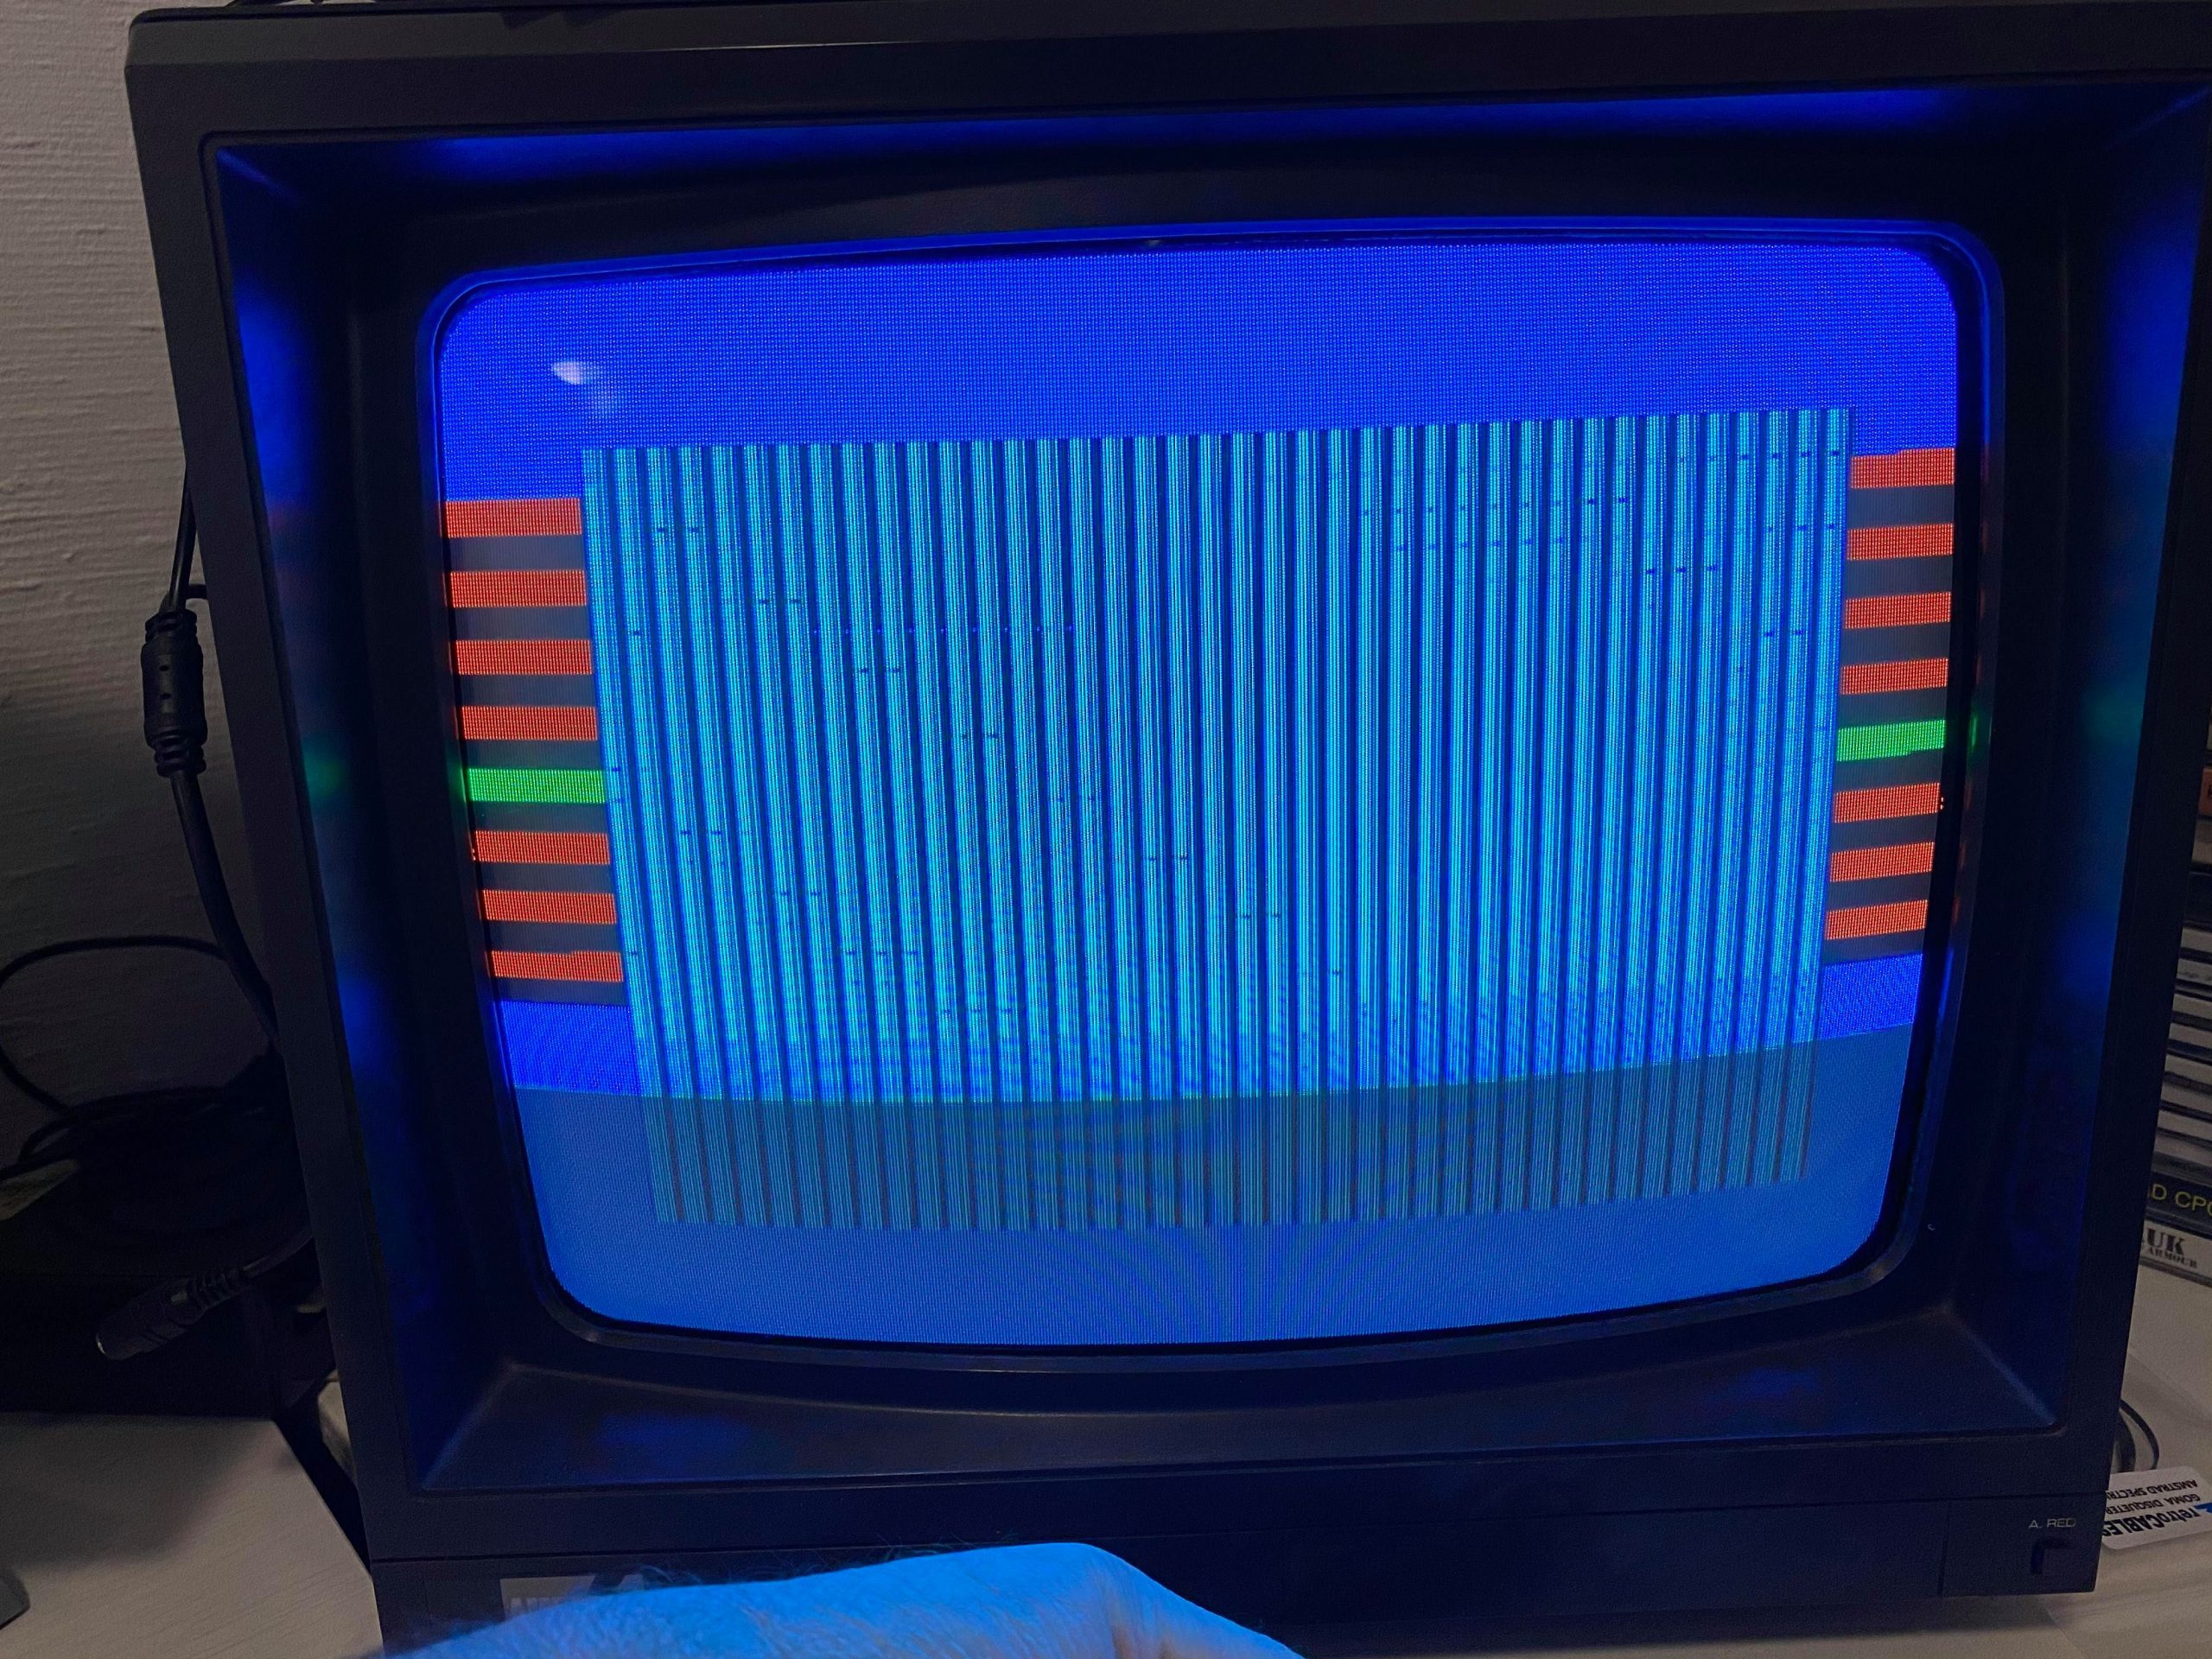
 At first when I connected the Dandanator to the 664 nothing happened. So I wiggled it and the CPC came to life, or rather, showed the same square video.
 Pressing R did nothing but that’s probably because my keyboard membrane is faulty, or there is some other issue yet to be discovered. The reset button does reset the 664 so at least something is happening here.
I posted about this on the CPC Wiki and Noel came to my rescue, basically you have to hold down the left black button while powering on the CPC and it’ll run the RAM test. And here’s the result, all RAM chips are duff except one (D3)!
As per Noel, “Lowest one is D0, top one is D7, so if you look at the 664 schematics, you can then figure out which IC exactly has the problem.”
And MrByte himself responded with this info on Facebook “Hi Niall, you can press alternate ROM when turn on CPC. Alternate is left button”
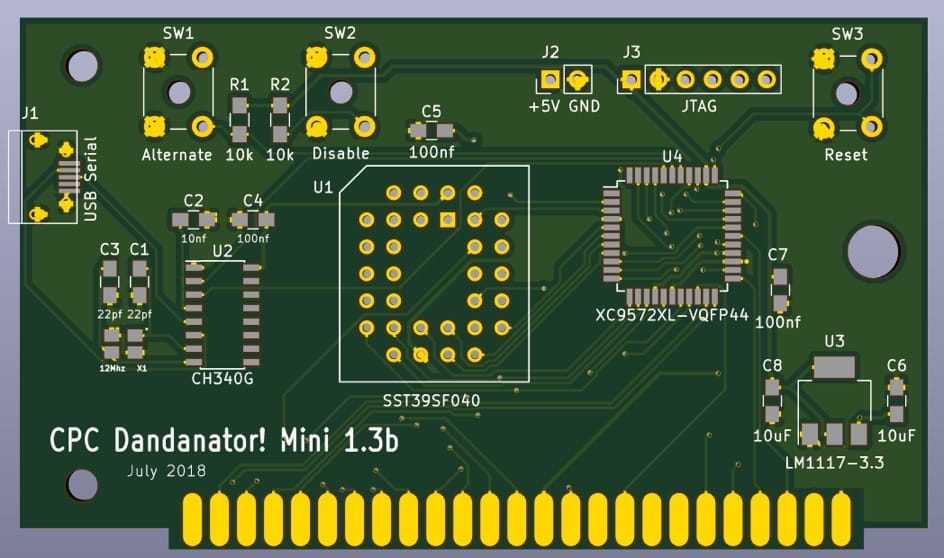
Below is a circuit board diagram of the DanDanator.
So let’s take a look at the schematics for the CPC.
http://www.cpcwiki.eu/index.php/Schematics
Here’s the one I need for the CPC 664.
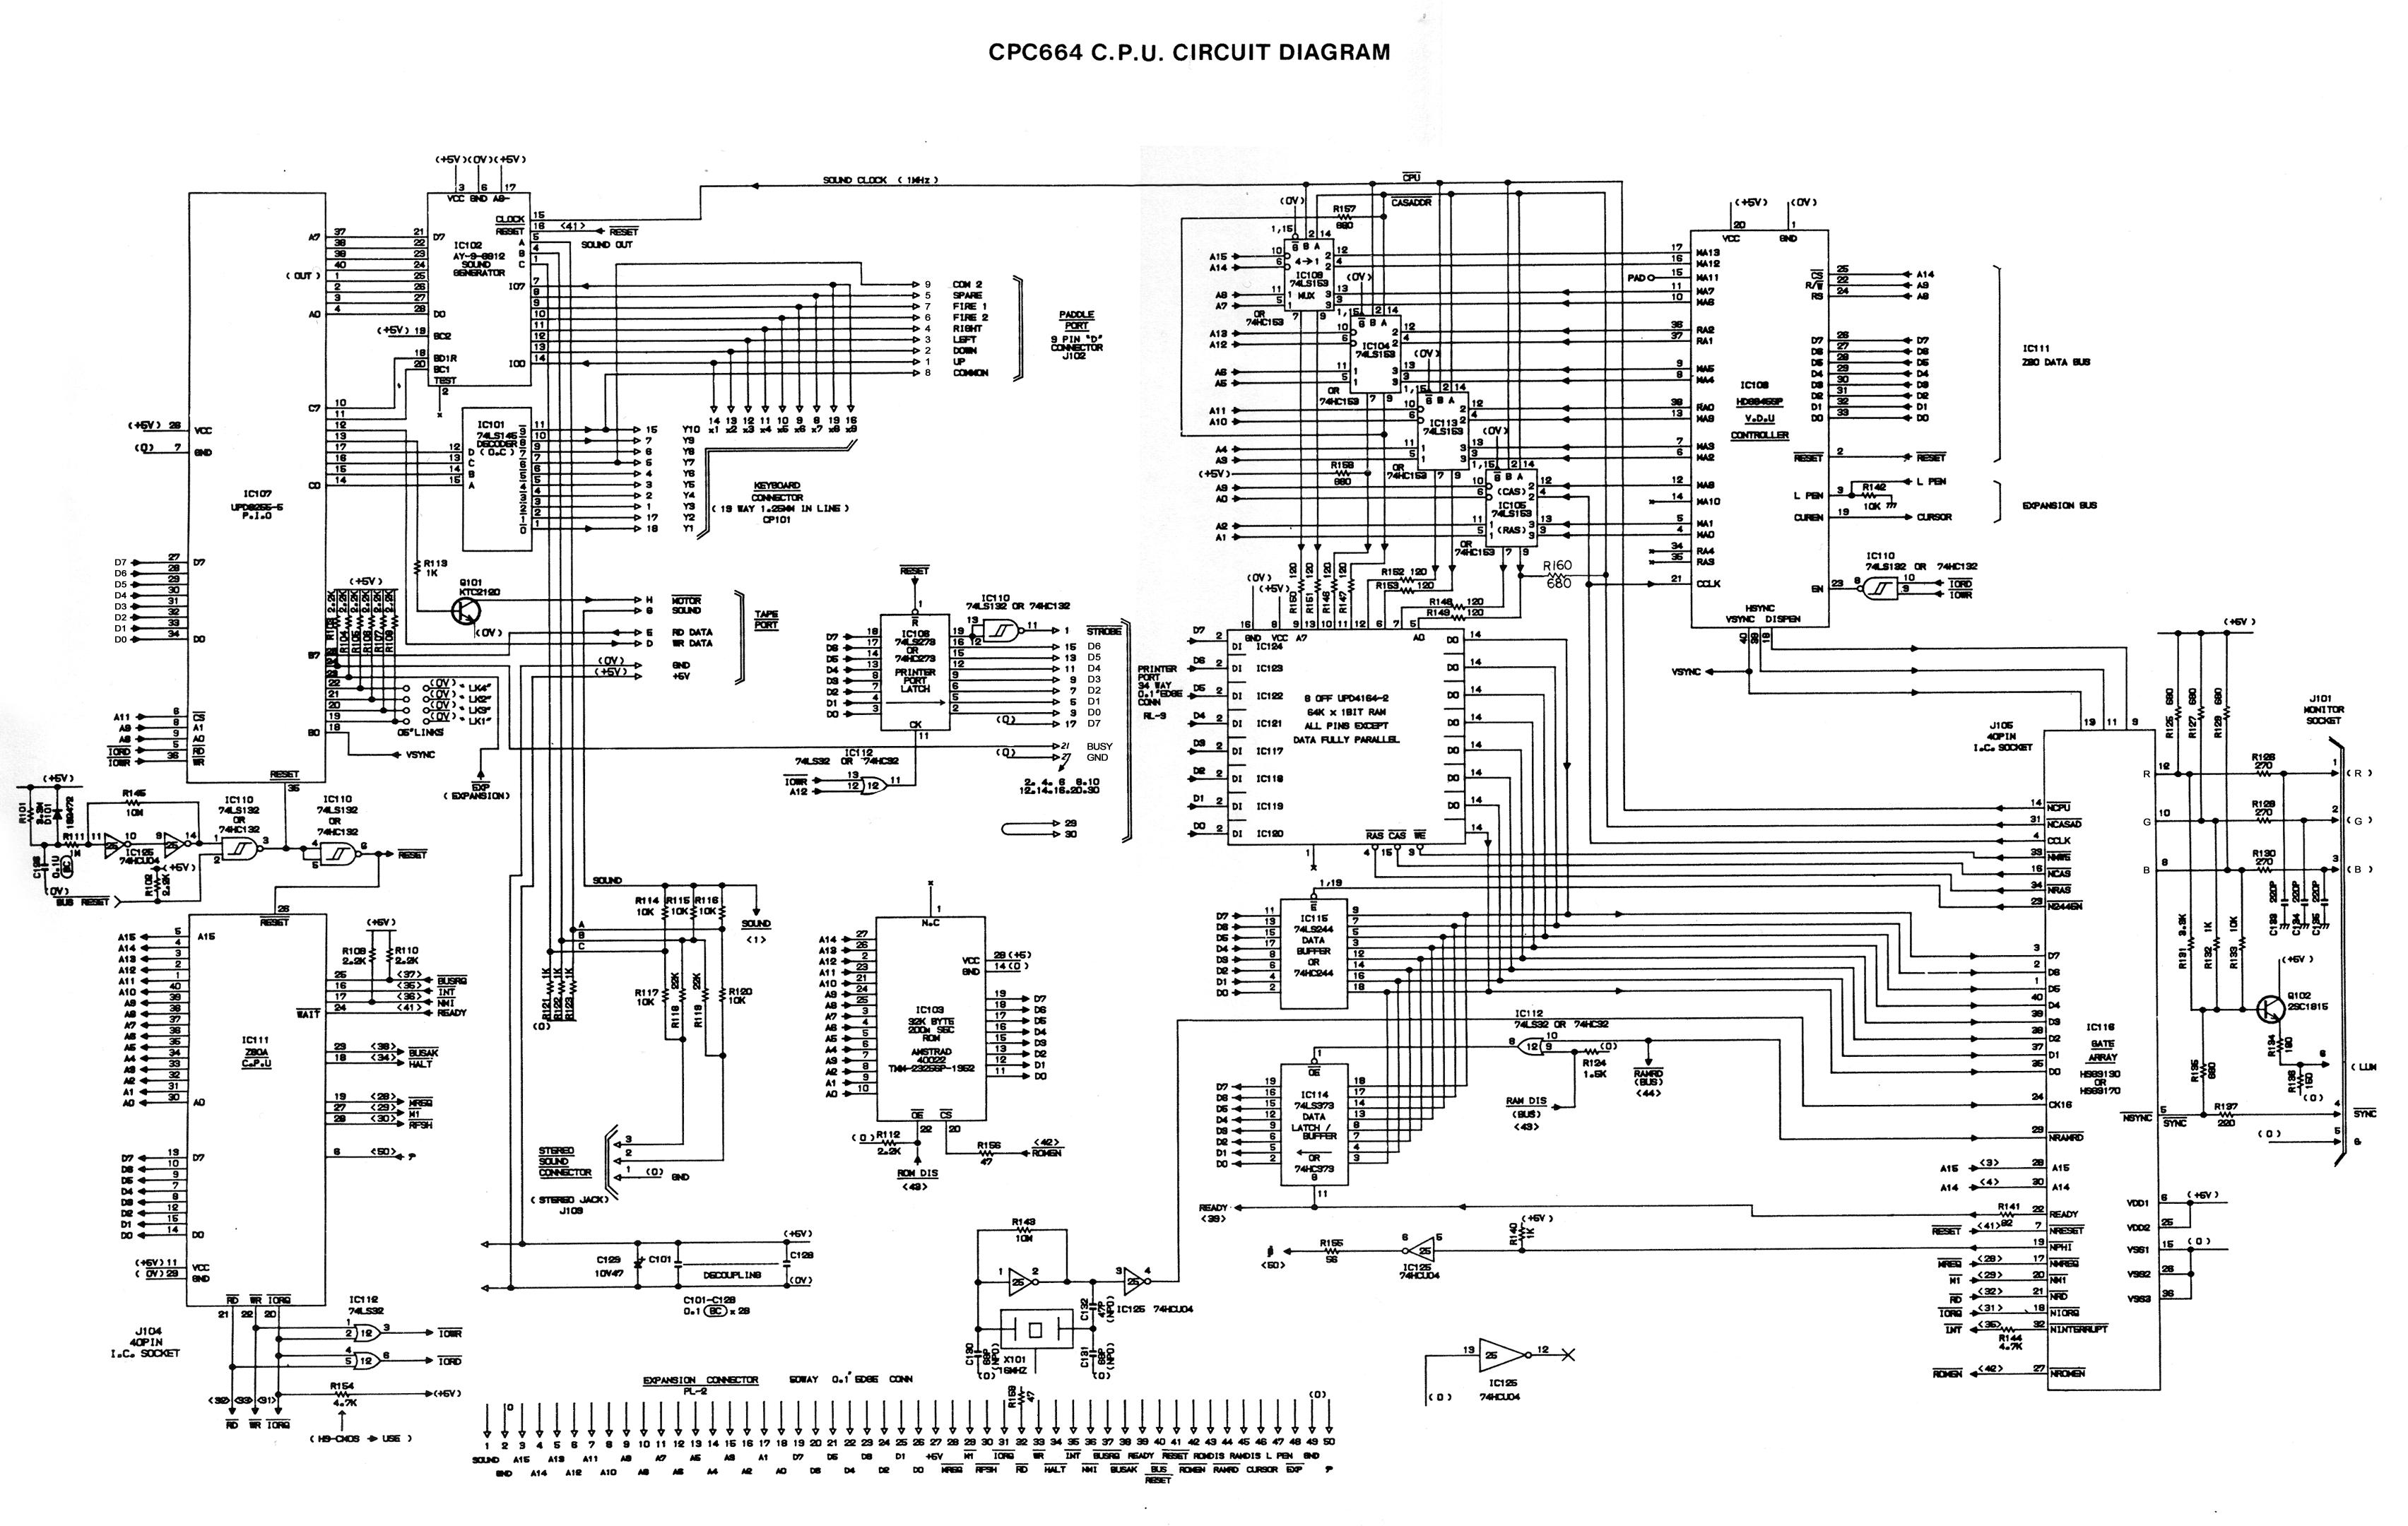
and here’s the corresponding motherboard for the CPC 664
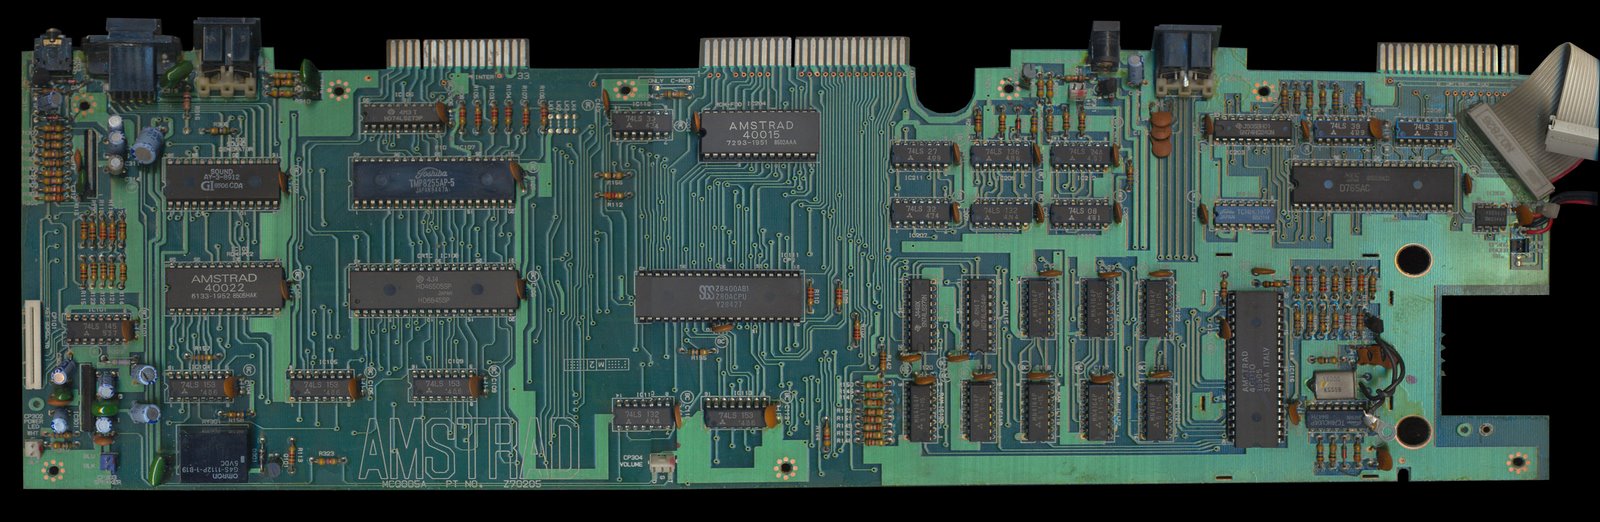
Amstrad CPC664 PCB Top
Well that’s it for this quick blog post, I hope it gives you some ideas about the Dandanator, I really look forward to learning more about the device. Speaking of which, take a look at the links below for more info about it (in Spanish, use Google Translate in Chrome to translate to your language).
You can see a Dandanator in action in Noel’s video here and he uses it to help determine faulty RAM (or broken traces) in his CPC 6128. Hopefully I won’t have such issues on my CPC 664.